
CONCEPTION AND DESIGN
I was attracted when I used Garage Bank to generate beats—put percussions on the grid and listen to the exciting rhythm they generate. Though I never learn writing music, I can still create rhythmic beats, which is a good experience I want to bring to my project. Also, inspired by Music Swing, I want to create the experience of cooperation among users. Thus, I came up with the idea of “Beat” Together. Before I started to think about how to finish making it within less than a month, in my imagination, it is an installation on the ground with many grids and each grid control when certain percussion appears in a loop, like a physical version of Garage Bank.
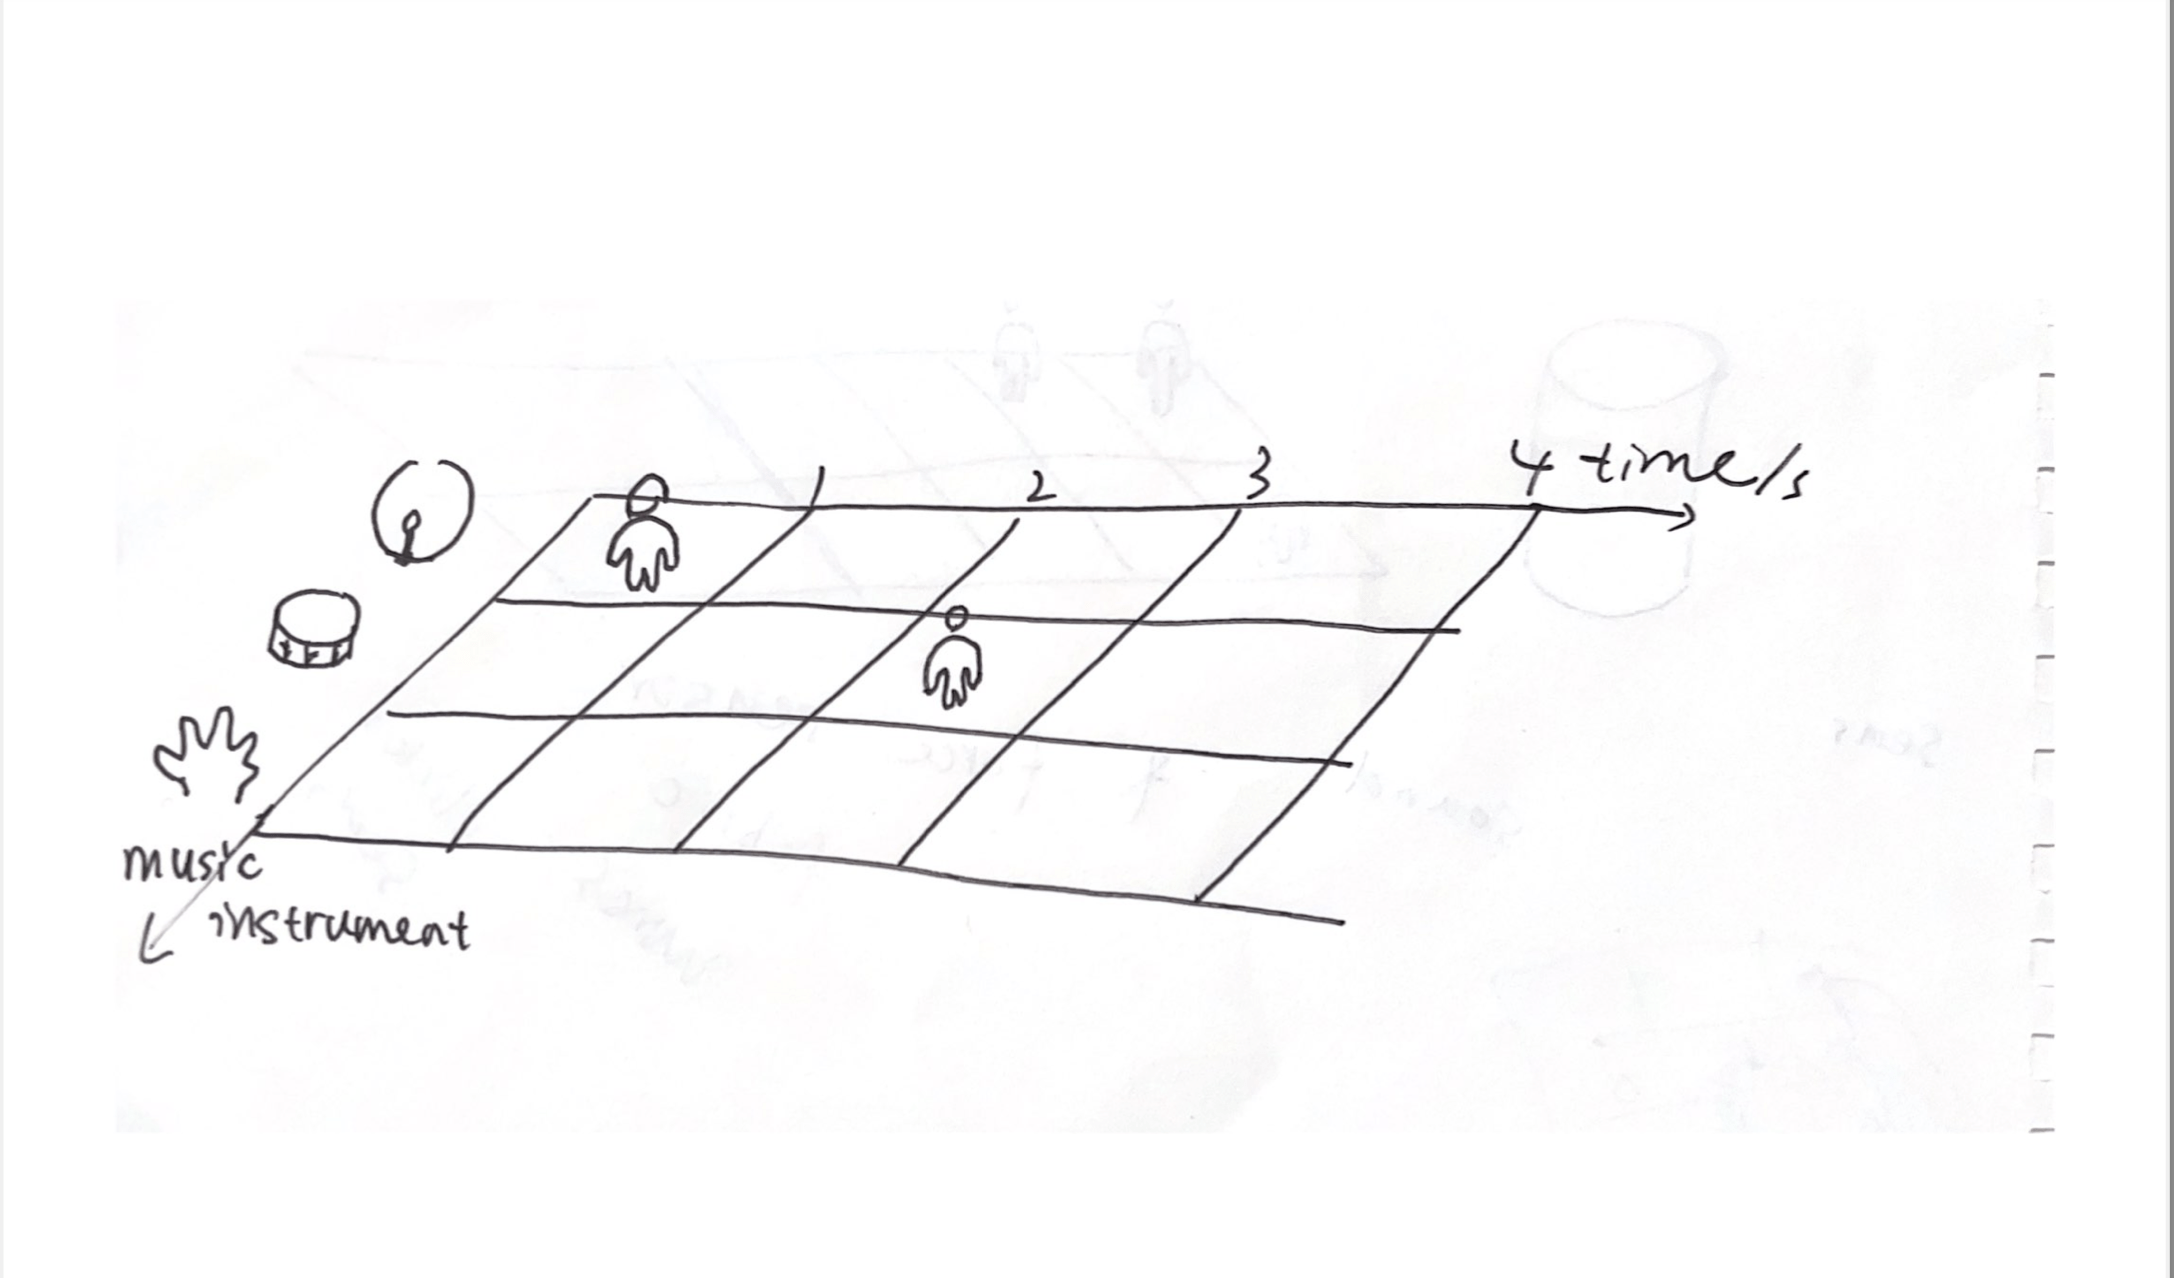
pic.1.1. draft of the initial idea
Yet considering the enormous workload and the uncertainty of whether the idea worked or not, I decided to cut the number of grids to six, and stepping on each grid will control a specific percussion appearing at a particular point.
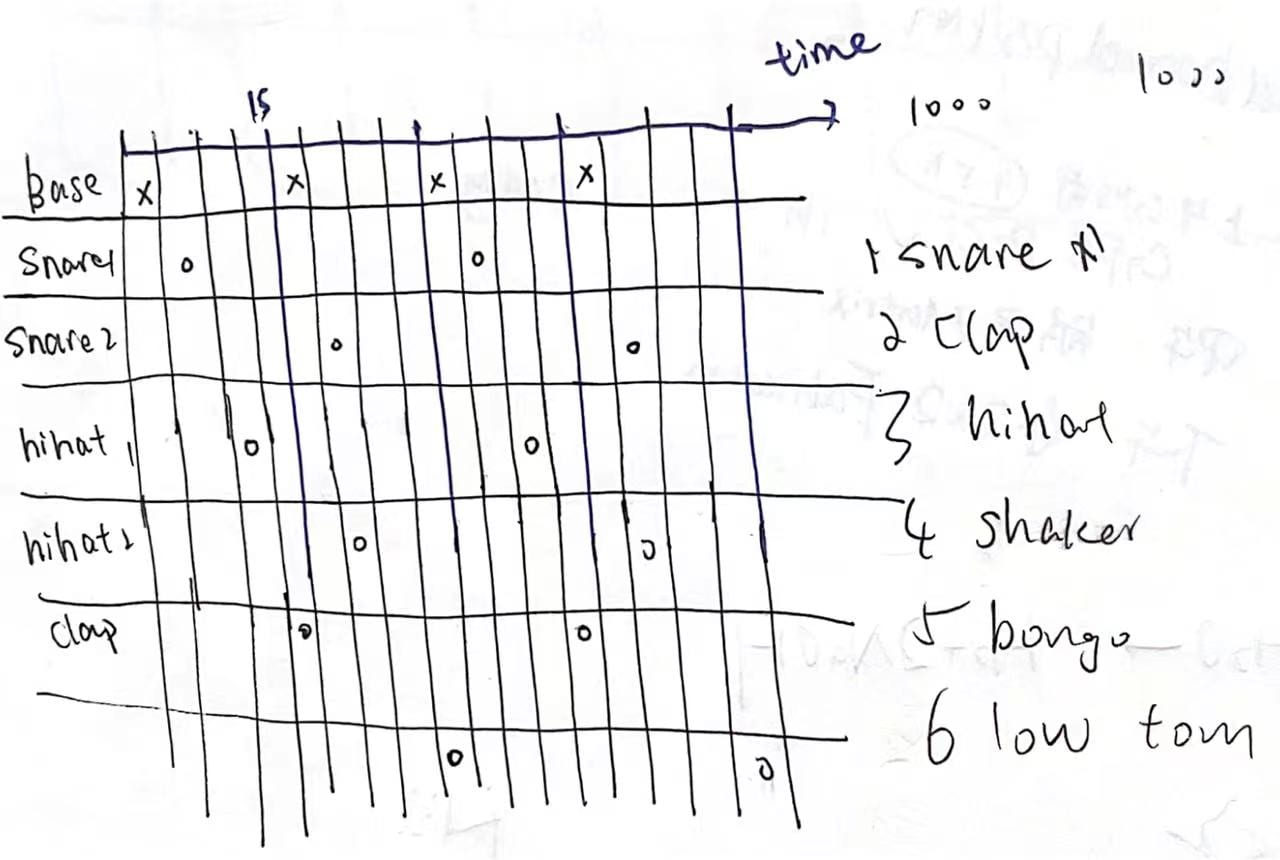
pic.1.2. the timing each percussions appears
At first, users needed to stay still on the grid and wait for their percussion’s sound to appear in the loop. Yet, during the user testing, users tended to jump or step once then take their feet off. Users were more likely to move than stand still when hearing the beats. Also, they expected to have an instant feedback when they stepped on it, instead of waiting for some time to hear their controlled percussions’ sound appear.
vid.1.1. user testing
After user testing, I tried several ways to adjust.
The first way is to mix the project with a rhythm game. Each stamp will trigger one beat. A piece of music will be provided to guide users when to stamp. Yet I tried this idea with some friends, and because people can’t stamp on the exact point on the music, the beats they produced together sounded disharmony.
vid.1.2 rhythm game testing
I tried another way to add some visual clues when people step on the button.
pic.1.3. visual clue
I also wanted to achieve specific percussion sounds in a few random places when a user steps on the button controlling certain percussion. Yet I still like the users to have more control of the music they create than letting the system decide, so I return to the first adjustment plan but remove the music and add a basic rhythm, anticipating users will try to add their beats according to the background rhythm. Under the guidance of a background rhythm, the beats created by different users can merge and form rhythmic music. After the project was adjusted, users were not confused about how to interact with the project anymore as they could get instant feedback. Yet, the adjustment didn’t entirely help achieve the goal of creating a collective experience. (See more details in the conclusion part)
FABRICATION AND PRODUCTION
At first, I want to use a pressure sensor to sense whether the user steps on the project or not. I checked out the pressure sensor from the ER and used it to sense pressure.
vid. 2. use the pressure sensor
Yet Rudi reminded me that the pressure sensor is easy to break, so if users were going to step on it, it needs careful protection. I only needed to know whether users were on the mat, so I decided to make my button.
I put a sponge between two pieces of cardboard, cut a hole in the middle of the sponge, and stick metal tapes on the cardboard. To make the metal taps touch each other when the sponge is pushed, I put a piece of cardboard under the metal tapes to make the metal tapes bulge. The button worked well when being pressed by hands or being stepped.
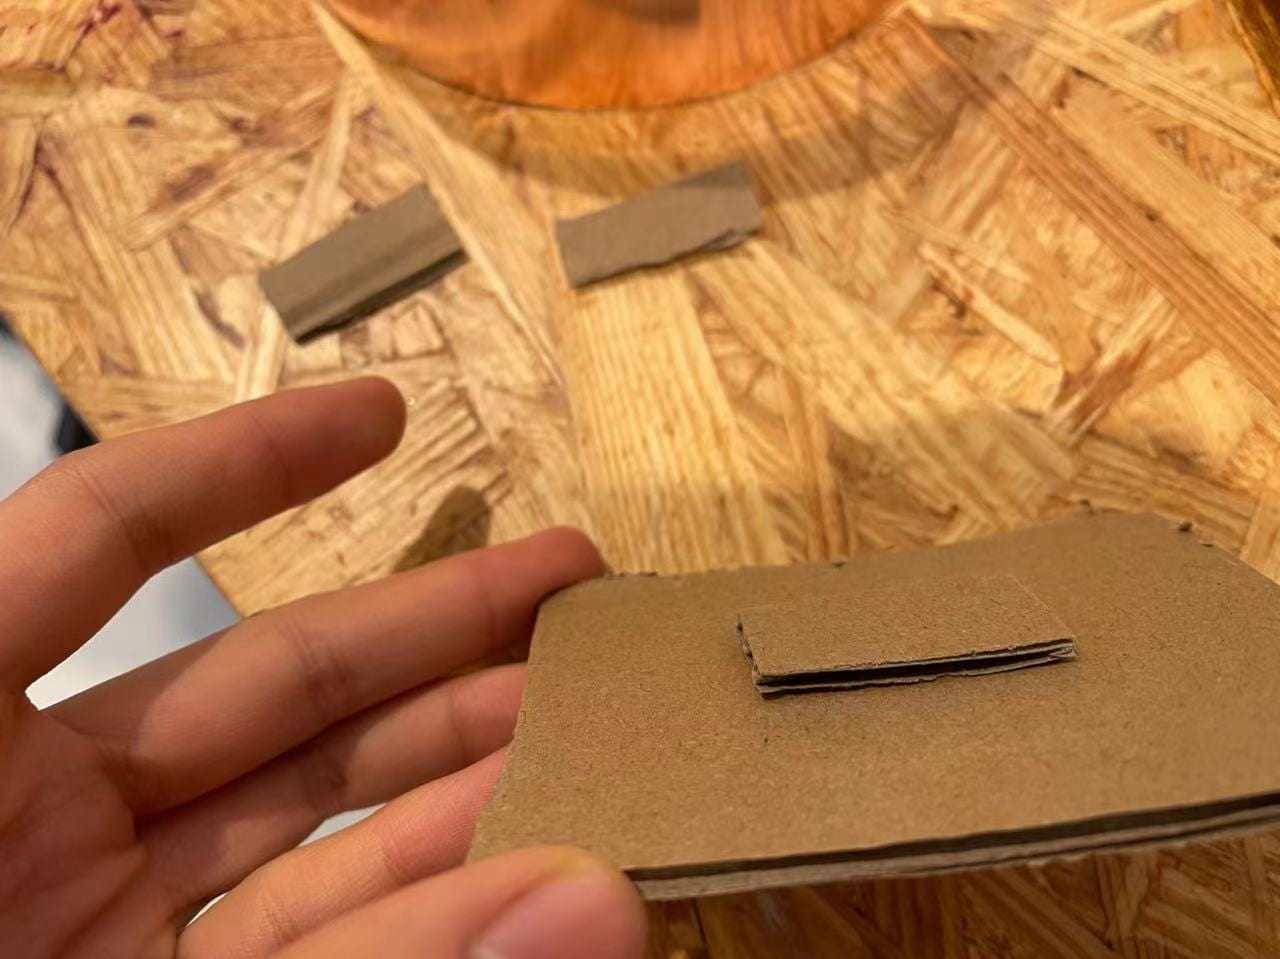
pic.4 under the metal tape
vid. 3. pressing the button
vid.4. testing stepping on the button
Before figuring out how many buttons my project needed, I told Rudi that it required many, so Rudi suggested using the matrix button.
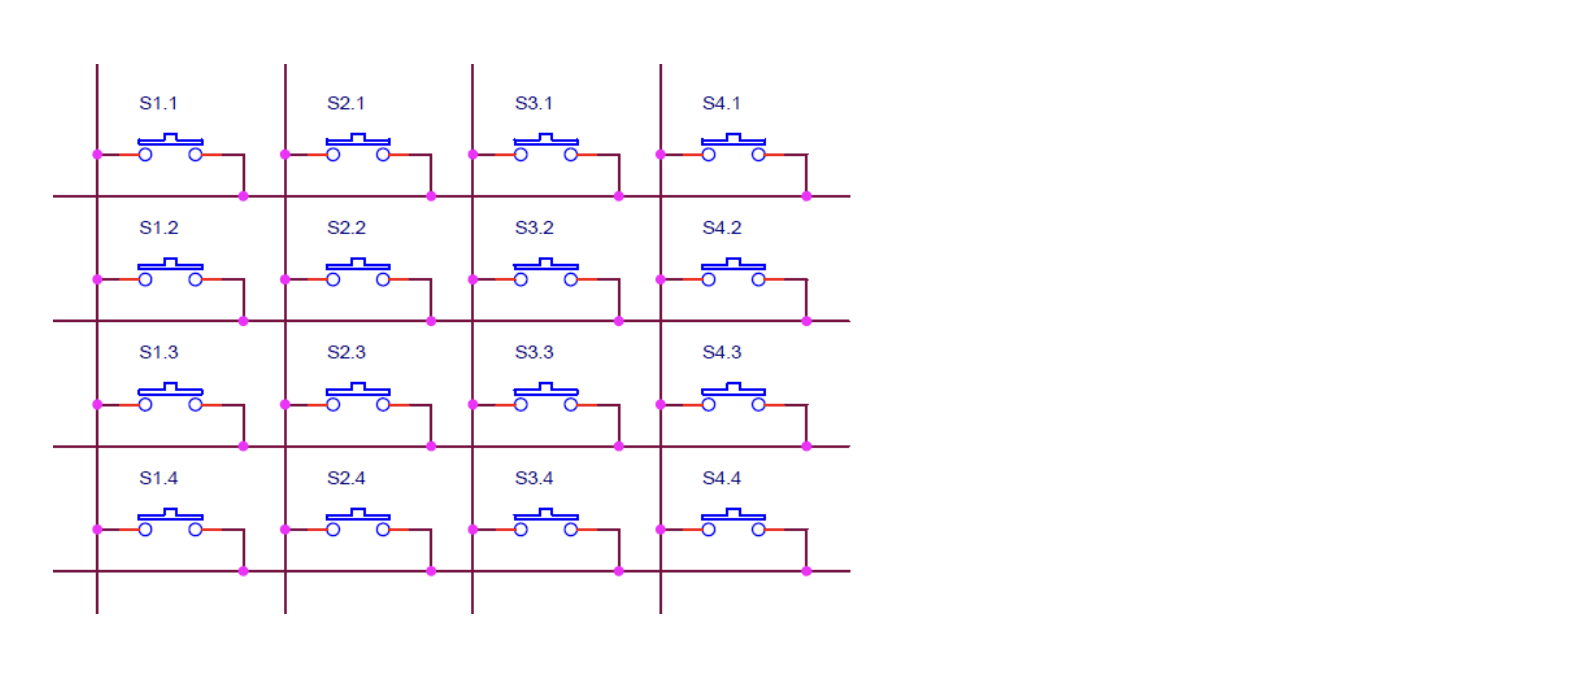
pic.5. button matrix. equipment technology development. http://mypractic.com/lesson-18-connecting-a-matrix-of-buttons-to-arduino-library-matrixkeys-function-tone/.
I spent some time figuring out how the matrix works and how to connect the circuit. Then I realized that it might be easier to forget about the matrix and just use separated buttons if only six buttons are needed. I discussed this with Rudi, and he agreed with me. What’s more, he introduced the digital pull-up resistor to me, which could simplify the circuit.
Next, I made more buttons and fixed the buttons on the mat. I used paper tape to stick the buttons and set the wires, so it was easy to adjust.
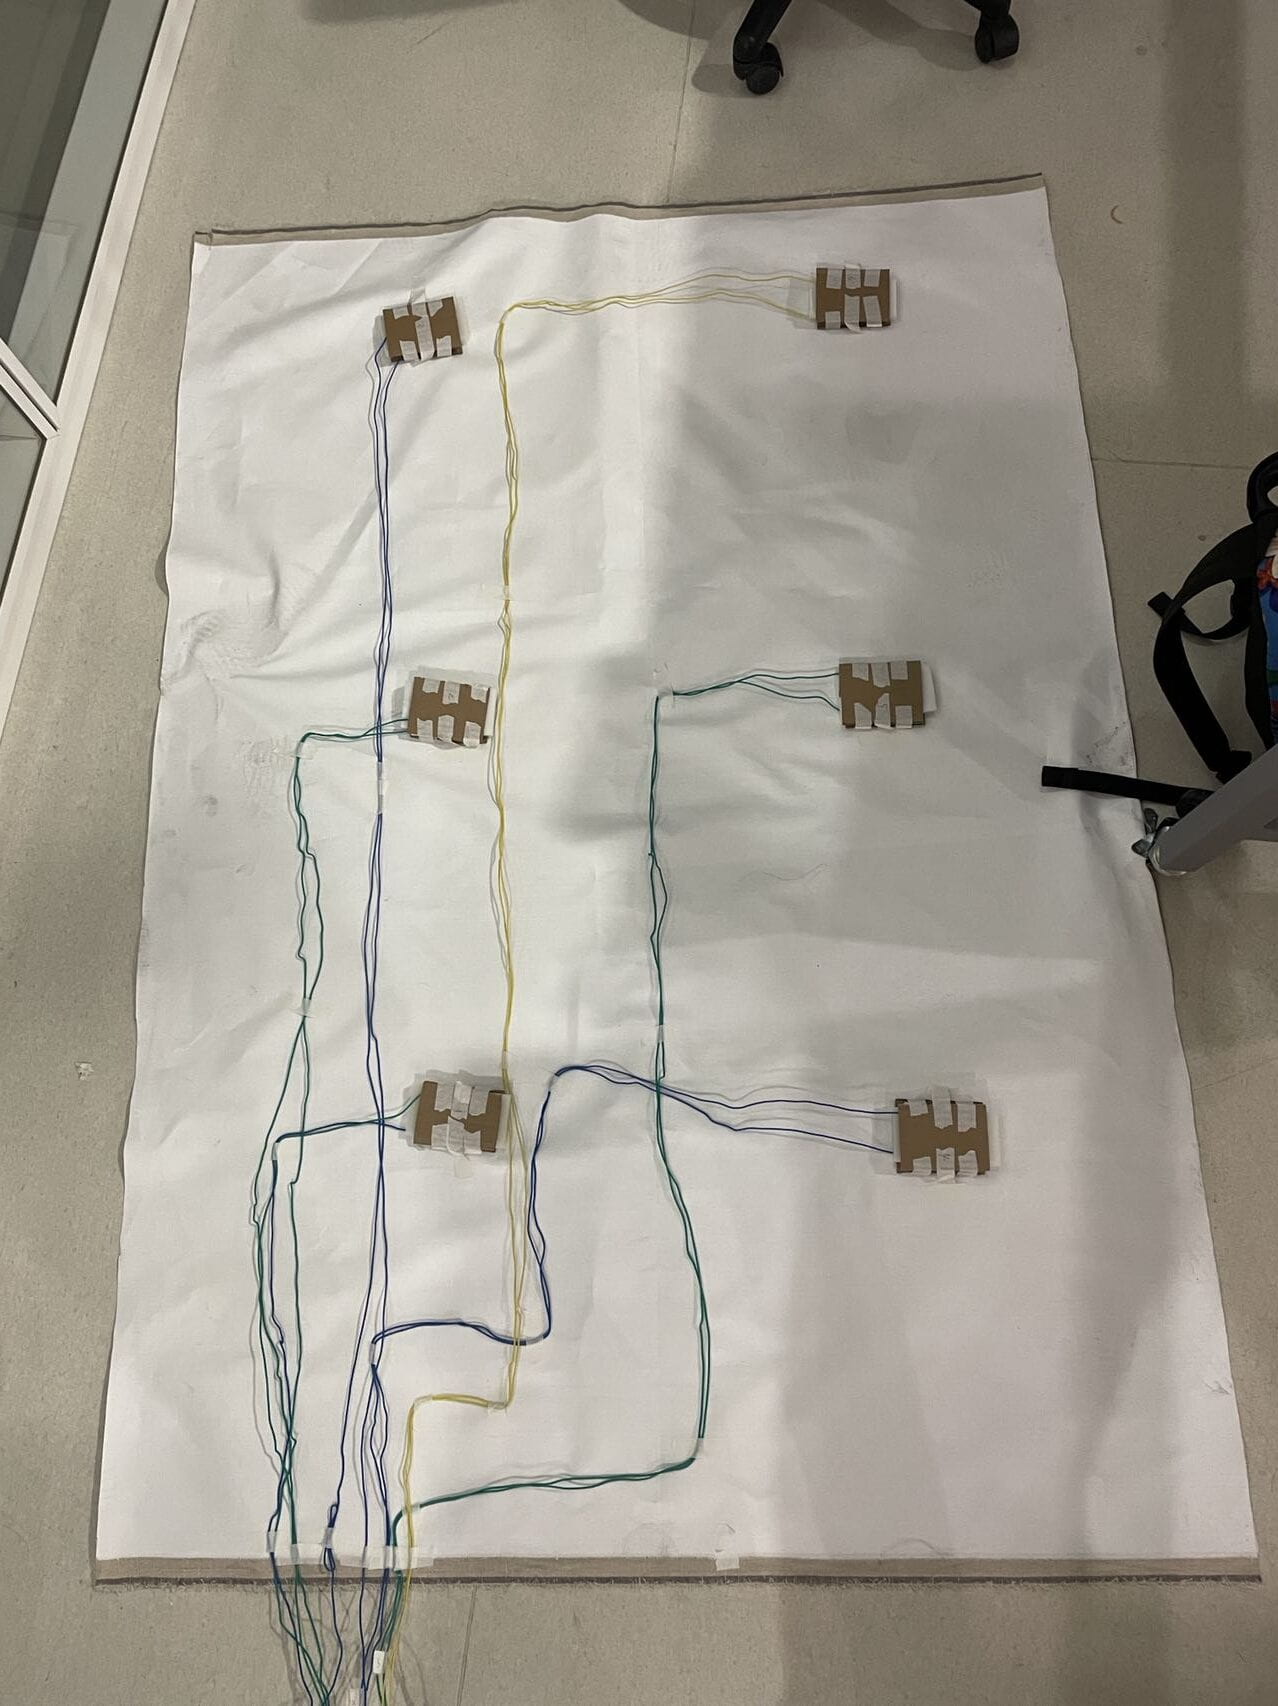
pic.6. the back of my project
As the decoration, in my first version, I put two footprints in one grid, supposing users would think they need to step on it with two feet simultaneously. However, few users kept both feet on the two footprints in the user testing. They could feel one of the two footprints softer, which can trigger sound but confused about using another footprint. So, the idea failed that use two footprints to guide users to stand still.
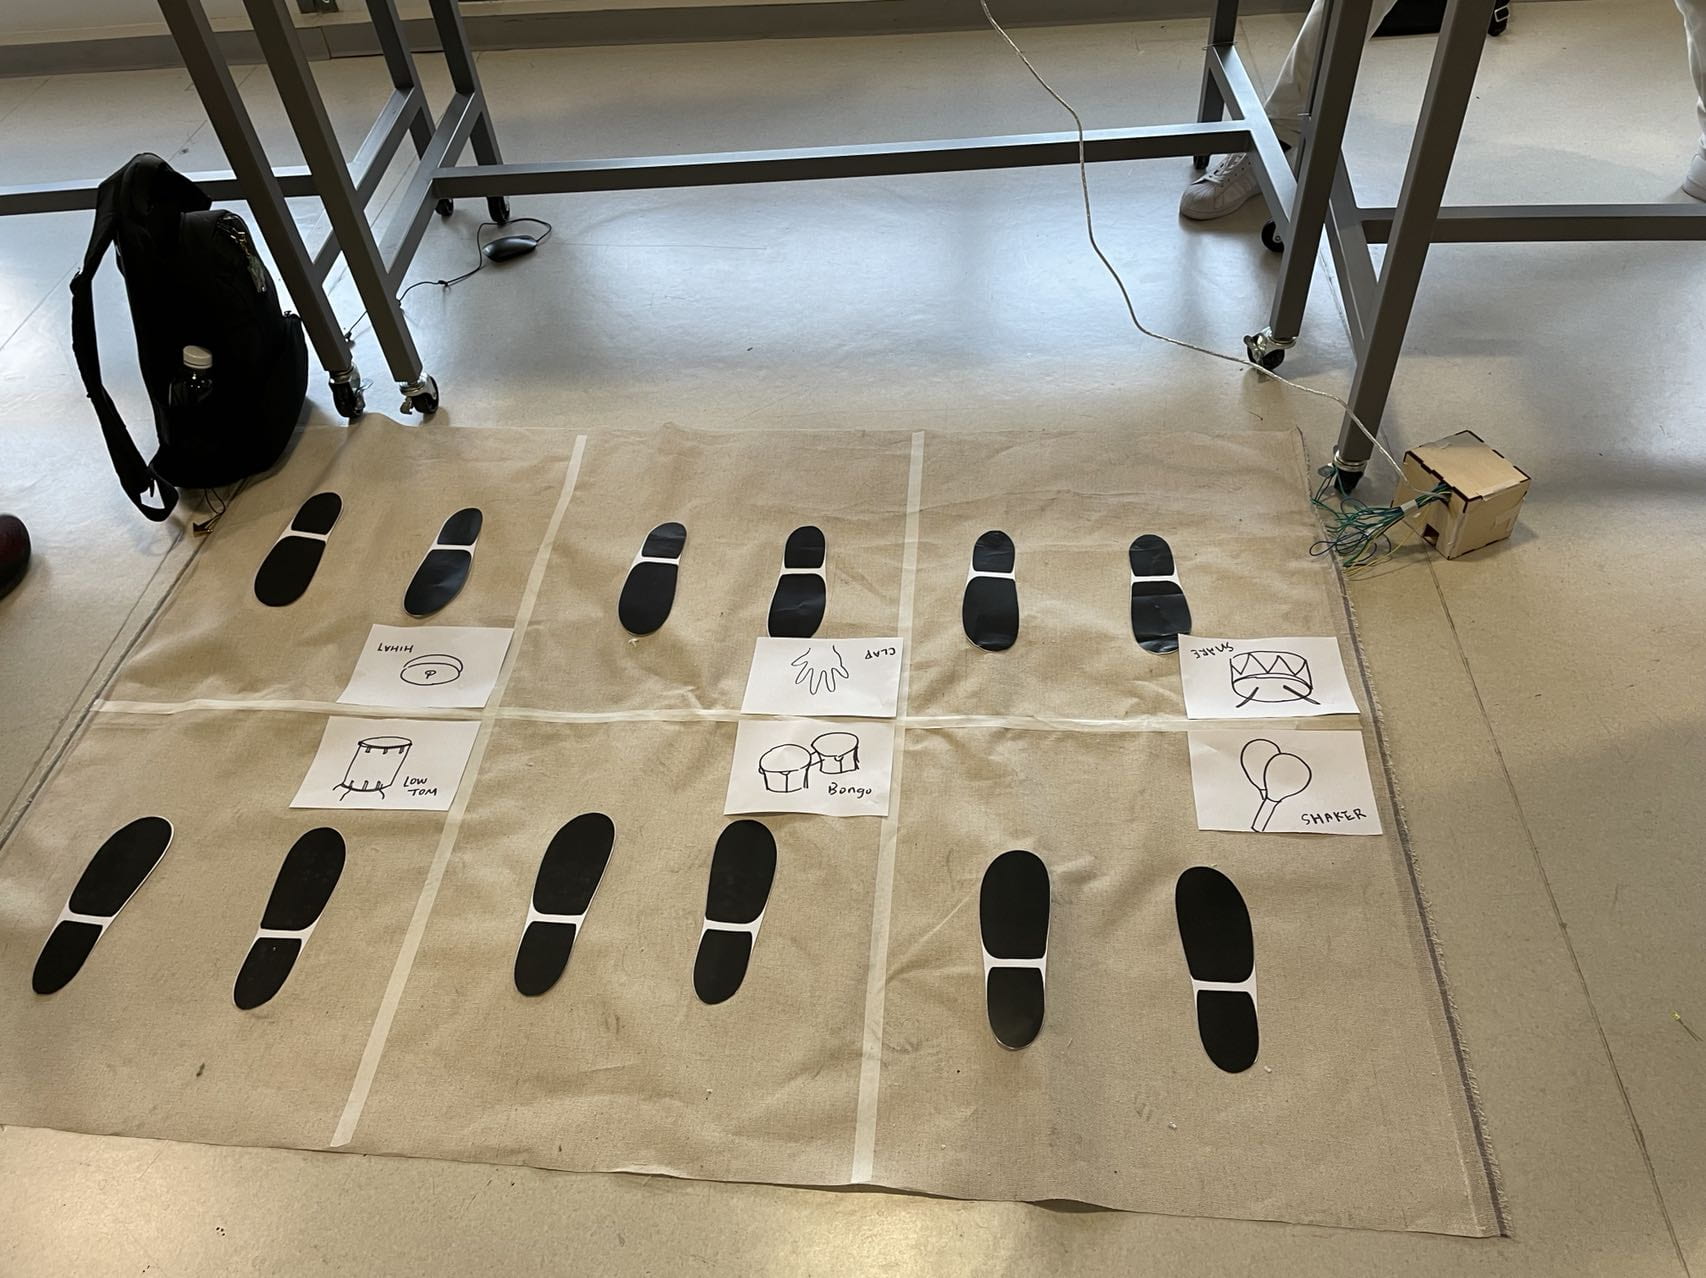
pic 7. the first version of the project at user testing
As my second version didn’t need the users to stand still anymore, I changed the footprints to colorful dots for users to step. Yet, dots are not the right visual clue for some users, for I saw on the IMA final show, one or two users tried to play with my project by touching the spots.
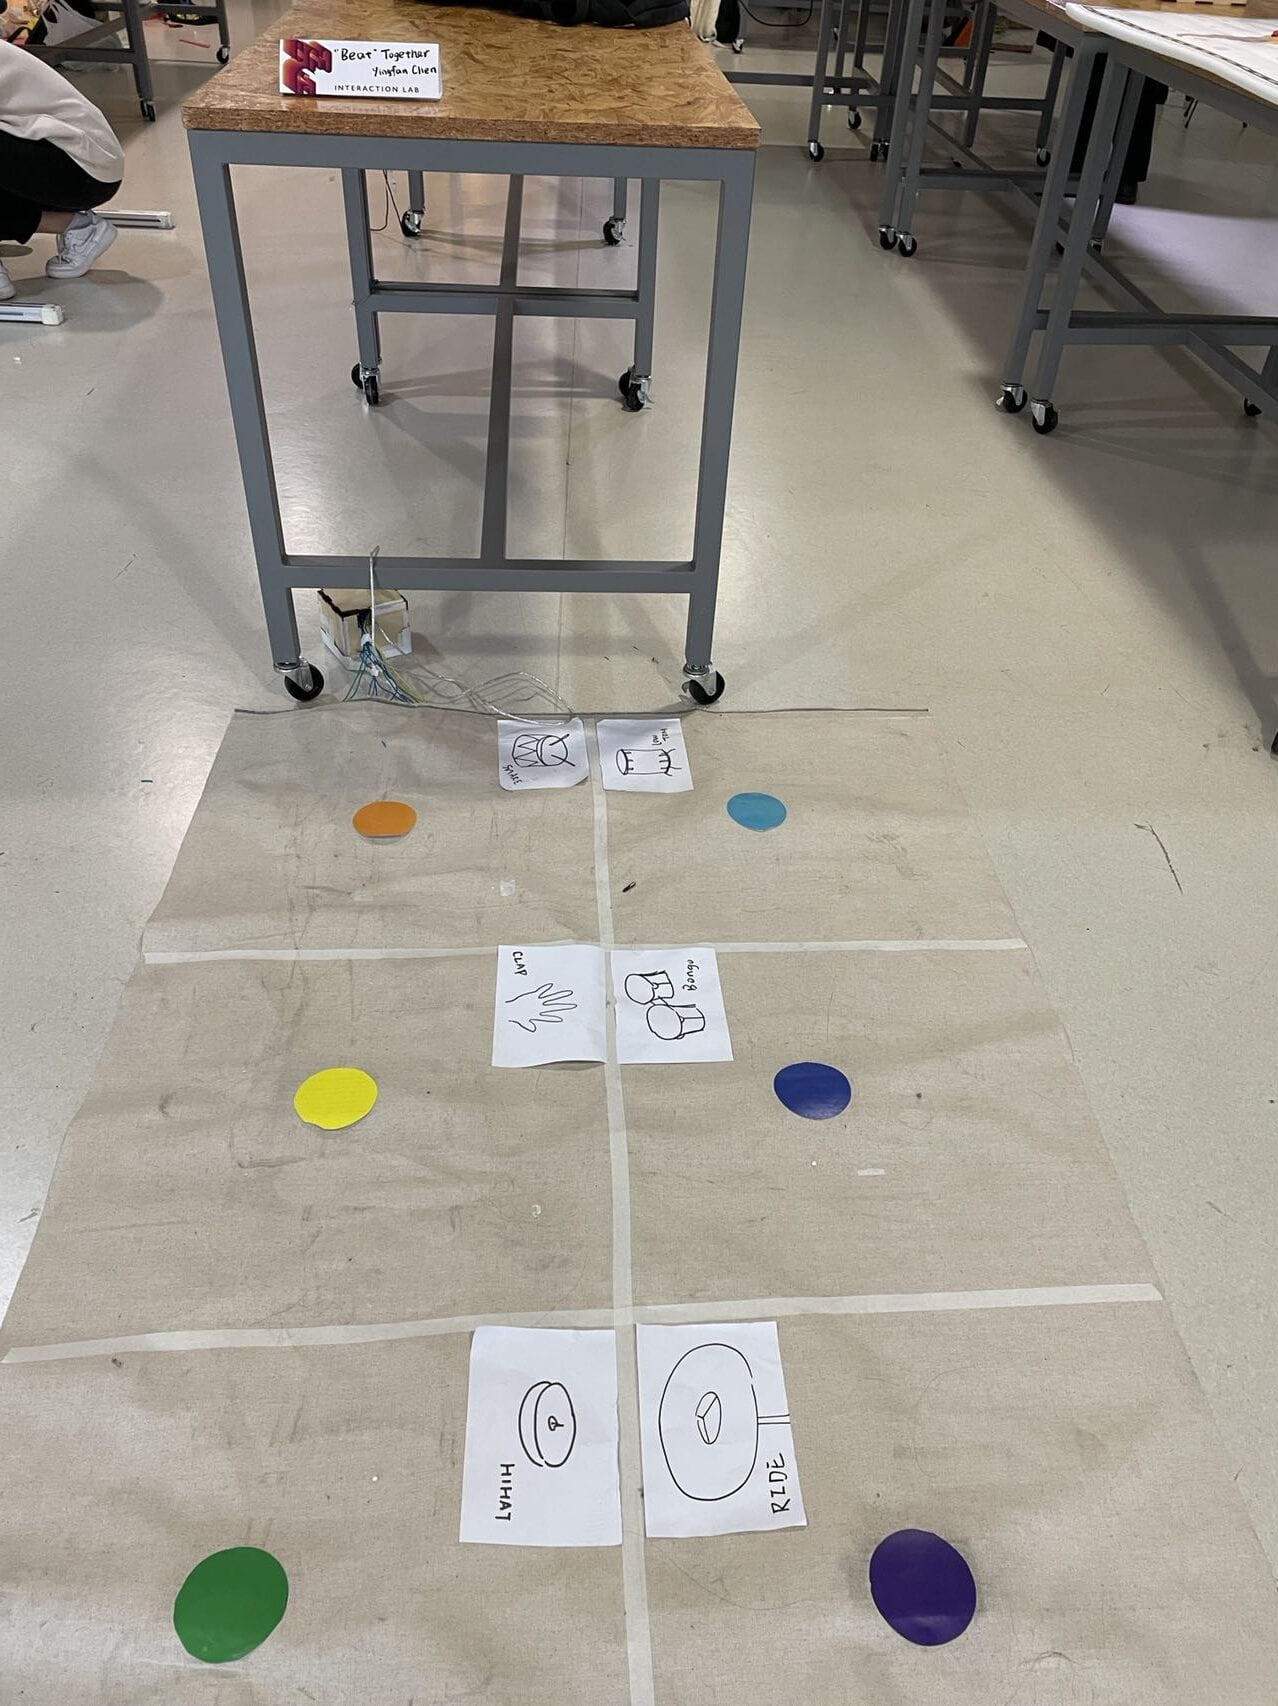
pic.8.the adjusted version at presentation
CONCLUSION
My goal of the project is to let users create rhythmic beats together and experience the happiness of cooperation. During the presentation and IMA final show, users’ interaction with the project differed. Sometimes users just stepped on the mat a few times and focused on their own percussions’ sound, not thinking of creating a rhythmic beat with other users. Yet, I saw people that had known each other coming as a group, paid attention to the rhythms they make, and consciously controlled their steps to create rhythmic beats together. In addition, they discussed who should be the first to start stepping and who was the following. What’s more, a group of friends came with a person with a leadership spirit that guides others on what kinds of beats they should create.
vid.3.1. a group of friends consciously generate rhythmic beats
vid. 3.2. a user leading the group
vid.3.3.the group making beats under the leader’s guidance
vid.3.4. solo player
I was happy to see these groups that actively interacted with the project, tended to stay on it for a longer time, and, most importantly, try to generate combined beats instead of separated beats. Yet, the cooperation can’t appear only through my projects, needing the already built relationships between users or a person’s lead. Therefore, I can only say the project partly achieve my goal.
It aligns with my definition of interaction as it senses users’ stamps as inputs, and after the Arduino and Processing process, it has sounds of beats as output. It could also promote interaction between people.
improvement
I discussed the ways of improvement with Professor Minsky, and she mentioned two directions to improve—increase the excitement of music generations or create a story underlying my project. If going on the former track, I would like to ask some of my playing music friends to record personal music. These music clips would not be only a beat but could be a longer rhythm. The recording could be more than percussion but has other musical instruments. The latter track could be a beat mat displayed at a party for a group of close friends to create beats.
Professor Minsky also suggested a way to bring up good ideas: hold a design workshop with a group of musicians. If I have this chance, I would like to ask the musicians to join in the music one by one. The newcomers should try to play music that can fit into the already playing music. By doing so, I would like to know what the musicians do when they try to join in a piece of existing music.
Takeaway from my setback
There was a time when I was anxiously adjusting my projects. I was thinking about making it more engaging, trying several ways like making it into a rhythm game, adding a visual effect, or changing the code to trigger random beats. Still, I strongly doubt whether that was interesting enough. In the end, what I brought to the presentation was not a satisfying project, yet I was confused about what was wrong in the project building process that got me stuck. Eventually, Eric’s words during a presentation made me clear. He said that my project was nice, but it didn’t have a clear purpose. Exactly. Before building it, I had a clear purpose: to let users get the feeling of cooperation with strangers and make music. I clearly imagine it being put on cities’ public places where people usually don’t have many connections with passers-by. Yet, after the user testing, I thought the project is not interesting enough, and I tried to make it more interesting but forgot to think about the project’s purpose, which led to my several adjustments that try to engage the users but didn’t move the project closer to my purpose. I learned from the setback that it’s essential to base the whole thinking and adjustment of the project on purpose.
Takeaway from accomplishment
Many users mentioned they liked the comfy of stepping on my project as I used the sponge to make the buttons. I learned from the accomplishment that it is worthy of choosing material based on the interactions users will have with the project. In addition, users mentioned that they liked the excitement of beats that my project brought. I also perceived this excitement in other students and me when we ran the example code that generated beats with the keyboard. I learned that I could carefully capture people’s emotions when facing some specific things and use the insights in my project.
TECHNICAL DOCUMENTATION
coding
On the Arduino side, it uses six digital pins.
// IMA NYU Shanghai
// Interaction Lab
// For sending multiple values from Arduino to Processing

int button1=2;
int button2=3;
int button3=4;
int button4=5;
int button5=6;
int button6=7;

void setup() {
  Serial.begin(9600);
//  pinMode(2,INPUT_PULLUP);
  pinMode(button1, INPUT_PULLUP);
  pinMode(button2, INPUT_PULLUP);
  pinMode(button3, INPUT_PULLUP);
  pinMode(button4, INPUT_PULLUP);
  pinMode(button5, INPUT_PULLUP);
  pinMode(button6, INPUT_PULLUP);
}

void loop() {
  // to send values to Processing assign the values you want to send
//  buttonState1=digitalRead(2);

  //this is an example
  int sensor1 = digitalRead(button1);
  int sensor2 = digitalRead(button2);
  int sensor3=digitalRead(button3);
  int sensor4=digitalRead(button4);
  int sensor5=digitalRead(button5);
  int sensor6=digitalRead(button6);
//  int sensor2 = analogRead(A1);
//  int sensor3 = analogRead(A2);
//


  // send the values keeping this format
  Serial.print(sensor1);
  Serial.print(",");  // put comma between sensor values
  Serial.print(sensor2);
  Serial.print(",");  // put comma between sensor values
  Serial.print(sensor3);
  Serial.print(","); // add linefeed after sending the last sensor value
  Serial.print(sensor4);
  Serial.print(",");
  Serial.print(sensor5);
  Serial.print(",");
  Serial.print(sensor6);
  Serial.print(",");
  Serial.println();

  // too fast communication might cause some latency in Processing
  // this delay resolves the issue.
  delay(100);

  // end of example sending values
}
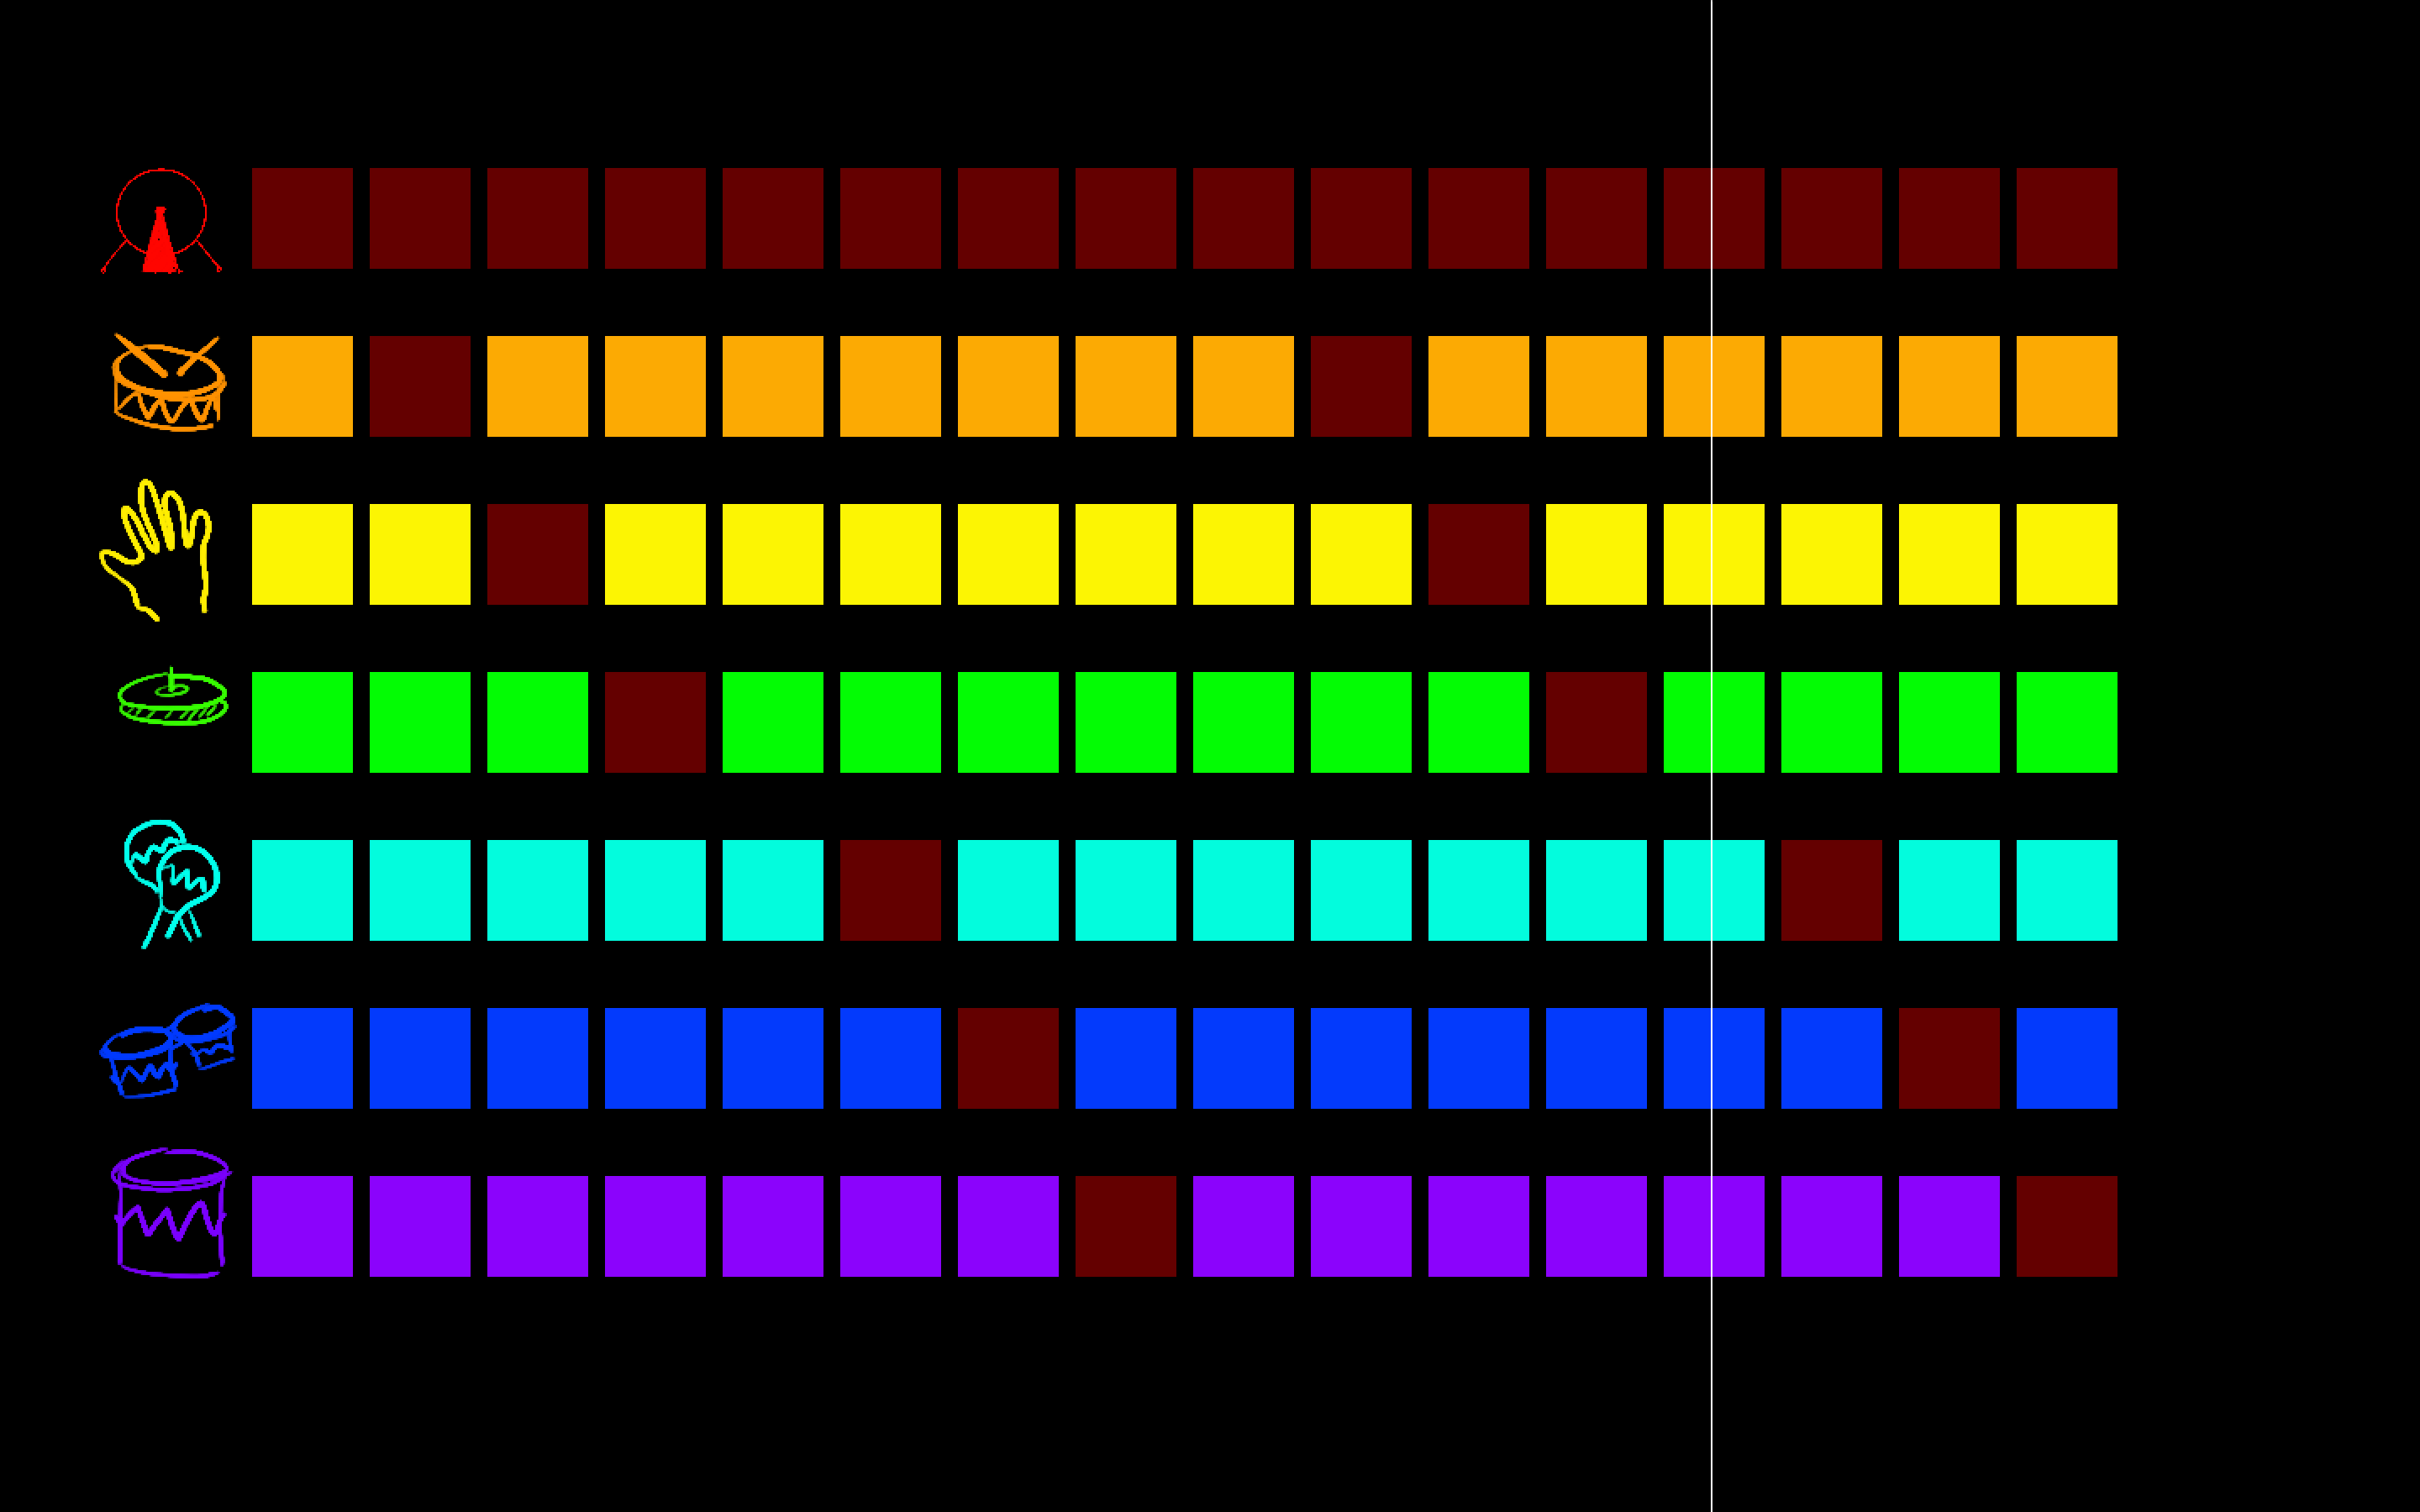
On the Processing side, my first version of the project is that when a user keeps staying on the map, the sound of the corresponding percussion will appear in a loop. I achieved this by using millis to control specific percussion timing, and when the button state is high, the amplitude of the percussion will be high.
// IMA NYU Shanghai
// Interaction Lab
// For receiving multiple values from Arduino to Processing

/*
 * Based on the readStringUntil() example by Tom Igoe
 * https://processing.org/reference/libraries/serial/Serial_readStringUntil_.html
 */


import processing.serial.*;
import processing.sound.*;
SoundFile kick;
SoundFile snare1;
SoundFile clap1;
SoundFile ride;
SoundFile hihat1;
SoundFile bongo;
SoundFile shaker;
SoundFile lowtom;

PImage kickpt;
PImage snarept;
PImage clappt;
PImage hihatpt;
PImage shakerpt;
PImage bongopt;
PImage lowtompt;


int speed;
int a;
int b1,b2,b3,b4,b5,b6,b7;
int p;
int q;
int lx,ly;
int m;

int NUM_OF_VALUES_FROM_ARDUINO = 6;   /** YOU MUST CHANGE THIS ACCORDING TO YOUR PROJECT **/
int sensorValues[];      /** this array stores values from Arduino **/

String myString = null;
Serial myPort;


void setup() {
  //size(500, 500);
  fullScreen();

  setupSerial();

  //pictures
  kickpt = loadImage("kick.png");
  snarept=loadImage("snare.png");
  clappt=loadImage("clap.png");
  hihatpt=loadImage("hihat.png");
  shakerpt=loadImage("shaker.png");
  bongopt=loadImage("bongo.png");
  lowtompt=loadImage("lowtom.png");


  //the following are my adding codes
  kick = new SoundFile(this, "kick.wav");
  snare1= new SoundFile(this, "snare.wav");
  clap1= new SoundFile(this, "clap.wav");
  ride= new SoundFile(this, "ride.wav");
  hihat1=new SoundFile(this, "openhihat.wav");
  bongo=new SoundFile(this, "bongo.wav");
  shaker=new SoundFile(this, "shaker.wav");
  lowtom=new SoundFile(this, "lowtom.wav");

  speed=500;
  p=150;
  q=100;
  lx=70;ly=100;
  b1=100;b2=200;b3=300;b4=400;
  b5=500;b6=600;b7=700;
  m=150;
}

void draw() {
  background(0);
  //m=millis()%50;
  getSerialData();
  printArray(sensorValues);

  // use the values like this!
  // sensorValues[0]

  // add your code
  //draw the background
  noStroke();
  for (int a = 150; a < 1250; a = a+70) {
    fill(255,0,0,100);
    square(a,b1,60);
  }

  //orange
  for (int a = 150; a < 1250; a = a+70) {
    fill(#FCAA03);
    square(a,b2,60);
  }

  //yellow
  for (int a = 150; a < 1250; a = a+70) {
    fill(#FCF503);
    square(a,b3,60);
  }

  //green
  for (int a = 150; a < 1250; a = a+70) {
    fill(#03FC04);
    square(a,b4,60);
  }

  //light blue
    for (int a = 150; a < 1250; a = a+70) {
    fill(#03FCDD);
    square(a,b5,60);
  }

  //dark blue
  for (int a = 150; a < 1250; a = a+70) {
    fill(#033AFC);
    square(a,b6,60);
  }
  //purple
  for (int a = 150; a < 1250; a = a+70) {
    fill(#8B03FC);
    square(a,b7,60);
  }

  //draw instruments
  image(kickpt, 50, 70,100,100);
  image(snarept,50,170,100,100);
  image(clappt,50,270,100,100);
  image(hihatpt,50,370,100,100);
  image(shakerpt,50,470,100,100);
  image(bongopt,50,570,100,100);
  image(lowtompt,50,670,100,100);

  //draw the moving line
  push();
  stroke(255,255,255);
  line(m,0,m,displayHeight);
  pop();

  if (m>=150){
    m+=4;
  }
  if (m>1270){
    m=150;
  }


  //volume control
  if (sensorValues[0]==0) {
    snare1.amp(0.5);
    fill(100,0,0);
    square(p+lx,q+ly,60);
    square(p+lx*9,q+ly,60);


  } else {
    snare1.amp(0);
  }


  if (sensorValues[1]==0) {
    clap1.amp(1);

    fill(100,0,0);
    square(p+lx*2,q+ly*2,60);
    square(p+lx*10,q+ly*2,60);
  } else {
    clap1.amp(0);
  }


  if (sensorValues[2]==0) {
    hihat1.amp(1);

    fill(100,0,0);
    square(p+lx*3,q+ly*3,60);
    square(p+lx*11,q+ly*3,60);
  } else {
    hihat1.amp(0);
  }


  if (sensorValues[3]==0) {
    shaker.amp(1);
    fill(100,0,0);
    square(p+lx*5,q+ly*4,60);
    square(p+lx*13,q+ly*4,60);
  } else {
    shaker.amp(0);
  }


  if (sensorValues[4]==0) {
    bongo.amp(1);

    fill(100,0,0);
    square(p+lx*6,q+ly*5,60);
    square(p+lx*14,q+ly*5,60);
  } else {
    bongo.amp(0);
  }


  if (sensorValues[5]==0) {
    lowtom.amp(1);

    fill(100,0,0);
    square(p+lx*7,q+ly*6,60);
    square(p+lx*15,q+ly*6,60);
  } else {
    lowtom.amp(0);
  }


  //consistantly playing the base
  if (millis() % 1000 < 50) {
    // check if the file is already playing
    //if(kick.isPlaying() == false) {
    // if it is not playing, play it
    kick.play();
    kick.amp(0.5);
    //}
  }

  //playing the snare1
  if ((millis()-0.25*speed) % (2*speed) < 50) {
    // check if the file is already playing
    //if(kick.isPlaying() == false) {
    // if it is not playing, play it
    snare1.play();
    //}
  }

  if ((millis()-speed*0.5)%(2*speed)<10) {
    clap1.play();
  }

  if ((millis()-speed*0.5)%(2*speed)<10) {
    hihat1.play();
  }


  if ((millis()-(speed*1.25)) % (2*speed) < 50) {
    shaker.play();
  }


  if ((millis()-speed*1.5)%(2*speed)<10) {
    bongo.play();
  }


  if ((millis()-speed*1.75)%(2*speed)<10) {
    lowtom.play();
  }
}


void setupSerial() {
  printArray(Serial.list());
  myPort = new Serial(this, Serial.list()[3], 9600);
  // WARNING!
  // You will definitely get an error here.
  // Change the PORT_INDEX to 0 and try running it again.
  // And then, check the list of the ports,
  // find the port "/dev/cu.usbmodem----" or "/dev/tty.usbmodem----"
  // and replace PORT_INDEX above with the index number of the port.

  myPort.clear();
  // Throw out the first reading,
  // in case we started reading in the middle of a string from the sender.
  myString = myPort.readStringUntil( 10 );  // 10 = '\n'  Linefeed in ASCII
  myString = null;

  sensorValues = new int[NUM_OF_VALUES_FROM_ARDUINO];
}

void getSerialData() {
  while (myPort.available() > 0) {
    myString = myPort.readStringUntil( 10 ); // 10 = '\n'  Linefeed in ASCII
    if (myString != null) {
      String[] serialInArray = split(trim(myString), ",");
      if (serialInArray.length == NUM_OF_VALUES_FROM_ARDUINO) {
        for (int i=0; i<serialInArray.length; i++) {
          sensorValues[i] = int(serialInArray[i]);
        }
      }
    }
  }
}
I changed my code for the second version, in which one stamp triggers one beat.
// IMA NYU Shanghai
// Interaction Lab
// For receiving multiple values from Arduino to Processing

/*
 * Based on the readStringUntil() example by Tom Igoe
 * https://processing.org/reference/libraries/serial/Serial_readStringUntil_.html
 */

import processing.serial.*;
import processing.sound.*;
SoundFile kick;
SoundFile snare1;
SoundFile clap1;
SoundFile ride;
SoundFile hihat;
SoundFile bongo;
SoundFile shaker;
SoundFile lowtom;
SoundFile basic;


//SoundFile kick;
boolean snare1Played;
boolean clap1Played;
boolean hihatPlayed;
boolean shakerPlayed;
boolean bongoPlayed;
boolean lowtomPlayed;
//SoundFile clap1;
//SoundFile ride;
//SoundFile hihat1;
//SoundFile bongo;
//SoundFile shaker;
//SoundFile lowtom;

int speed;


int NUM_OF_VALUES_FROM_ARDUINO = 6;   /** YOU MUST CHANGE THIS ACCORDING TO YOUR PROJECT **/
int sensorValues[];      /** this array stores values from Arduino **/

String myString = null;
Serial myPort;

void setup() {
  size(500, 500);
  background(0);
  setupSerial();

  //the following are my adding codes
  kick = new SoundFile(this, "kick.wav");
  snare1= new SoundFile(this, "snare.wav");
  clap1= new SoundFile(this, "clap.wav");
  ride= new SoundFile(this, "ride.wav");
  hihat=new SoundFile(this, "openhihat.wav");
  bongo=new SoundFile(this, "bongo.wav");
  shaker=new SoundFile(this, "ride.wav");
  //temporary change
  lowtom=new SoundFile(this, "kick.wav");

  basic=new SoundFile(this, "basic.wav");
  basic.loop();
  basic.amp(0.5);

  speed=500;
}

void draw() {
  getSerialData();
  printArray(sensorValues);

  // use the values like this!
  // sensorValues[0]

  // add your code
  //if(sensorValues[0]==0) {
  //     snare1.amp(0.5);
  //   }else {
  //    snare1.amp(0);
  //  }


  if (sensorValues[0]==0) {
    //if (!snare1.isPlaying()) snare1.play();
    if (snare1Played == true) {
      snare1.play();
      snare1Played = false;
    }
  } else {
    snare1Played = true;
  }


   if (sensorValues[1]==0) {
    //if (!clap1.isPlaying())
    if (clap1Played == true) {
      clap1.play();
      clap1Played = false;
    }
  } else {
    clap1Played = true;
  }


if (sensorValues[2]==0) {

    if (hihatPlayed == true) {
      hihat.play();
      hihatPlayed = false;
    }
  } else {
    hihatPlayed = true;
  }


  if (sensorValues[3]==0) {

    if (shakerPlayed == true) {
      shaker.play();
      shakerPlayed = false;
    }
  } else {
    shakerPlayed = true;
  }

  if (sensorValues[4]==0) {

    if (bongoPlayed == true) {
      bongo.play();
      bongoPlayed = false;
    }
  } else {
    bongoPlayed = true;
  }

  if (sensorValues[5]==0) {

    if (lowtomPlayed == true) {
      lowtom.play();
      lowtomPlayed = false;
    }
  } else {
    lowtomPlayed = true;
  }


}


void setupSerial() {
  printArray(Serial.list());
  myPort = new Serial(this, Serial.list()[3], 9600);
  // WARNING!
  // You will definitely get an error here.
  // Change the PORT_INDEX to 0 and try running it again.
  // And then, check the list of the ports,
  // find the port "/dev/cu.usbmodem----" or "/dev/tty.usbmodem----"
  // and replace PORT_INDEX above with the index number of the port.

  myPort.clear();
  // Throw out the first reading,
  // in case we started reading in the middle of a string from the sender.
  myString = myPort.readStringUntil( 10 );  // 10 = '\n'  Linefeed in ASCII
  myString = null;

  sensorValues = new int[NUM_OF_VALUES_FROM_ARDUINO];
}

void getSerialData() {
  while (myPort.available() > 0) {
    myString = myPort.readStringUntil( 10 ); // 10 = '\n'  Linefeed in ASCII
    if (myString != null) {
      String[] serialInArray = split(trim(myString), ",");
      if (serialInArray.length == NUM_OF_VALUES_FROM_ARDUINO) {
        for (int i=0; i<serialInArray.length; i++) {
          sensorValues[i] = int(serialInArray[i]);
        }
      }
    }
  }
}
poster:

pic.4.1.poster
TinkerCad 3D model:
pic.4.2 3D model