
Link to notion post: notion page
Project 2: Kinetic Prototype
Documentation of Project 2:
For Project 1: New Bodies, Rainee, Alan, and I were inspired by sea life and the feelings of entrapment – creating a dress with a light-up spine made of wire overlaid on top that doubled as a tail as well. For our kinetic prototype, we wanted to follow the same theme, thus, we decided to create the foundation for moving fish scales at an attempt of biomimicry.
In order to better understand the movement of the scales, we decided to experiment with how to mimic it best using cardboard, paper/various fabrics, and fishing wire. We made different placements for where the wire would go and shapes for the base frame.
Here is the photo of the different prototypes we made:
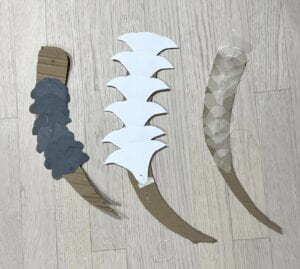
The middle is the initial draft, and the left photo is made from the fabric cutouts I made for the scales, which we were originally planning to use but realised that there were better materials that were more scale-like yet provided flexibility to showcase the motion, like the TPU on the right that Rainee and Alan used the laser cutter for.
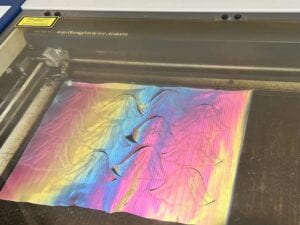
For the actual fabric, Professor Marcela provided us with a fabric that was what we were looking for. Here is the photo of the fabric and what the laser-cut scales look like:

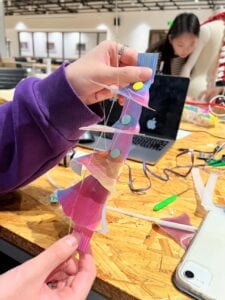
For the movement of the scales themselves, we originally tried to use a joint mechanism. However, the joint was not smooth enough, so we pivoted to using buttons and the fabric strip as a connector.
For the sensor, we initially tried to use the DC motor; however, we could not figure out how to program the speed of the rotation and control it. We decided to use the stepper motor combined with the ultrasonic sensor, with a base that Alan 3D printed, because it is the most accurate and controllable, allowing the strings to go in the right direction.
Here is a video of the motor attached to the scales:
After I made the base for the dress, we needed to make the frame. To make the frame for each row of scales to put on the actual mannequin, we 3D printed sticks with holes lining them, and put screws in the top and bottom to secure the two parallel sticks together. Then, the sticks were tied together with the fishing wire looped through the remaining holes to allow a strip of fabric with the scales attached to stay rigid on the frame. Three pairs were connected and put as a sort of tail, using the same pulling mechanism as the fish scales but with no motor (therefore, the motion was manual).
Here is the final prototype:
Improvements for future consideration:
- Placement of the strings through the scales: It seems that the movement worked best when the strings were placed closer to, but not directly above, the base of the scale as compared to when it was placed at the tip of the scale. We should try to continue with that placement on a larger scale and see if it holds out.
- Motors: The stepper motor we used is really heavy – thus if we want multiple rows of scales, we may need to find a lighter alternative and experiment with fixing all the lines to a singular motor.
- Joints: The initial joint prototype did not work – thus we used buttons. The buttons are quite bulky/noticeable and do not blend well with the fabric at all. However, for the final project, we will explore different methods in order to have a more seamless connection.
- Teamwork and communication: I will improve on managing time better in order to be able to work on the group project and contribute more, as there were a lot of prior obligations during the times. I also feel that the group could do better in terms of communicating with me, as I felt like I was kept out of the loop for a majority of the time even when I was able to make it to meetings.
Overall, I look forward to seeing how this will progress into the final.
Week 10: Paneling Tools
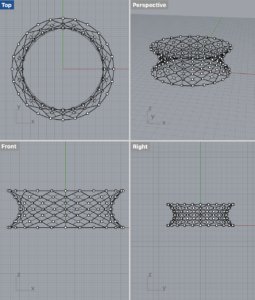
For this week, we learned about paneling tools in Rhino and attempted to create a wearable. I decided to try to follow along with the bangle tutorial in class.
This week’s was a bit tougher for me because Rhino is still pretty hard for me to adjust to and I’m still getting the hang of it. However, I enjoyed learning about the grid points and learning about the different patterns that can be made on the 3d object itself. For my version, I created a bangle that has a diamond-like grid on it.
This is what my frame looked like:
Project 1: New Bodies
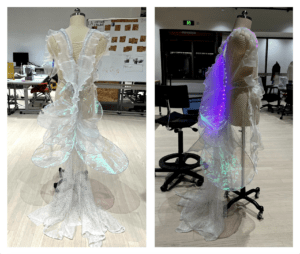
For the first project, Rainee, Alan, and I decided to alter the human form by drawing inspiration from ocean creatures and specifically, a fish. There are so many elements of the deep sea that have yet to be explored by humans – oxygen tanks provided aren’t even enough to allow us to take a glimpse, and the technology we have at the moment isn’t strong enough to survive the pressure in the deep sea. So how do these various sea creatures survive? There is much mystery and fascination to the various habits of these creatures that humans cannot even begin to imagine. That is what Drowning, our project, attempts to do – bridge the gap between humans and fish to create an altered form of the human body using elements of biomimicry.
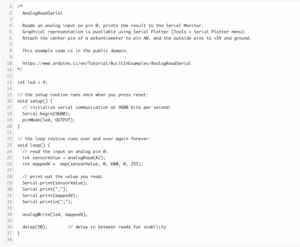
Though fish and humans are relatively different in terms of physical stature and composition, they share a few common traits: the need to eat, organs that keep us alive, and a spine – which is what we decided to draw on the most. To create the spine, we used a malleable wire that we bent into a net-like frame and layered it over an actual fishing net turned into the base of a dress, weaving an LED strip into an iridescent fabric to create dimension to it. We originally wanted to use optic fibres, but the LED light that we were going to use was not bright enough to light the entire fibres. We then connected the LED lights to Arduino in order to make it change colour according to the volume of music played.
Something we struggled with was getting the colour/brightness to vary according to how loud the music was. The analog input kept jumping and the sensor values were inaccurate. To fix this, Alan used three ranges in order to have better control of the brightness.
In order to improve our project for the future, we can figure out a way to embed the circuit into the wearable instead of connected separately. Furthermore, we can try to find a different sensor that reacts to distance better than the microphone sensor. Based off of feedback from the class, rather than focusing on one part of the body, we could try to find a way to transform the entire figure into a fish-human hybrid, and create even more exaggerated features to truly distort the wearer’s body.
Overall, I enjoyed creating this project and learned a lot from the process. Not only does Drowning attempt to create a fish-human hybrid, it also draws attention to the feeling of being trapped by beauty constructs. The fabric of the wearable is beautiful, but the net and the wire themselves are rather “ugly” and restraining. In a sense, it is an ironic allusion to humans restricting themselves by beauty standards and constructs – something that is only able to be felt by humans.

Week 3: Sensors
This week, we learned about sensors and using different types of sensors to turn an LED light on and off. To do this, we used Velostat which is a conductive fabric.
We had several options in terms of what type of sensors to use, but my partner and I decided to do the first one, which was the linear potentiometer. To do this, we needed to use a conductive surface, spacers, and the Velostat to allow for room to switch the light on and off.
In terms of the coding part, we had a little trouble getting the output to reflect the sensor value. They were way too high for starting points and didn’t reflect much of a change, but we figured it out and here is the code:
Overall, it was interesting to learn the way that sensors can be controlled and altered. Here is the end result of the sensor working: working sensor
Week 7: Inflatables
This week, we learned about pneumatics – using gas/pressurised air to create movement in a certain flow. We would be creating our own inflatable shape and using the motor to inflate and deflate it.
First, my partner and I created the circuit for the motor. It looked pretty complicated at first, but then we realised the first loop just needed to be repeated three times for each of the connection points – the first motor, second motor, and air valve. Here is the motor in action with the demo inflatable: working motor
I forgot to document our design, but we decided to create a rectangle that would fold/curl up as air is pushed in and out of it. To do this, we first sketched the rectangle then drew rhombuses lining vertically along it. The first try cutting it didn’t exactly work, but we realised that it was because we had left no gap between the cut rhombuses and the edge. It ended up being torn by the cutter. The second time, we left room around as a border, and it worked.
If I were to do this differently, I would have started with a design that was a little simpler and fully understand the mechanics of it first. However, overall I feel like it was a pretty successful execution.
Week 5: Textiles
This week, we learned about textiles and creating textiles out of unconventional materials. For my new textile, my partners and I decided to use leaves that had “fallen” off of the tree outside of the classroom. (I forgot to document the process with photos and forgot to take a photo of the end result).

The tree looked a little like the one above, but had longer leaves – thus, we decided to tear each of the leaves off the smaller branches and start weaving them together to create a woven textile. We then added duct tape the seal the edges and keep it together, then added split pins in the intersections of each leaf. The result was a flexible yet rigid textile, that bent at the intersecting angles.
Though it looked cool, upon reflection after the class, I realise that I should have expanded my thoughts and ideas in terms of what could be used to create a new textile. I definitely went with something a little more conventional, and it wasn’t really something new – the tacky pins didn’t add any value to the textile either. If I were to expand on this or do it again, I would search for more out-of-the-box materials and also think about the function of every element I am putting into it, rather than just making it look pretty. I would also experiment with different ways of creating fabric/textiles rather than a basic weave – maybe with different knots.
Case Study: Rei Kawakubo
Link to Google Slides: Case Study: Rei Kawakubo
PDF version: reikawakubo-Yasmin-Pang.pdf
Script: script
Week 4: Reflection and Mask
Paris Is Burning Reflection
Everything is a social construct, whether it is our gender, our jobs, or our entire identities. In Paris Is Burning, we see a conglomeration of people who express themselves in any way, shape, or form in “balls” held in venues around New York City. When the participants enter the venue space, who they are in the outside world disappears, and they are free to be whoever they want to be. Judged in different categories, despite being given a rating, everyone is a winner and no one is critical or disapproving in the space.
In society, we are led to believe that we have to conform to male or female, certain jobs that we hold, and certain expectations and/or restrictions that come with our race and education. However, the people in the documentary decide to use fashion as a way to break past those barriers, truly expressing the fluidity of human identity and what it means to be ourselves. They found a community bound together by their queer identities and acceptance, and reinvented themselves even if it’s only for a few hours.
Overall, the main takeaway is that fashion is not always in the eyes of the beholder – it is also in the hands of whomever chooses to wear different pieces of clothing, different styles, and different materials. While stereotypes and judgements are still prevalent in the modern-day world, they should empower us rather than make us feel lesser than we are.
Mask Assignment
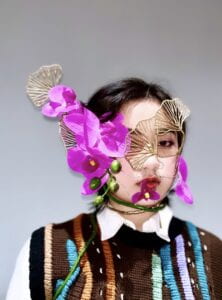
For this week’s assignment, we were instructed to create a mask/headpiece that expressed a part of our identity that cannot be expressed in our everyday fashion. I worked with Rainee Yang.
Concept: Ecofeminism
Ecofeminism examines the connection between nature and females, and explores the concept of domination by the patriarchy in our society. It focuses on the destruction and abuse of nature and their consequences as caused by capitalism and a male-dominated world. This branch of feminism draws attention to the recognition and acceptance of interdependence of humans and the natural world, as well as acknowledging nature as something that nourishes us.
Construction
While we originally wanted to use real flowers, they would have died too quickly so we decided to use fake flowers that had wire stems, allowing for more flexibility. By creating the headpiece in a way that wraps around the wearer, it represents not just the restraint felt by proponents of ecofeminism, but also the integration of our bodies with nature. The stems are made to look almost as if they are growing out of the wearer, with orchids representative of female organs and the gingko leaves representative of lungs, breathing, and thus, freedom.
Week 1: Soft Circuits
For the first week of this class, we were instructed to create a circuit using conductive thread, fabric, a battery, and LED lights. To start the process, we first built a tester on a breadboard to understand how the circuit works, then applied that concept to the fabric shape we chose (I did a heart).
Originally, I had intended to have a magnet switch, but it unfortunately would not work with my design so I decided to have a button instead. To do this, I used three pieces of the same fabric and sewed through the layers, ensuring the conductive threads of each segment did not cross. I also cut a hole in the middle layer so the knot inside the pouch holding the battery could be touched by the knot on the bottom layer, completing the circuit when the knots are pressed together.
Overall, I struggled a bit with not letting the threads touch each other, however, once I understood it fully it was much smoother to complete the project. I have attached the final product demonstration below.