Recitation 2: Arduino Basics
Meet Arduino, and start basic coding!
By Wendy
In this recitation, I made 3 circuits with Arduino. Fade, toneMelody, and a little 2-player game.
Arduino Basics
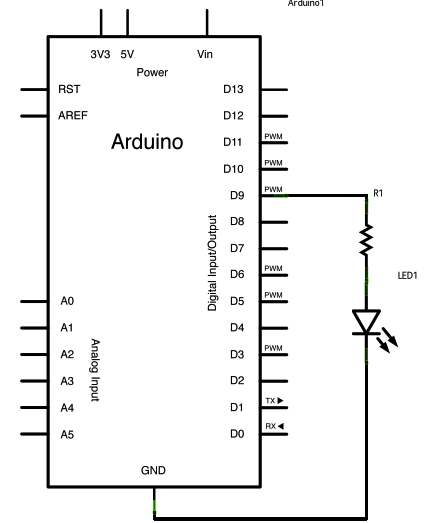
Circuit 1: Fade

Circuit 2: Tone Melody- Play a Melody using the tone() function

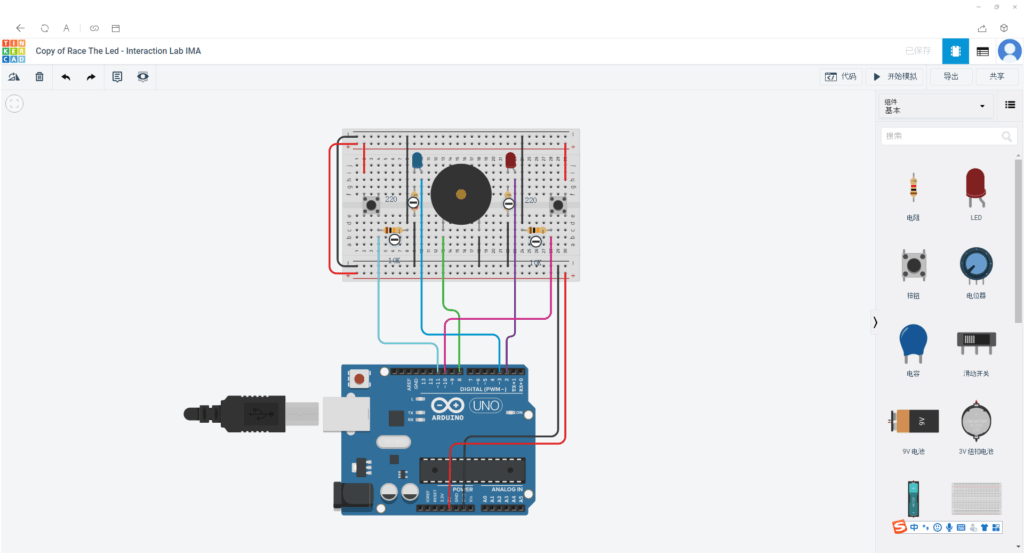
Circuit 3: Speed Game: Race the Led
The schematic:

https://www.tinkercad.com/things/6MzvN5rlZlr
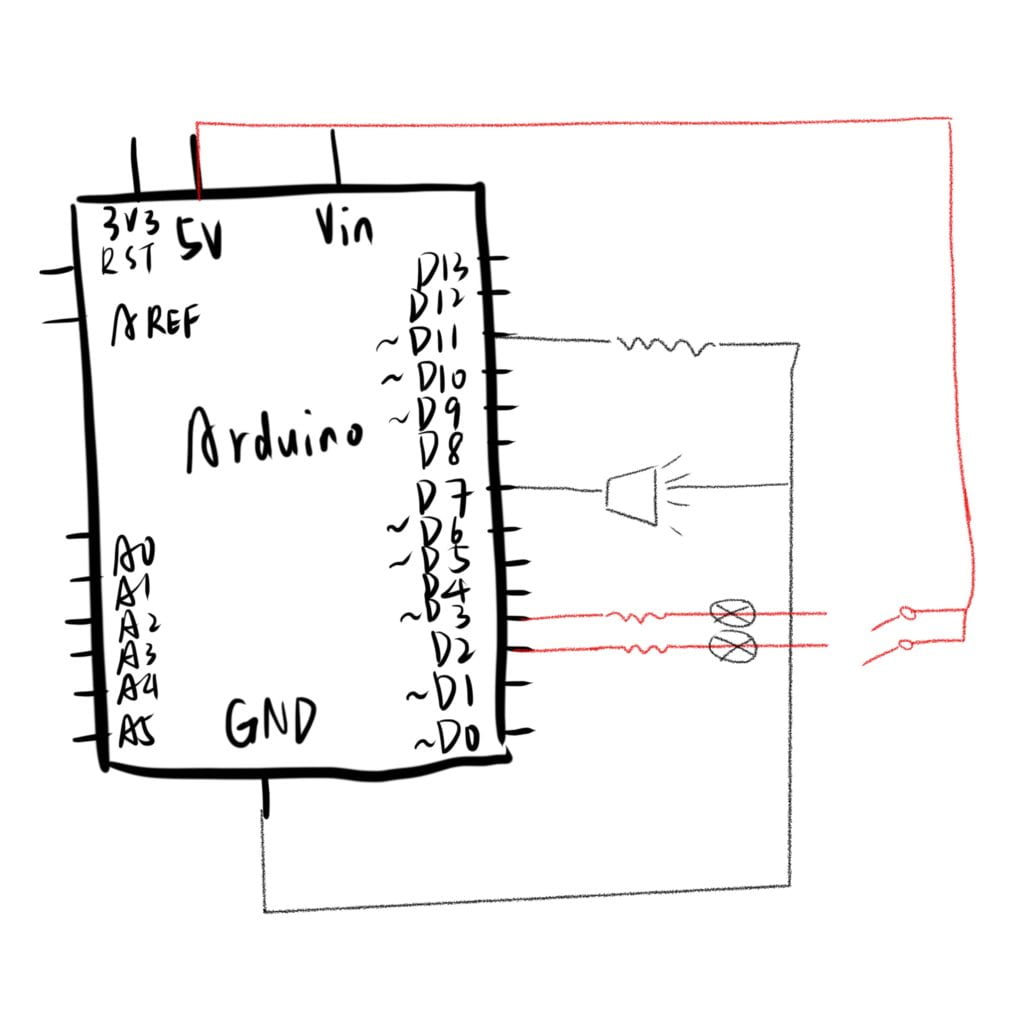
Schematic(hand-drawn)

I am really unsure about this.
Improvements
Should be more careful with cathodes&anodes and unnecessary wires: keep the circuit concise!
Question 1
In my daily life I only interact with the interfaces using the language I am familiar with. But on the circuits I built today, I need to talk to the circuits in THEIR language(codes!) in order to realize the interaction.
Interaction goes into effect when there is an instruction, delivered in the form of physical computing( to sense and to interact with the analog world through digital data in soft-wares in computers). In this example, as codes that the computer reads and send signals to outputs. Interaction is the exchanging of information(in the form of low-level electrons) between the analog world(in the way we humans understand) and the digital environment(in the language the computer understands).
Question 2
A resistor is usually employed in dropping a voltage or producing a potential divider action, also be used to limit current flow. If we don’t, the button will be damaged by the extensive current flow.
Determine the voltage and current needed for your device(button). the following formula to determine the resistor value: Resistor(in R) = (Battery Voltage – button voltage) / desired button current.
For a push button that requires 10mA, powered by 5V the values are: (12-3.4)/. 010=860 ohms.
10k resistor is 10000R. Also, Ohm’s law formula. The resistor’s current I in amps (A) is equal to the resistor’s voltage Vin volts (V) divided by the resistance Rin ohms (Ω): V is the voltage drop of the resistor, measured in Volts (V). In some cases Ohm’s law uses the letter E to represent voltage. We use a 10K resistor becasue that is the most appropriate amount of voltage we need to block from the circuit.
Question 3
If I have 100,000 LEDs of any brightness and color at my disposal, I would make it on my vehicle! To play music when stopped by a teaffic light, and to display thank you/ excuse me on roads. I would make this commercial, too.
If I have another 100,000 LEDs of any brightness and color at my disposal, I would use that to build a momentum Arduino board, as a facia to the electro-grocery store, or an Arduino festival!
Appendix: Code and source
Circuit 1: Fade
/*
Fade
This example shows how to fade an LED on pin 9 using the analogWrite()
function.
The analogWrite() function uses PWM, so if you want to change the pin you're
using, be sure to use another PWM capable pin. On most Arduino, the PWM pins
are identified with a "~" sign, like ~3, ~5, ~6, ~9, ~10 and ~11.
This example code is in the public domain.
http://www.arduino.cc/en/Tutorial/Fade
*/
int led = 9; // the PWM pin the LED is attached to
int brightness = 0; // how bright the LED is
int fadeAmount = 5; // how many points to fade the LED by
// the setup routine runs once when you press reset:
void setup() {
// declare pin 9 to be an output:
pinMode(led, OUTPUT);
}
// the loop routine runs over and over again forever:
void loop() {
// set the brightness of pin 9:
analogWrite(led, brightness);
// change the brightness for next time through the loop:
brightness = brightness + fadeAmount;
// reverse the direction of the fading at the ends of the fade:
if (brightness <= 0 || brightness >= 255) {
fadeAmount = -fadeAmount;
}
// wait for 30 milliseconds to see the dimming effect
delay(30);
}
Circuit 2: Tone Melody
/*

  Melody

  Plays a melody

  circuit:

  - 8 ohm speaker on digital pin 8

  created 21 Jan 2010

  modified 30 Aug 2011

  by Tom Igoe

  This example code is in the public domain.

  http://www.arduino.cc/en/Tutorial/Tone

*/

#include "pitches.h"

// notes in the melody:
int melody[] = {

  NOTE_C4, NOTE_G3, NOTE_G3, NOTE_A3, NOTE_G3, 0, NOTE_B3, NOTE_C4
};

// note durations: 4 = quarter note, 8 = eighth note, etc.:
int noteDurations[] = {

  4, 8, 8, 4, 4, 4, 4, 4
};

void setup() {

  // iterate over the notes of the melody:

  for (int thisNote = 0; thisNote < 8; thisNote++) {

    // to calculate the note duration, take one second divided by the note type.

    //e.g. quarter note = 1000 / 4, eighth note = 1000/8, etc.

    int noteDuration = 1000 / noteDurations[thisNote];

    tone(8, melody[thisNote], noteDuration);

    // to distinguish the notes, set a minimum time between them.

    // the note's duration + 30% seems to work well:

    int pauseBetweenNotes = noteDuration * 1.30;

    delay(pauseBetweenNotes);

    // stop the tone playing:

    noTone(8);

  }
}

void loop() {

  // no need to repeat the melody.
}
Circuit 3: Speed Game
credit to mdogdoy from TinkerCad.
int buzzerPin = 8;int button1 = 11;int button2 = 10;int led1 = 3;int led2 = 2;int goal = 10;int buttonState1 = LOW;int previousState1 = LOW;int buttonState2 = LOW;int previousState2 = LOW;int counter1 = 0;int counter2 = 0;boolean winner1 = false;boolean winner2 = false;// the follow variables are long's because the time, measured in miliseconds,// will quickly become a bigger number than can be stored in an int.long time = 0; // the last time the output pin was toggledlong debounce = 200; // the debounce time, increase if the output flickersvoid setup() {// put your setup code here, to run once:Serial.begin(9600);pinMode(buzzerPin, OUTPUT);pinMode(button1, INPUT);pinMode(button2, INPUT);pinMode(led1, OUTPUT);pinMode(led2, OUTPUT);Serial.println("******************* RACE THE LED *******************");delay(1000);Serial.println("READY");delay(1000);Serial.println("SET");delay(1500);Serial.println("GO!!!!!!!!!!!!!!!!");}void loop() {// put your main code here, to run repeatedly:buttonState1 = digitalRead(button1);buttonState2 = digitalRead(button2);//Serial.println(buttonState1);//this checks the times player 01 has pressed the buttonif (counter1 < goal && winner2 == false) {if (buttonState1 != previousState1 && millis() - time > debounce) {if (buttonState1 == HIGH) {counter1++;Serial.print("player 01: ");Serial.println(counter1);time = millis();}}previousState1 = buttonState1;if (counter1 == goal && winner2 == false) {winner1 = true;digitalWrite(led1, HIGH);Serial.println("PLAYER 01 WINS");playMelody();}}//this checks the times player 02 has pressed the buttonif (counter2 < goal && winner1 == false) {if (buttonState2 != previousState2 && millis() - time > debounce) {if (buttonState2 == HIGH) {counter2++;Serial.print("player 02: ");Serial.println(counter2);time = millis();}}previousState2 = buttonState2;if (counter2 == goal && winner2 == false) {winner2 = true;digitalWrite(led2, HIGH);Serial.println("PLAYER 02 WINS");playMelody();}}}void playFreq(double freqHz, int durationMs) {//Calculate the period in microsecondsint periodMicro = int((1 / freqHz) * 1000000);int halfPeriod = periodMicro / 2;//store start timeint startTime = millis();//(millis() - startTime) is elapsed play timewhile ((millis() - startTime) < durationMs) {digitalWrite(buzzerPin, HIGH);delayMicroseconds(halfPeriod);digitalWrite(buzzerPin, LOW);delayMicroseconds(halfPeriod);}}void playMelody() {playFreq(262, 100);playFreq(294, 100);playFreq(349, 100);playFreq(294, 100);playFreq(440, 200);delay(100);playFreq(440, 400);playFreq(392, 400);delay(300);playFreq(262, 100);playFreq(294, 100);playFreq(349, 100);playFreq(294, 100);playFreq(392, 200);delay(100);playFreq(392, 400);playFreq(349, 400);}
