A. Project
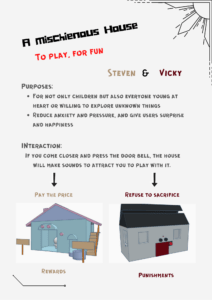
Title: A Mischievous House
Name: Vicky (Team member: Steven)
Instructor: Margaret Minsky
B. CONTEXT AND SIGNIFICANCE
My group project is “Mood Project”, which created a device called the “main brain” to deliver emotion and memories, making people understand others’ feelings. This project sparked me to think more about the definition of interaction. I think interaction includes continuous receiving orders, processing, and making actions. Therefore, why don’t I make a project that has different responses to different states? Just like video games. We may try to interact with the NPC and get tasks, which may lead to different plot directions, such as side quests. Our project adapted this idea and I guess this is the uniqueness because instead of following a standard routine, it had various possibilities.
And because of COVID-19, we divided the project into two parts. Steven, choose the ‘rewards’ part, which still focused on the pet caring part. I, on the other hand, decided to make use of the ‘punishment’ characteristics to build a ghost house. In my opinion, this interesting game project is not only for children but also for everyone young at heart. They can interact with our mischievous house and felt surprised and maybe laughed after seeing scary photos pop up. The goal is not to really scare someone, it is just a small prank. For dull life, especially during quarantine time recently, staying at home may be extremely boring. In this case, small entertainment matters a lot for people who want to seek something interesting. Apart from online games, our project can be a choice to kill the time.
C. CONCEPTION AND DESIGN:
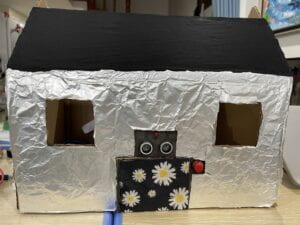
I first pretend I am actually in front of someone’s house, so what would I do? In my imagination, When I come closer to the house, I might press the doorbell to wait for the host to open the door. If no one responded, I may go to the window to see if someone is inside. Keep pressing the bell, knocking on the door, or yelling to wake the residents are also choices. Therefore, turn the thoughts to a haunted house. When passed by or, or purposely come to observe the house, the house would make noise and light to ‘welcome’ the guests. If the user presses the doorbell to represent a signal of being interested in the house, the LED on the side would also light to attract the user. The sign, “Sacrifice!”, and weird decorations may scare the users and go back to the front door. In this case, if the user keeps pressing the door ring, and does not give the house something as an offering, the roof would pop off and show fearful images, implying the past victims and scared the visitors.
Here are the materials I use. I am not sure about Steven’s part.
- cardboards
- glue gun/ adhesive/ paper tape/insulating tape
- scissors/box cutters
- ultrasonic ranger HC-SR04
- button
- buzzer
- LED lights
- servo motor
(For decoration)
- papers
- mask
- color pens
- tin foil
- a pair of old pant
I almost used everything we learn in class to try to create a reasonable and interesting interactive device. However, I gave up using the sound sensor (loudness) for the yelling part because the professor said this sensor is not sensitive. I also asked Carina’s opinion, and she suggested I use a servo rather than a DC motor to better brace the roof.
D. FABRICATION AND PRODUCTION:
3/14~16
After posting the midterm proposal and receiving the professor’s feedback, we discussed online what we can do to improve the flaws. I carried the idea of dividing the projects into two parts to adapt to the covid situation.
3/17
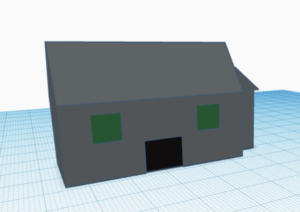
I first draw a very simple 3Dmodel and started to build the cardboard house. I spent a day measuring scales, cutting cardboards, assembling the house, and digging holes for further installing circuits. Steven also booked an office hour that day with Professor Minsky to clarify our final decision.
3/18~19
Because I have no coding experience before, I was very worried about I can not write the code on my own. Therefore, I decided to start to write the code as quickly as possible.
// ---------------------------------------------------------------- //
// Arduino Ultrasoninc Sensor HC-SR04
// Re-writed by Arbi Abdul Jabbaar
// Using Arduino IDE 1.8.7
// Using HC-SR04 Module
// Tested on 17 September 2019
// ---------------------------------------------------------------- //

#define echoPin 2 // attach pin D2 Arduino to pin Echo of HC-SR04
#define trigPin 3 //attach pin D3 Arduino to pin Trig of HC-SR04
#define LED1 4
#define LED2 5
#define buzzer 6
const int buttonpin = 7;

int k ;
int button = 0;
int prevbutton = 0;
int counter = 0;
int goal = 5;

int stage = 1;

long duration; // variable for the duration of sound wave travel
int distance; // variable for the distance measurement

#include "pitches.h"

// notes in the melody:
int melody1[] = {
  NOTE_C4, NOTE_G3, NOTE_G3, NOTE_A3, NOTE_G3, 0, NOTE_B3, NOTE_C4
};

int melody2[] = {
  NOTE_CS1, NOTE_CS1, NOTE_CS1, NOTE_CS1, NOTE_CS1, NOTE_CS1, NOTE_CS1, NOTE_CS1
};


// note durations: 4 = quarter note, 8 = eighth note, etc.:
int noteDurations1[] = {
  4, 8, 8, 4, 4, 4, 4, 4
};
int noteDurations2[] = {
  4, 4, 4, 4, 8, 8, 4, 4
};

void setup() {

  pinMode(trigPin, OUTPUT); // Sets the trigPin as an OUTPUT
  pinMode(echoPin, INPUT); // Sets the echoPin as an INPUT
  pinMode(LED1, OUTPUT);
  pinMode(LED2, OUTPUT);
  pinMode(buzzer, OUTPUT);
  pinMode(buttonpin, INPUT);
  Serial.begin(9600); // // Serial Communication is starting with 9600 of baudrate speed
  Serial.println("Welcome");

}
void loop() {
  // Clears the trigPin condition
  int k = 0;
  button = digitalRead(buttonpin);
  digitalWrite(trigPin, LOW);
  delayMicroseconds(2);
  // Sets the trigPin HIGH (ACTIVE) for 10 microseconds
  digitalWrite(trigPin, HIGH);
  delayMicroseconds(10);
  digitalWrite(trigPin, LOW);
  // Reads the echoPin, returns the sound wave travel time in microseconds
  duration = pulseIn(echoPin, HIGH);
  // Calculating the distance
  distance = duration * 0.034 / 2; // Speed of sound wave divided by 2 (go and back)
  // Displays the distance on the Serial Monitor
  Serial.print("Distance: ");
  Serial.print(distance);
  Serial.println(" cm");

  if (distance <= 50 && k == 0) {
    digitalWrite(LED1, HIGH);
    digitalWrite(buzzer, HIGH);
    for (int thisNote = 0; thisNote < 8; thisNote++) {
      // to calculate the note duration, take one second divided by the note type.
      //e.g. quarter note = 1000 / 4, eighth note = 1000/8, etc.
      int noteDuration = 1000 / noteDurations1[thisNote];
      tone(6, melody1[thisNote], noteDuration);

      // to distinguish the notes, set a minimum time between them.
      // the note's duration + 30% seems to work well:
      int pauseBetweenNotes = noteDuration * 1.30;
      delay(pauseBetweenNotes);
      // stop the tone playing:
      noTone(6);
      k++ ;
    }

    if (button == true && prevbutton == false) {
      counter = counter + 1;
      Serial.println(counter);
    }
    prevbutton = button;
    if (counter == 1) {
      digitalWrite(LED2, HIGH);
    }
    if (counter == goal) {
      digitalWrite(buzzer, HIGH);
      Serial.println("reach");
      for (int thisNote = 0; thisNote < 8; thisNote++) {
        // to calculate the note duration, take one second divided by the note type.
        //e.g. quarter note = 1000 /4, eighth note = 1000/8, etc.
        int noteDuration = 1000 / noteDurations2[thisNote];
        tone(6, melody2[thisNote], noteDuration);
        // to distinguish the notes, set a minimum time between them.
        // the note's duration + 30% seems to work well:
        int pauseBetweenNotes = noteDuration * 1.30;
        delay(pauseBetweenNotes);
        // stop the tone playing:
        noTone(6);
      }
      delay(10);
    }


  }
}
However, I found out problems that every time the distance was < 50 cm, the buzzer would make noises, and the button counting repeatedly reached 5. I tried to debug myself, and guess maybe I need to put the if statement outside the void loop() to solve this problem. However, if I moved these codes to the void setup(), the range sensor can not work properly. I asked my high school classmate who majors in Electrical Engineering now, and she suggested I add a ‘k’ to control the if statement. Nevertheless, this approach did not work. I searched for a lot of information online and could not find a solution.
3/20~22
Professor sent the example code of ‘stage’ in Slack. I found time during the busy midterm to understand the code and adapted it to my code. I booked an office hour on 3/22 to help me debug and learn how to reference the code.
Here is my final code. After 3/22, I just alter a few numbers in the code, such as the distance and motor angle.
// escapeRoom Copyright 2022 Mario Yang
// Heavily modified as stageChallenges by Margaret Minsky <mdm19@nyu.edu>
// Heavily modified as try by Vicky Chen and Steven Qu
// remixed with Arduino Ultrasoninc Sensor by Arbi Abdul Jabbaar
// This code is available under the MIT License.
// ---------------------------------------------------------------- //
// Arduino Ultrasoninc Sensor HC-SR04
// Re-writed by Arbi Abdul Jabbaar
// Using Arduino IDE 1.8.7
// Using HC-SR04 Module
// Tested on 17 September 2019
// ---------------------------------------------------------------- //

// buzzer code derived from Arduino examples

#define echoPin 2 // attach pin D2 Arduino to pin Echo of HC-SR04
#define trigPin 3 //attach pin D3 Arduino to pin Trig of HC-SR04
#define LED1 4
#define LED2 5
#define buzzer 6
const int buttonpin = 7;

int button = 0;
int prevbutton = 0;
int counter = 0;
int goal = 6;

bool presserevent = false;
int stage = 1;

long duration; // variable for the duration of sound wave travel
int distance; // variable for the distance measurement

#include "pitches.h"

// notes in the melody:
int melody1[] = {
  NOTE_C4, NOTE_G3, NOTE_G3, NOTE_A3, NOTE_G3, 0, NOTE_B3, NOTE_C4
};

int melody2[] = {
  NOTE_DS8, NOTE_DS8, NOTE_DS8, NOTE_DS8, NOTE_DS8, NOTE_DS8, NOTE_DS8, NOTE_DS8
};


// note durations: 4 = quarter note, 8 = eighth note, etc.:
int noteDurations1[] = {
  4, 8, 8, 4, 4, 4, 4, 4
};
int noteDurations2[] = {
  4, 6, 6, 6, 8, 8, 8, 8
};

#include <Servo.h>
Servo myservo;  // create servo object to control a servo
int servopin = 10;

void setup() {

  pinMode(trigPin, OUTPUT); // Sets the trigPin as an OUTPUT
  pinMode(echoPin, INPUT); // Sets the echoPin as an INPUT
  pinMode(LED1, OUTPUT);
  pinMode(LED2, OUTPUT);
  pinMode(buzzer, OUTPUT);
  pinMode(buttonpin, INPUT_PULLUP);
  myservo.attach(10);
  myservo.write(200);
  Serial.begin(9600); // // Serial Communication is starting with 9600 of baudrate speed
  Serial.println("Welcome");

}
void loop() {
  button = digitalRead(buttonpin);
  digitalWrite(trigPin, LOW);
  delayMicroseconds(2);
  // Sets the trigPin HIGH (ACTIVE) for 10 microseconds
  digitalWrite(trigPin, HIGH);
  delayMicroseconds(10);
  digitalWrite(trigPin, LOW);
  // Reads the echoPin, returns the sound wave travel time in microseconds
  duration = pulseIn(echoPin, HIGH);
  // Calculating the distance
  distance = duration * 0.034 / 2; // Speed of sound wave divided by 2 (go and back)
  // Displays the distance on the Serial Monitor
  //Serial.print("Distance: ");
  //Serial.print(distance);
  //Serial.println(" cm");
  Serial.println(stage);

  switch (stage) {
    case 1:
      rangeDetection();
      break;

    case 2:
      doorbell();
      break;

    case 3:
      motor();
      break;

    case 4:
      break;
  }
}
void rangeDetection() {
  if (distance <= 30) {
    digitalWrite(LED1, HIGH);
    digitalWrite(buzzer, HIGH);
    for (int thisNote = 0; thisNote < 8; thisNote++) {
      // to calculate the note duration, take one second divided by the note type.
      //e.g. quarter note = 1000 / 4, eighth note = 1000/8, etc.
      int noteDuration = 1000 / noteDurations1[thisNote];
      tone(6, melody1[thisNote], noteDuration);

      // to distinguish the notes, set a minimum time between them.
      // the note's duration + 30% seems to work well:
      int pauseBetweenNotes = noteDuration * 1.30;
      delay(pauseBetweenNotes);
      // stop the tone playing:
      noTone(6);
    }
    stage = stage + 1 ;
  }
}
void doorbell() {
  if (button == true && prevbutton == false) {
    counter = counter + 1;
    Serial.println(counter);
  }
  prevbutton = button;
  if (counter == 2) {
    digitalWrite(LED2, HIGH);

  }
  if (counter == goal && presserevent == false) {

    digitalWrite(LED1, LOW);
    digitalWrite(LED2, LOW);
    delay(50);
    digitalWrite(LED1, HIGH);
    digitalWrite(LED2, HIGH);
    delay(50);
    digitalWrite(LED1, LOW);
    digitalWrite(LED2, LOW);
    delay(50);
    digitalWrite(LED1, HIGH);
    digitalWrite(LED2, HIGH);
    Serial.println("reach");
    for (int thisNote = 0; thisNote < 8; thisNote++) {
      // to calculate the note duration, take one second divided by the note type.
      //e.g. quarter note = 1000 /4, eighth note = 1000/8, etc.
      int noteDuration = 1000 / noteDurations2[thisNote];
      tone(6, melody2[thisNote], noteDuration);
      // to distinguish the notes, set a minimum time between them.
      // the note's duration + 30% seems to work well:
      int pauseBetweenNotes = noteDuration * 1.30;
      delay(pauseBetweenNotes);
      // stop the tone playing:
      noTone(6);
    }
    stage = stage + 1;
  }
}
void motor() {
  myservo.write(0);

  stage = stage + 1;
}

/*
     Copyright 2022 Mario Yang

     Permission is hereby granted, free of charge, to any person obtaining a copy
     of this software and associated documentation files (the "Software"), to deal
     in the Software without restriction, including without limitation the rights
     to use, copy, modify, merge, publish, distribute, sublicense, and/or sell
     copies of the Software, and to permit persons to whom the Software is
     furnished to do so, subject to the following conditions:

     The above copyright notice and this permission notice shall be included in
     all copies or substantial portions of the Software.

     THE SOFTWARE IS PROVIDED "AS IS", WITHOUT WARRANTY OF ANY KIND, EXPRESS OR
     IMPLIED, INCLUDING BUT NOT LIMITED TO THE WARRANTIES OF MERCHANTABILITY,
     FITNESS FOR A PARTICULAR PURPOSE AND NONINFRINGEMENT. IN NO EVENT SHALL THE
     AUTHORS OR COPYRIGHT HOLDERS BE LIABLE FOR ANY CLAIM, DAMAGES OR OTHER
     LIABILITY, WHETHER IN AN ACTION OF CONTRACT, TORT OR OTHERWISE, ARISING FROM,
     OUT OF OR IN CONNECTION WITH THE SOFTWARE OR THE USE OR OTHER DEALINGS IN THE
     SOFTWARE.
*/
3/24
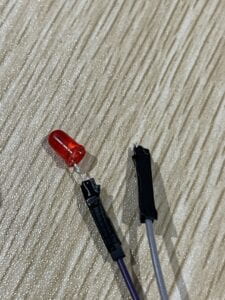
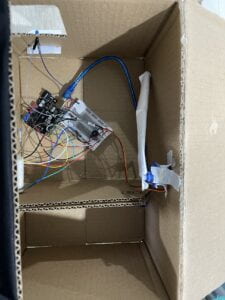
I took off all the circuits on the breadboard and tried to install them inside the house. The buzzer is the easiest, remaining on the breadboard. The range sensor and servo motor were also simply because they originally needed to use male to female cables to connect to the breadboard. However, how to deal with LEDs and the button was hard since I am not familiar with soldering, and their connection with cable is very unstable. In order to solve the problem, I booked an office hour again. Professor gave me many methods and I chose to use insulating tape to tightly connect.
Even though I broke a LED in the end, I guess the result is acceptable. I also dig holes for LEDs, a button, and windows to finish the process of installing the circuits.
3/25
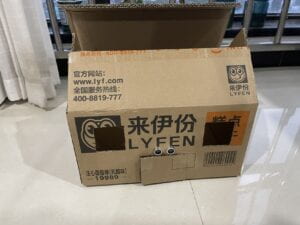
In the morning, I pasted a piece of cardboard behind the button to create a force so that users can press the doorbell easily. Because the paints I bought online nearly two weeks age still not delivered, I had to use the materials at home to decorate the house. The wall is made of tin foil, the door is pasted with a mask and the roof is actually made of my mom’s old pants!
Moreover, even though I tried different angles of rotation, different heights of the paper columns, I still did not solve the problem of how to use a servo motor to brace the roof. In recitation, Andy told me that maybe the paper I used is too heavy, and his advice stimulus my later experience. I changed the material into a cardboard column, pen, marker, but still failed. Finally, I used a piece of moderate length and weight cardboard to successfully lift up the roof.
After the recitation, I and Steven met on zoom for around one hour. During that time, I explained my code, taught him how to write his code and debug. At night, I used colored pens to finish the decoration part.
3/26
I recorded the final video in the morning due to better daylight. In the afternoon, I designed the poster and update my 3D model. I also changed Steven’s model’s color to make a strong comparison with my haunted house.
E. CONCLUSIONS:
Why should we care about this project?
The possibility of exploring is the most significant feature of our project. “A Mischievous House” is a cool game for people willing to explore new things but may feel boring in life. They can find out the working routine of this project by themselves without the creators’ instructions. During the process, they can not only kill the time but also relieve the pressure and increase their happiness. As a result, I think this project meets the topic of “To play, for fun” and is interesting and entertaining.
Furthermore, I think this project fits my definition of interaction. The users can do common actions, such as knocking on the door and pressing the button when coming to the house, and receive corresponding responses. For example, if the users only press the button one time, the LED beside the window will remind them to have a look at the side of the house. If they just leave and do not keep pressing the button, they won’t trigger the part of the scary photo. As a result, since the user can figure out how to play with the house themselves, and the house has diverse responses, I believe our project is pretty interactive. However, I felt a pity because I can imagine the house would be more interesting and mysterious if we can work in person to combine these two houses into one complete project.
The most difficult part of the project is the code. I am proud of myself because I was afraid and unconfident about coding in the past but now I wrote the majority of the code for my group. I have learned to seek help actively to solve the problem effectively. I asked fellows and the professor to assist me in debugging the code and aggressively changing it after receiving new suggestions.
The most frustrating part is how to use the servo motor to lift the roof. I changed a lot of factors every day and even made dreamed about it at night. Nevertheless, after keep trying, I finished the project successfully. The takeaway is that when feeling depressed about a part of the project, I can keep it aside and do other things, and inspiration may be born suddenly.
The decoration also anxious me because I do not have paints at home. However, using ready-made materials around me may also form a different effect. I did not imagine my house would look like this in the beginning, but for now, it seems really cool.
Leave a Reply