In the first recitation class, we learned about how to build a circuit by using a breadboard. I thought it is very interesting and worth exploring even though I almost forgot all the knowLEDge about electricity.
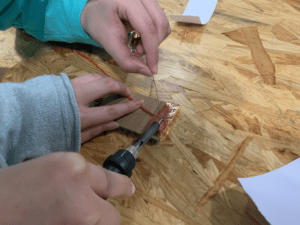
At first, we tried to build a switch by soldering wires and copper tape. The process of metal gradually melting by heat is fascinating, but we actually try many times before success. I guessed it is because the solder had not reached the high temperature.
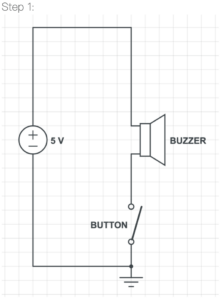
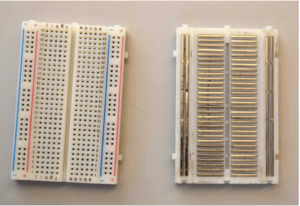
Later on, we turned to our seats to start working with the complex circuits. In the beginning, we were confused with the functions of different small items and the many holes on the breadboard. We discussed, searched for information, but still did not have any idea. Finally, We decided to ask a learning assistant. She showed the bottom of the breadboard and explained to us its structure and how it worked. Moreover, she also corrected us that we used the button wrong. We should connect the wire and button using a and c points or b and d points otherwise the electricity will not pass the bottom and the buzz will keep beeping.
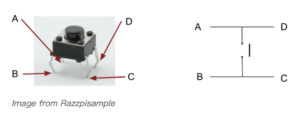
Thanks to her help, we got the knack quickly and finish the first step. By plugging in the electricity and pressing the green button, the black buzz would beep.
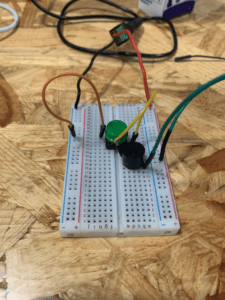
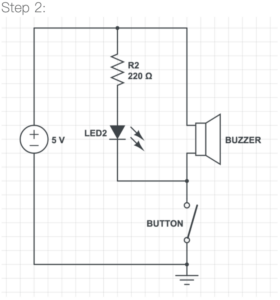
The second step was to add a parallel circuit. The new circuit started before the buzzer and ended before the button. The only difficulty during the process is that I was not sure if the resistor had positive and negative differences or not. I thought was no, but our resistor could only work on one side, which really confused me.
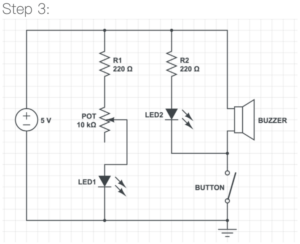
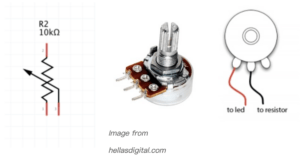
The third step is to add another new circuit. However, since this circuit did not connect to the button, the LED one would keep shining even though we did not press the button. Moreover, we also added a potentiometer in this process. The potentiometer was an adjustable resistance that users can twist the direction to change the resistance. The instructor taught us the exact usage of the potentiometer, just like the picture below. If we want to change the brightness of the LED light, we should plug the wire in the middle so that it can work properly.
Process 4:
Finally, all the circuits builder up. After that, we pasted two soldered pieces of cardboard together to finish the switch. If we press the switch, the buzz would beep and the LED 2 would also light. When changing the potentiometer, the LED 1 would become brighter or darker based on the direction.
Question 1:
What is the function of the resistor R1?
The LED would draw as much power as possible when connected directly to the current. However, the LED has its limited voltage and datasheet. If exceeded, LED has a high percentage of damage. Therefore, the resistor can limit the amount of current so that the light can function properly.
Question 2:
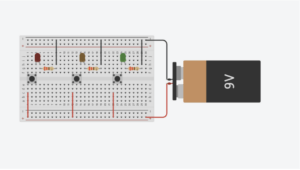
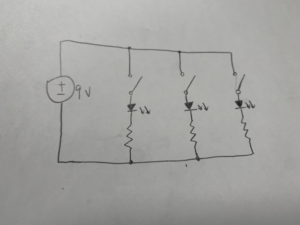
Question 3:
After reading The Art of Interactive Design, in what way do you think that the circuit you built today includes interactivity? Which degree of interactivity does it possess?
The article mentioned that interactivity is like two actors taking turns listening, thinking, and speaking. The person needs to be focused on what the other says, think about it, and give out useful responses. In today’s circuit, the current ‘listen’ to what we say, such as pressing the button, ‘think’ about our instructions, and ‘speak’ to us by the buzz and LED. Under the circumstance, even though the action that current do is quite simple, I still think it includes interactivity since it meets the definition. Nevertheless, I think the degree of interactivity is not high because it can not interact with us just like real people think and speak.
Question 4:
How can Interaction Design and Physical Computing be used to create Interactive Art?
Zach Lieberman inspires me that we can still interact with objects even though we do not contact them physically. For instance, some exhibition art can use interaction design to increase the connection between audience and artwork. What is more, Arduino is an approach that physical computing can be used to create interactive art. By the operation of the microcontrollers, users can just do some designated action and receive artistic feedback if the code is related to art.
Leave a Reply