class 5 – Project Progress, BOM, System Diagram ✅💰

Mega and Pearl’s Heartbeat Project 

BOM:  


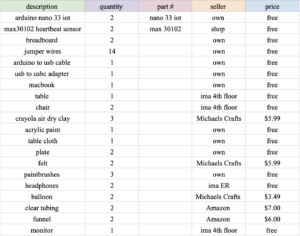
This is our BOM. Most of the things we need can be found on the floor, in the IMA shop, or the IMA ER, which makes most items free. A lot of the fabrication items are being reused from past projects that used similar materials, like fabric and paint. The one things we need to buy is clay and the materials for testing the making of a stethoscope. We may choose to just play the sound a heartbeat instead of playing the partner’s real heartbeat sound, but the supplies have been ordered incase we have time try to make a device to actually hear the heartbeat and not just a recording of it. 

⭐️⭐️

System Diagram: 

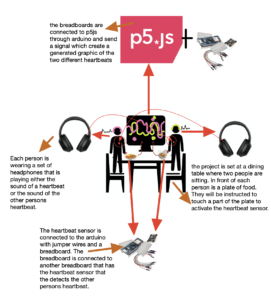
This is our system diagram. After meeting with Yeseul we decided to only have one screen that both users are interacting with and viewing instead of two. Because we are incorporating two inputs into p5js it is easiest if they are both going to one sketch instead of trying to combine two different ones. We are using two breadboards with two separate heartbeat sensors to create different inputs that go into one sketch. We are hoping that at some point the generated graphics combine into one as the two users interact with the project. 

⭐️⭐️

Current Project Progress 

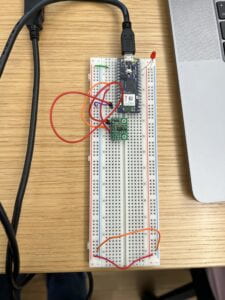
First, Mega and I tested the heartbeat sensor and made sure we knew how to connect it to the arduino and where all the wires worked. After some trial and error, we got the sensor to work. We also figured out that the sensor takes temperature, heartbeat and also average heartbeat. 

We found that it is easiest if we just choose one of these elements to put into p5js, so we just chose heart-rate in BPM for now. We connected the arduino to p5js and made the range small enough to actually show change. In real time, a persons heartbeat is not constantly changing, but because the sensor is so sensitive, the number is constantly changing which in turn makes the p5 sketch constantly change. This turned out to not be an issue yet because it is more visually appealing to see the sketch constantly change. 

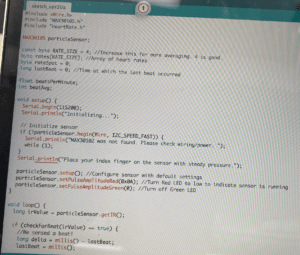
*arduino code for sensor*

*video of heartbeat sensor working with p5js*

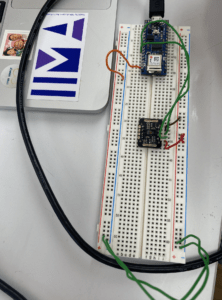
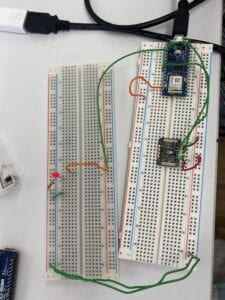
After figuring out the sensor we realized that we would need to connect to different breadboards to one arduino and two heartbeat sensors. There are two different users so they each need their own sensor and connection. We found that using one arduino makes it easier, so we experimented connecting the breadboards and seeing if they were connected using a LED light.   *connected breadboards with LED light* 

⭐️⭐️

Questions

  • does having both people look at one screen add to the meaning of the project? 
  • how do we incorporate both breadboards in p5js? 
  • what would be the best sound to input into the headphones? should we try to make a listening device that actually plays the persons heartbeat or does it matter if it is just playing a pre-recorded sound? 


Sensor Party 💡✨

Sensor Party

Marjorie and Pearl

We used the time-of-flight distance sensor (200cm max) VL53L0X. The wiring on the breadboard was a little tricky and took a bit of trial and error but we were able to successfully set up the connection with help from the ITP Website.

After wiring the sensor correctly we could see how it worked using the console log portion of the arduino.

We then decided to add a led light to the board and add a simple code to have the light turn on when the sensor was below 100 (when it was close to the sensor) and turn off when above 100. 


After experimenting with this sensor I learned that it was very accurate and the light turned on at the correct number every time. Some of the sensors that I have previously worked with are not as reliable but this sensor was great. I also learned that you have to make sure that the wiring is correct because it took us a long time to fix the wiring and understand the problem with the circuit. 

This sensor could be used many different ways in different types of projects. One project could Incorporate p5 and drawing. Maybe the user could use their hand as a paintbrush and the further away or closer they go to the sensor the color of the “paint” would change, and they could draw something using the sensor as the mouse. It would also be fun to make the sensor a sort of volume know, so that depending if you moved your hand close or far away a sound would get quieter or louder. 

I think that the next step to working with this sensor would be to connect multiple LEDs to experiment with using the distance to multiple outputs. 


Project #2: Project Interactive 💟🩺

Pearl & Mega 

drawing by Mega 🙂

One Sentence Summary: Immersive experience that is controlled by two participants heart beats.

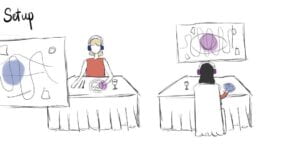
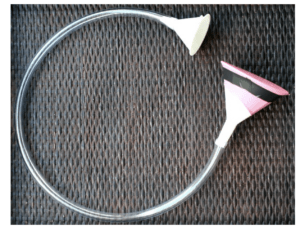
Project Description: Two participants will sit at different tables, set as a dining experience. Both participants will be able to listen to the other persons heartbeat through headphones and visualize it through a projection across from them at a table. Based on the heartbeat the projection will change using colors and animations. We will make a DIY stethoscope using simple materials like balloons, plastic piping, and a funnel. We will connect the stethoscope to headphones for the user to wear.  

(instructions for DIY stethoscope) :

DIY Stethoscope Tutorial~Science Experiment for Kids


Inspiration: https://www.pinterest.com/pin/158400111882229460/ 

The dining experience of people has changed after the pandemic, which made us realize that talking with people or having someone to eat with is a very essential part of the experience. This work focuses on the meaning of “food-partner” more than the food and other aspects of a dining experience. 


Interaction: The user will interact with the project by touching a fork that was connected to the heartbeat sensor. Because the project is set at a dinner table, in front of the user will be a place setting with objects like a fork, knife, plate etc. The project will not work unless the user is interacting with it and touching something on the setting like the plate. We want our project to incorporate the personal and emotional vulnerability that is eating dinner with someone, even a stranger. To share a heartbeat is one of the most personal things you can do, it can say a lot about you without speaking a word. Our project allows you to be with someone without them physically being there, it touches on the loneliness of the pandemic and eating alone, while trying to get used to getting back to a normal life. 

Background: We came up with this idea while thinking about how people can connect without talking. During covid and constant isolation, talking to one another was rare and exciting, but now that we are trying to once again get used to the normalcies of life it can be an awkward readjustment. We wanted the interaction to feel personal and communicative.


Interaction Dismantle ⭐️🌞🌷


https://www.creativeapplications.net/environment/a-studio-sun-system-with-light-artist-arnout-meijer-random-studio/

https://www.tangibleinteraction.com/artworks/exspheres

I chose these two particular projects because they contradict each other in a wonderful way. Both projects, “Experience Spheres” by Tangible and “A studio sun system with light by artist Arnout Meijer and Random Studio” focus on the idea of interaction using lights. 

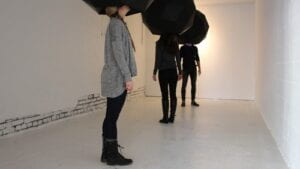
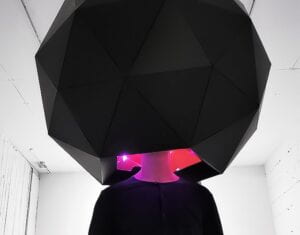
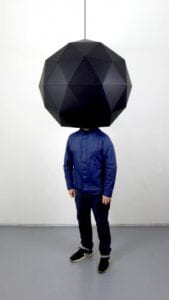
“Experience Spheres” by Tangible. This project puts people “inside” their own space, transporting them to a new world full of bright colors and geometric patterns. There are individual geometric domes hung from the ceiling with a space in the bottom. When a person puts their head inside the dome, a sound starts to play as well as a unique light show. The led lights inside range in color from shades of green, blue, red, orange, and more. The person gets to have control over their own experience as well as influence the other people in the room waiting for their turn. I like that this project allows people to truly have their own experience but in a unique setting. It is not often that you only experience art with your head. I think that the fabrication could slightly be enhanced or the watcher experience. I think that this element of interaction works really well with the project. Much like the weather, you can’t control what it does. This lighting system allows you control but there is also some randomness to it that I think is nice. 
 

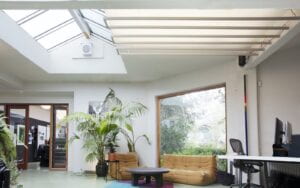
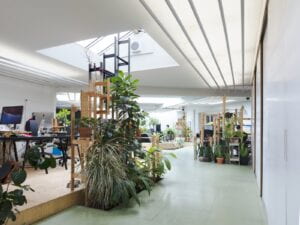
The next project that I chose was “A studio sun system with light by artist Arnout Meijer and Random Studio” This project is an indoor lighting installation that also focuses on the sun. The lighting mimics the moment of the sun throughout the day and the movement inside the workplace to create a more natural inside environment. The led lights interact with the natural light that already exists within the space and then copy it, making the inside feel like the outside. This creates a better environment for plants and greenery as well as productivity. Personally, I really enjoy working in an outdoor environment but it can get too hot or ruined by the elements, so having the ability to move the outside “in” is a wonderful idea. I really like this art project because it takes something that is already used every day like a lightbulb and then makes it better. I also like that it tries to turn an office into a nice place to be. I think the simplistic design is nice and works well with the meaning behind the project. 
Show: 

My show would be titled “turn the lights on.” I am imagining one room that has a nice chair, plants, and the lights that were used in the Random Studio. The other part of the show would be a darker space that had the experience spheres. My target audience is anyone who likes experiencing lights and colors with nature. 

Interactive Component: 

“A studio sun system with light by artist Arnout Meijer and Random Studio” 

  • The people inside the workspace can play around with the lighting inside the space to manipulate the lights as well as move around to cause changes in the light pattern. 
  • Even if it is bright outside people can block out the natural light causing the sun system to change
  • The lighting is also controlled by sound
    • By strategically placing speakers and sound devices around the space translating brightness of areas to loudness, following people where they go. 
  • Led brightness is affected by sound and outside lighting in the space 
  • Intangible Interaction 
    • The user does not have to consciously turn anything on 
    • The led lights will be affected by normal day to day activities such as talking, moving around, and closing curtains 
  • Implicit Interaction 
  • Slow 
    • Because the led lights mimic the sun and sound the actions are not instantaneous, they happen gradually throughout the day
  • Anyone can interact with this project because they may not even notice that they are affecting it 
  • It helps people who enjoy being outside but have to work inside all-day 
  • Can increase productivity because it feels sunnier and doesn’t have the harsh effect of bright LED lights 

“Experience Spheres” by Tangible 

  • The users initiate the project by sticking their head inside the hole at the bottom of the sphere.
  • They can manipulate their experience by placing their head at different heights or determining how much of the outside world they can hear/experience. 
  • Users are essentially a “switch” that turns on the led lights and initiates a sound to play. 
  • Tangible Interaction 
    • The user is the switch
    • Without the user sticking their head inside the lights and sound do not turn on. 
  • Explicit Interaction 
  • Instant 
    • The light instantly turns on when an object such as a head is detected
  • Shorter people have a harder time experiencing the sphere as a whole because they can only lookup. 
  • If someone is deaf or blind they can still experience the project, just not all its elements.  
Reverse Engineer: 

“A studio sun system with light by artist Arnout Meijer and Random Studio” 

  • “numerous inputs and outputs such as motion detection and wind, heat, and sound.”
  • the reactive lighting system consists of 1080 dimmable LEDs, in warm and cold white
  • DMX lights and Artnet combine
  •  “direct manual control, to color temperature and brightness changing with the time of day, localized brightness following the position of the sun, and pre-rendered animations driving the output. With speakers placed throughout the space, and control using the 4DSOUND system, lighting modes and spatial soundscapes can work in tandem for a more immersive experience.”
  • The sensors inside the lights detect certain things and react to them
    • Light sensor 
      • The brighter the space it is detecting the brighter the lights 
      • Or darker visa versa
    • Heat sensor 
    • Sound 
      • When the sound detected gets to a certain level the led light brightness is activated
    • Motion detector 
  • Led lights that can be dimmed 
  • The sensors are programmed to send a message to the led lights when they go off over a period of time 

“Experience Spheres” by Tangible 

  • There are multiple sensors placed throughout the sphere
  • Motion sensor
    • When they detect motion (the head) they send a signal to the lights and the sound telling them to turn on 
    • A simple switch that tells a lot of led lights to turn on 
    • The led lights are programmed to be random so they create a different experience for each user 
Project 1 – Mystery Controls

Pearl Marden, Emily Shen, Hazel

  1. Ideas:
  •  A p5 puzzle game that is connected to an arduino, when the user guesses it wrong or right something will pop out from the box.
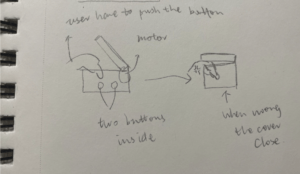
  • A box with the cover controlled by a motor, ideally with two buttons inside, one represents the right answer and the other one is wrong. When you push down the wrong one the box will close.
  • Have the user solve a ridder and answer by pushing a button the amount of times corresponding with the answer (a. – 1x, b. – 2x, c.-3x, etc.) 


The Riddle Chosen and Instructions: 

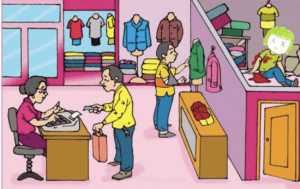
Based on the clues in the picture below, can you find the killer? 

(Press the button once answer A. twice for answer B., and so on)

After every wrong answer, reset the program by pushing the right button


A. Press 1: The girl, she killed herself

B. Press 2: The man with the pink bag

C. Press 3: The woman at the cashier 

D. Press 4: The man with the cast

2. Output : Servo Motor

  • If the user answers the riddle correctly and figures out who the murderer is, the servo motor will turn to reveal that the person in the riddle has been murdered. 
  • If they do not answer the riddle correctly, the servo motor will not move and the person will stay alive. 

3. Input: 2 buttons connected to arduino 

  • the user needs to push the button to answer the riddle (if they think the answer is a. – push the button 1 time, if they think the answer is b. – push the button 2 times , answer c. – push the button 3 times, answer d. – push the button four times) 
  • the second button is for clearing the counter on the arduino (after each try, the user needs to clear the counter by pushing the right button. After pushed they can retry the question) 

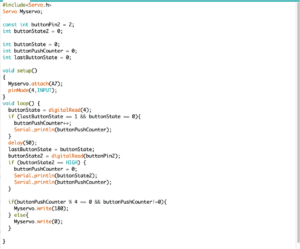
4. Programming the Arduino: 

5. Build an Enclosure 

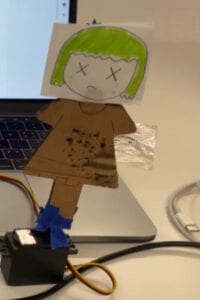
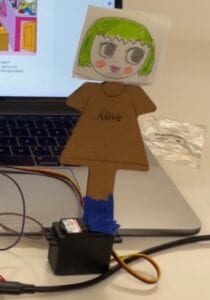
  • First we drew a person to put on top of the servo motor
    • using paper and markers we drew the head 
      • one head she is alive, the other one she is dead
    • using a laser cuter and cardboard we made a double sided dress for the girls head
      • one side she is alive 
      • one side she is dead


Progress Documentation: 


Progress Documentation Video  

Final Documentation: 

Final Documention Video

Week 1 Assignment – Observing & Analyzing Interactions

Pearl Marden & Marjorie Yang 

Brainstorm

Everyday Interactive Systems (brainstorm):

    • Class examples – automatic door, alarm clock
    • Objects: Coffee/espresso machine, electric kettle
    • Systems: NYU security swiping machine, 
    • Interpersonal interactions: grocery store cashier at checkout

Chosen Interactive System – Electric kettle

What did you observe?
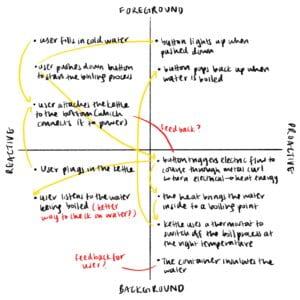
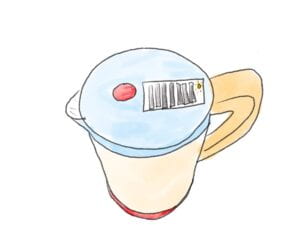
From the surface, this interactive system feels very simple – you fill in cold water, press a button, and you have boiled water in just a few minutes. However, the longer we observed this object, the further we understood the considerations that went behind designing this tool, noticing both the successes and failures. Examples include the small outward convex shape for pouring out the water, and the insulated materials used to cover the container and handle.

How does it work?
Plug in cord, press button on top to open lid, fill tap/filtered water below maximum level, close lid by pushing it back down, push down boil button from the side, wait for the button to pop back up, and pour out hot water!

What are common errors of the system, and how can you improve them?

  • The button on the top of the kettle can get stuck so the lid doesn’t open 
  • The button doesn’t always pop back up when the water is boiled 
  • You have to be watching the kettle to see when the water is boiled (can be improved by adding a sound notification when the water is boiled – or there can be different sound signals when the water is at different temperatures depending on how hot you want the water to be)

Implicit Reactions: 

Option 1: If you were to redesign it, how would you improve it?

  • Add different settings for the temperature of water – can be based on best temperatures for different drinks like tea
  • There is a thermometer on the outside of the kettle so the user can see how hot the water is and how close it is to being done (fahrenheit and celsius both included)
  • When the water has heated to the desired temperature the kettle not only stops, but a catchy jingle that plays so the user can tell when it is done without being by the kettle
  • Even after boiled, the kettle will keep the water warm by using small solar panel located on the top of the kettle.