Documentation
In your documentation post, please post your answers to the following questions, along with the other documentation for the circuit(s) that you built in class, and the diagram(s) you drew.
Question 1: What did you intend to assemble in the recitation exercise? If your sensor/actuator combination were to be used for pragmatic purposes, who would use it, why would they use it, and how could it be used?
Question 2: Code is often compared to following a recipe or tutorial. Why do you think that is?
Question 3: In Language of New Media, Manovich describes the influence of computers on new media. In what ways do you believe the computer influences our human behaviors?
You should cite any sources you referred to for your recitation exercise.
** You should embed your code into your blog instead of taking a screenshot of it. In order to do so, you can go to Edit > Copy as HTML in Arduino, and paste it in the Text view of your blog post editor.
Answer 1:
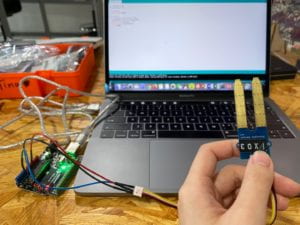
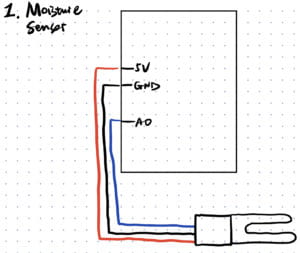
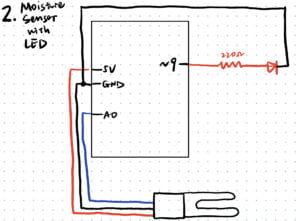
In this recitation exercise, my first and the most important intention was to get familiar with the usage of different types of sensors. Also, I tried to apply what I had learned in classes to add some other electronic elements to the original simple circuit. For example, the first sensor I tried was the moisture sensor, after directly connecting it to the Arduino with red, black, yellow wires connected to 5 voltages, GND, and A0 respectively, I added an LED to the original circuit. The LED was connected in another independent circuit together with the 220 ohms resistor to protect it. And instead of connecting the LED to the 5 voltages, I connected it to the digital pin 9, which can also read and write analog information, and set the pin as an output. Therefore, the LED’s brightness can be altered as the value of the moisture sensor changes.
If my sensor combination were to be used for pragmatic purposes, I suppose that the cosmetics industry may feel interested in that. To explain further, they can adapt this design to a more sophisticated one, which can sense the moisture level in a more detailed way and the related output can be a few pilot lamps, instead of the simple LED, to indicate and inform the customers of the skincare condition.
Answer 2:
Code is often compared to following a recipe or tutorial, and I very much agreed with that. First of all, code is a very crucial part of designing an interactive object. We write codes to let the computer know what we are going to ask the device to do. If we compare the codes to a recipe, then the various electronic elements are the ingredients for making a plate of delicacy and the final product can be regarded as the plate of delicacy that finally is displayed on the dinner table and wait for people to savor.
Answer 3:
As far as I am concerned, the most important and obvious influence that computers have towards us human behaviors is that it takes us more time to focus our work and attention on computers as well as save us a lot of time to deal with problems by replacing handwritten with typing and by helping us with complex calculating.
Below are my codes for the circuits that I have done in this week’s recitation:
- Moisture Sensor
int sensorPin = A0;

int sensorValue = 0;

void setup() {

    Serial.begin(9600);

}

void loop() {

    // read the value from the sensor:

    sensorValue = analogRead(sensorPin);

    Serial.print("Moisture = " );

    Serial.println(sensorValue);

    delay(1000);

}
Photo Documentation:
Video Documentation:
Circuit:
- Moisture Sensor with LED
int sensorPin = A0;

int sensorValue = 0;

int ledPin = 9;

void setup() {

    Serial.begin(9600);

    pinMode(9, OUTPUT);
}

void loop() {

    // read the value from the sensor:

    sensorValue = analogRead(sensorPin);

    Serial.print("Moisture = " );

    Serial.println(sensorValue);

    int mois = map(analogRead(A0), 0, 200, 0, 255);

    if (mois > 3000) {

      analogWrite(ledPin, mois);

  Serial.println(analogRead(A0));

    }

    else{

      digitalWrite(ledPin, LOW);

    }

    delay(10);

    }
Video Documentation:
Circuit:
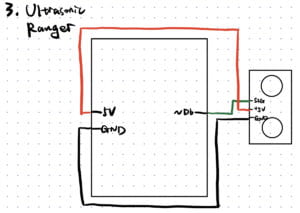
- Ultrasonic Ranger
const int pingPin = 6;

void setup() {

  Serial.begin(9600);

}

void loop() {

  long duration, inches, cm;

  pinMode(pingPin, OUTPUT);

  digitalWrite(pingPin, LOW);

  delayMicroseconds(2);

  digitalWrite(pingPin, HIGH);

  delayMicroseconds(5);

  digitalWrite(pingPin, LOW);

  pinMode(pingPin, INPUT);

  duration = pulseIn(pingPin, HIGH);

  inches = microsecondsToInches(duration);

  cm = microsecondsToCentimeters(duration);

  Serial.print(inches);

  Serial.print("in, ");

  Serial.print(cm);

  Serial.print("cm");

  Serial.println();

  delay(100);

}
Video Documentation:
Circuit:


great documentations Tina!