Circuit 1: Fade
The first step is to let the LED fade automatically and light up again through the Arduino Uno, and then repeat the cycle. I followed the circuit diagram to build the circuit, and found the sample in the software, successfully completed.
Circuit 2: toneMelody
In the second step, I need to add the buzzer to the circuit and let it make a piece of melody. After matching the circuit with the diagram, I opened the file to operate the code, and the buzzer sent out a short piece of melody “↑↓↓↑↓,↓↑”.
Circuit 3: Speed Game
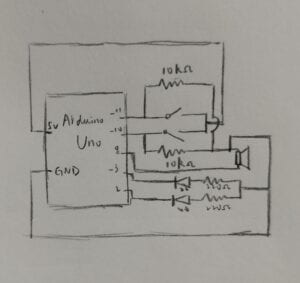
In the third step, we need to match the circuit. When I first saw such a complex circuit diagram, I was afraid of making mistakes because it would take a long time to check the circuit. We followed the circuit diagram step by step carefully. After completing the building, I ran the code and tried pressing one side of the button many times. Then the LED turned on. I tried again on the other side, and the circuit worked smoothly. Succeed!
Optional 1. Switch out the pushbuttons with the DIY paddles you soldered during the previous recitation.
We used the switch made by our own in the last class, and replaced the push-button switch. Having a match with the board-made-switches was more interactive and more interesting!
My own drawing of the schematic for circuit 3

Question 1: Propose another kind of creative button you could use in Circuit 3 to make the game more interactive. Read and use some material from the Physical Computing, Introduction Chapter (p. xvii – p. xxix) to explain why this button would make this game more interactive.
I think it will be cool if the button in circuit 3 can be a sound sensor. When a person claps his/her hands a time, the sound will be received by the sensor as an input and transform into a score. If either of the person reaches 10 scores, the light of his/her side will turn on as an output which means victory. The input part is not simple as clicking the button, it involves clapping, including both listening and thinking. Then it will transform the sound into electrical information in the processing part. The computer calculates and calculates the number of clapping from both sides. based on the changes it reads, when the number adds up to 10, the computer activates output—turn on the LED. The whole process includes listening, thinking and transduction, which makes it more interactive.
Question 2: Why did we use a 10 kOhm resistor with each push button?
The resistance of 10 kΩ is connected in the circuit, so that the circuit is in the connected state, but because the resistance is too large, the current becomes so small that the LED cannot glow. When the switch is closed, the current passes through the branch of switches with a small resistance value, the current becomes larger, and the LED shines up.
Question 3: In the book Getting Started with Arduino there is a clear description about the “Arduino Way” in chapter 2. Find a project that you find interesting that can be used as an example for these kind of projects. Cite it in adequate manner, include a picture, and explain the reasons that you chose it.
In the article, the author describes Arduino:“The Arduino philosophy is based on making designs rather than talking about them. It is a constant search for faster and more powerful ways to build better prototypes. We have explored many prototyping techniques and developed ways of thinking with our hands.”(5)
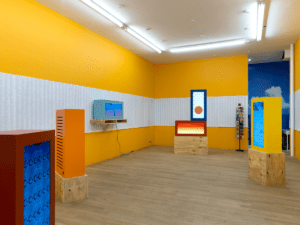
I found a project named Everything & More & More on the creative applications website that can be used as an example for the description.
“In MORE&MORE: “China, India, Japan, Mexico, Turkey, USA” (2016), six video sculptures of various shapes and colours are situated throughout the space, some placed upon wooden boxes that evoke shipping crates. The algorithmically generated visuals portray a looping combination of shipping motifs and abstract mosaics: cranes load and unload cargo, ships cross bodies of water and trucks transport to and from ports day and night in all manners of good and bad weather. In one video, oil droplets stretch down the screen.”(Marina Zurkow and Rachel Rose. (2016, March 14).
Everything & More & More – Marina Zurkow and Rachel Rose. Creative Applications.
https://www.creativeapplications.net/events/everything-more-more-marina-zurkow-and-rachel-rose/ )
Like what the author said in the article, the project used simple things—wooden boxes that evoke shipping crates, 3D powder, plaster…combined with interactive design to express the idea of the show. The old stuff was tinkered, reduced, patched to make them do something new, to endow them with new meanings. They might be junk before, but after scratching and redesigning, they were exhibits with new ideas, which was in the description of the “Arduino Way”.
