CONTEXT AND SIGNIFICANCE:
The Group Project that I worked on helped me to reflect on dynamic of how a team should work. I believe that it’s easier to work with one partner than with multiple partners due to creative differences. During the Group Project, there was a disagreement between practicality and interaction. We had to question whether adding additional interaction is necessary if it isn’t practical. Additionally, another point that I realized due to my Group Project is that it didn’t meet my definition of interaction. I define interaction as a continuous reaction by an object or project that changes depending on the way the user interacts with the project. Sol by Jelle Reith which depicts the pathway of the sun depending on the azimuth and elevation of the sun is an example that matches my definition of interaction. Due to the experience in the Group Project, I wanted to make sure that the Midterm Project did meet my definition of interaction. The significance of my project is that it interacts with the users biology, and continuously provides feedback to it. It’s a way of visualizing the human biology (or more specifically a person’s heartbeat). The project is based on technology that already exists and used frequently in the medical field, but we wanted to use the technology without relating it with medicine. In the end, we decided it to use the technology of a way to revealing a person’s true feelings since the heartbeat of a person can signify their mental state as well. Our project is intended for those who are interested in visualizing their heartbeat and revealing their feelings to others since that’s what our project does.
CONCEPTION AND DESIGN:
The original concept of our project was going to include a heartbeat sensor and a temperature sensor. The heartbeat sensor would be connected to LEDs so that the LEDs would flash with the beat of the heartbeat. The temperature sensor would be on top of the project and connected to a motor which would rotate the project depending on the temperature of the user.
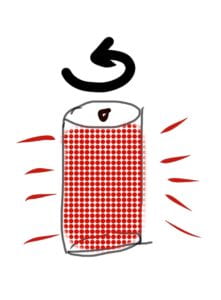
However, we found out that the temperature sensor that we wanted to use was not available so we had to remove the idea of using the temperature sensor. Instead we concentrated on making the LEDs more interactive with the heartbeat of the user since the main interaction would be with the heartbeat. We also planned on having the LED lights show the beats per minute of the user, but we later decided not to do it because we didn’t want it to related to the medical field. Instead we used the beats per minute as a way to measure how fast their heart is beating, which would be displayed through the color of the LED. Also, since we didn’t have a motor anymore, we placed the Neopixel LED matrix on a plane instead of curving it around a surface. The form of our project was similar to a computer. It consisted of a screen and a button which would turn on the display. This form was a natural design decision that we came up with. The material we used was cardboard since cardboard is sturdy and easy to use. We used the Neopixel LED matrix since it was the largest LED matrix in the equipment room, and the bigger the LED matrix, the more interaction we can display with the LEDs. Other options we had were LED strip and smaller LED matrixes.
FABRICATION AND PRODUCTION:
The production process can be divided to two parts: the coding and the physical construction. I contributed in the coding part while my amazing partner Jessie contributed in the physical construction. For the coding part, we first tested to make sure the heartbeat sensor worked with a basic LED since the output of the sensor is a digital signal.
After figuring that out, we wanted to measure the beats per minute. To implement this, we used the millis() function, and determined the time between two heart beat signals, and then used math to determine how many beats would be in one minute if each beat was as long as the time between two beats. Next, to use the Neopixel, we first used the FastLED library. At the beginning it seemed feasible to use FastLED library but after realizing that the FastLED library determines the LED location as an a zigzag pattern, we realized it would be difficult to turn on multiple LEDs.
We had to look for a different library instead which would allow me to turn on multiple LEDs through a coordinate system. The Adafruit Neopixel package allowed us to do this. I found code that created basic patterns and adapted it to create a heart instead. Then using for loops and multiple patterns, the heart would move with each beat and it would repeat as long as a signal from the heartbeat monitor was inputted.
Next, we wanted to implement color change of the hearts. At first it was just preset colors but later we decided to change the color of the hearts depending on the speed of the heartbeat. We used the map() function to map the range of a person’s heartbeat to 0 – 255 which is the range of color of the Neopixel. If the heartbeat is fast, the color of the hearts become more red and if it’s slower then the color becomes more blue. Lastly, we connected a button to turn on the display. After the User Testing, we got suggested to add another way of getting feedback from the heartbeat, so we implemented a buzzer which buzzes whenever a signal is received from the heartbeat sensor.
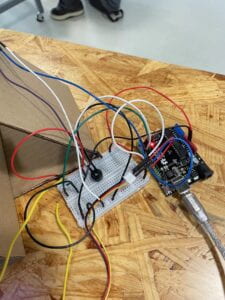
After all the changes, the following is the final code:
#include <Adafruit_NeoPixel.h>
#include <Adafruit_GFX.h>
#include <Adafruit_NeoMatrix.h>
// Melody was adapted through the inbuilt example
#include "pitches.h"


#define FACTORYRESET_ENABLE     1
#define PIN                     6

int melody[] = {
  NOTE_C4
};

int noteDurations[] = {
  4
};

int pushButton = 2;
int pushButton2 = 9;
int previousState = LOW;
int heartCount = 1;
int c;
long startTime;
float endTime;
float heartRate;
bool test;
bool turnOn = false;

// Adafruit Neopixel used to display patters was based from this GitHub file:
// https://github.com/adafruit/Adafruit_Learning_System_Guides/blob/main/Bluetooth_NeoMatrix_Snowflake/basic/basic.ino
Adafruit_NeoMatrix matrix = Adafruit_NeoMatrix(32, 8, PIN,
  NEO_MATRIX_TOP     + NEO_MATRIX_LEFT +
  NEO_MATRIX_COLUMNS + NEO_MATRIX_ZIGZAG,
  NEO_GRB            + NEO_KHZ800);

// the setup function runs once when you press reset or power the board
void setup() {
  // initialize digital pin LED_BUILTIN as an output.
  pinMode(3, OUTPUT);
  pinMode(pushButton2, INPUT);
  Serial.begin(9600);
  pinMode(pushButton, INPUT);

  matrix.begin();
  matrix.setBrightness(100);

  matrix.fillScreen(0);
  matrix.show(); // This sends the updated pixel colors to the hardware.

}


// the loop function runs over and over again forever
void loop() {
  int pushButtonState = digitalRead(pushButton2);

  int buttonState = digitalRead(pushButton);


  if (pushButtonState == HIGH) {
    turnOn = true;
    }


  if (previousState != buttonState && turnOn == HIGH) {

    digitalWrite(3, buttonState);
    previousState = buttonState;

    if (buttonState == HIGH && test != true) {
      for (int thisNote = 0; thisNote < 1; thisNote++) {

    // to calculate the note duration, take one second divided by the note type.
    //e.g. quarter note = 1000 / 4, eighth note = 1000/8, etc.
    int noteDuration = 1000 / noteDurations[thisNote];
    tone(8, melody[thisNote], noteDuration);

    // to distinguish the notes, set a minimum time between them.
    // the note's duration + 30% seems to work well:
    int pauseBetweenNotes = noteDuration * 0.40;
    delay(pauseBetweenNotes);
    // stop the tone playing:
    noTone(8);
  }
      c = map(heartRate, 60, 130, 0, 255);
      if (heartCount == 1) {
        matrix.fillScreen(0);
        Heart1(matrix.Color(c, 0, 255-c));
        matrix.show();
        heartCount++;
      }
      else if (heartCount == 3) {
        matrix.fillScreen(0);
        Heart3(matrix.Color(c, 0, 255-c));
        heartCount++;
      }
      else if (heartCount == 5) {
        matrix.fillScreen(0);
        Heart5(matrix.Color(c, 0, 255-c));
        heartCount++;
      }
      else if (heartCount == 7) {
        matrix.fillScreen(0);
        Heart7(matrix.Color(c, 0, 255-c));
        heartCount = 1;
      }
      else if (heartCount == 2) {
          matrix.fillScreen(0);
          Heart2(matrix.Color(c, 0, 255-c));
          heartCount++;
        }
        else if (heartCount == 4) {
          matrix.fillScreen(0);
          Heart4(matrix.Color(c, 0, 255-c));
          heartCount++;
        }
        else if (heartCount == 6) {
          matrix.fillScreen(0);
          Heart6(matrix.Color(c, 0, 255-c));
          heartCount++;
        }
      matrix.show(); // This sends the updated pixel colors to the hardware.
      startTime = millis();
      test = true;

    }

    else if (buttonState == HIGH && test == true) {
      for (int thisNote = 0; thisNote < 1; thisNote++) {

    // to calculate the note duration, take one second divided by the note type.
    //e.g. quarter note = 1000 / 4, eighth note = 1000/8, etc.
    int noteDuration = 1000 / noteDurations[thisNote];
    tone(8, melody[thisNote], noteDuration);

    // to distinguish the notes, set a minimum time between them.
    // the note's duration + 30% seems to work well:
    int pauseBetweenNotes = noteDuration * 0.40;
    delay(pauseBetweenNotes);
    // stop the tone playing:
    noTone(8);
  }
        endTime = millis() - startTime;
        heartRate = (1/endTime)*60000;
        Serial.println(heartRate, 0);
        if (heartCount == 1) {
          matrix.fillScreen(0);
          Heart1(matrix.Color(c, 0, 255-c));
          heartCount++;
        }
        else if (heartCount == 2) {
          matrix.fillScreen(0);
          Heart2(matrix.Color(c, 0, 255-c));
          heartCount++;
        }
        else if (heartCount == 4) {
          matrix.fillScreen(0);
          Heart4(matrix.Color(c, 0, 255-c));
          heartCount++;
        }
        else if (heartCount == 6) {
          matrix.fillScreen(0);
          Heart6(matrix.Color(c, 0, 255-c));
          heartCount++;
        }
        else if (heartCount == 3) {
        matrix.fillScreen(0);
        Heart3(matrix.Color(c, 0, 255-c));
        heartCount++;
      }
      else if (heartCount == 5) {
        matrix.fillScreen(0);
        Heart5(matrix.Color(c, 0, 255-c));
        heartCount++;
      }
      else if (heartCount == 7) {
        matrix.fillScreen(0);
        Heart7(matrix.Color(c, 0, 255-c));
        heartCount = 1;
      }
        matrix.show(); // This sends the updated pixel colors to the hardware.

        test = false;
    }

    }

}

void Heart1(uint32_t c){
  matrix.drawLine(1, 1, 2, 1, c); // x0, y0, x1, y1, color
  matrix.drawLine(5, 1, 6, 1, c); // x0, y0, x1, y1, color
  matrix.drawLine(0, 2, 7, 2, c); // x0, y0, x1, y1, color
  matrix.drawLine(0, 3, 7, 3, c); // x, y, color
  matrix.drawLine(1, 4, 6, 4, c); // x0, y0, width, height
  matrix.drawLine(2, 5, 5, 5, c); // x0, y0, x1, y1, color
  matrix.drawLine(3, 6, 4, 6, c); // x0, y0, x1, y1, color
}

void Heart2(uint32_t c){
  matrix.drawLine(5, 1, 6, 1, c); // x0, y0, x1, y1, color
  matrix.drawLine(9, 1, 10, 1, c); // x0, y0, x1, y1, color
  matrix.drawLine(4, 2, 11, 2, c); // x0, y0, x1, y1, color
  matrix.drawLine(4, 3, 11, 3, c); // x, y, color
  matrix.drawLine(5, 4, 10, 4, c); // x0, y0, width, height
  matrix.drawLine(6, 5, 9, 5, c); // x0, y0, x1, y1, color
  matrix.drawLine(7, 6, 8, 6, c); // x0, y0, x1, y1, color
}

void Heart3(uint32_t c){
  matrix.drawLine(9, 1, 10, 1, c); // x0, y0, x1, y1, color
  matrix.drawLine(13, 1, 14, 1, c); // x0, y0, x1, y1, color
  matrix.drawLine(8, 2, 15, 2, c); // x0, y0, x1, y1, color
  matrix.drawLine(8, 3, 15, 3, c); // x, y, color
  matrix.drawLine(9, 4, 14, 4, c); // x0, y0, width, height
  matrix.drawLine(10, 5, 13, 5, c); // x0, y0, x1, y1, color
  matrix.drawLine(11, 6, 12, 6, c); // x0, y0, x1, y1, color
}

void Heart4(uint32_t c){
  matrix.drawLine(13, 1, 14, 1, c); // x0, y0, x1, y1, color
  matrix.drawLine(17, 1, 18, 1, c); // x0, y0, x1, y1, color
  matrix.drawLine(12, 2, 19, 2, c); // x0, y0, x1, y1, color
  matrix.drawLine(12, 3, 19, 3, c); // x, y, color
  matrix.drawLine(13, 4, 18, 4, c); // x0, y0, width, height
  matrix.drawLine(14, 5, 17, 5, c); // x0, y0, x1, y1, color
  matrix.drawLine(15, 6, 16, 6, c); // x0, y0, x1, y1, color
}

void Heart5(uint32_t c){
  matrix.drawLine(17, 1, 18, 1, c); // x0, y0, x1, y1, color
  matrix.drawLine(21, 1, 22, 1, c); // x0, y0, x1, y1, color
  matrix.drawLine(16, 2, 23, 2, c); // x0, y0, x1, y1, color
  matrix.drawLine(16, 3, 23, 3, c); // x, y, color
  matrix.drawLine(17, 4, 22, 4, c); // x0, y0, width, height
  matrix.drawLine(18, 5, 21, 5, c); // x0, y0, x1, y1, color
  matrix.drawLine(19, 6, 20, 6, c); // x0, y0, x1, y1, color
}

void Heart6(uint32_t c){
  matrix.drawLine(21, 1, 22, 1, c); // x0, y0, x1, y1, color
  matrix.drawLine(25, 1, 26, 1, c); // x0, y0, x1, y1, color
  matrix.drawLine(20, 2, 27, 2, c); // x0, y0, x1, y1, color
  matrix.drawLine(20, 3, 27, 3, c); // x, y, color
  matrix.drawLine(21, 4, 26, 4, c); // x0, y0, width, height
  matrix.drawLine(22, 5, 25, 5, c); // x0, y0, x1, y1, color
  matrix.drawLine(23, 6, 24, 6, c); // x0, y0, x1, y1, color
}

void Heart7(uint32_t c){
  matrix.drawLine(25, 1, 26, 1, c); // x0, y0, x1, y1, color
  matrix.drawLine(29, 1, 30, 1, c); // x0, y0, x1, y1, color
  matrix.drawLine(24, 2, 31, 2, c); // x0, y0, x1, y1, color
  matrix.drawLine(24, 3, 31, 3, c); // x, y, color
  matrix.drawLine(25, 4, 30, 4, c); // x0, y0, width, height
  matrix.drawLine(26, 5, 29, 5, c); // x0, y0, x1, y1, color
  matrix.drawLine(27, 6, 28, 6, c); // x0, y0, x1, y1, color
}
For the physical fabrication of the project, we created the body, button and display of the project using cardboard and hot glue. The button was inspired by the paddle project, thus it uses metal wires that produce a signal when the ends of the wire connect.
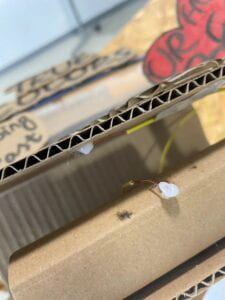
Also, Jessie came up with creating a hand so that users know to put their hand on it and a sign that says “Push to See” so they push the button to start the display. The design came out as this:
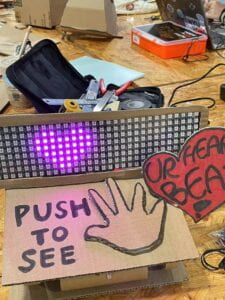
One of the feedbacks that we received during the user testing was that users didn’t understand what the color of the heart would do. Thus, during our revision we added a sign showing what the colors would represent. We also added the title of our project as well. This is what the final project looked like:
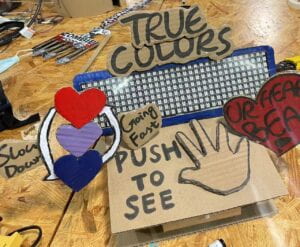
During the User Testing Session, we did get suggestions about adding a goal to the project, like having the user try to increase their heartbeat with exercise. But we decided against it because the heartbeat sensor is very sensitive to movement, which messes up the color of the heartbeat. Instead we changed the concept to showing a person’s true feelings (or true colors) instead. Jessie and I worked very well as a team. I really liked working with her because she was very enthusiastic and creative in approaching the project.
CONCLUSIONS:
The main goal of our project was to aid in visualizing a part of the human biology to the user. We did accomplish that goal at the end, even though we did change the overall concept of the project. Our project aligned with my definition of interaction because the project continuously reactions with the user’s heartbeat, and it can reacts according to the changes within the user’s heartbeat. Ultimately, the audience interacted with our project as planned.
However, if I had more time I’d really like to include other parts of human biology in the project as well. I’d also like to improve the way the button worked since I wanted the button to be able to turn off the display as well, but I didn’t have enough time to work on it. I’ve learned that it’s important to keep my options open and try new things instead of trying really hard to make something work since I wasted a lot of time trying to use the FastLED library to make the Neopixel Matrix work. Also, I think it would be important to make more sketches of the physical fabrication since I was mostly thinking about how the code would work. From my accomplishments, I learned a lot about how the Arduino works and how LED matrixes work. It was also interesting to see what others online came up with using the LED matrix. Through my experience working on this project, I’ve realized the potential of bringing two completely different pieces of technology together to create something that has a different usage. Using a heartbeat sensor and LED display can be used to create interactions with the heart which aren’t common in our daily life. Experimentation with the interaction between two different has a lot of potential and can cause uses that haven’t been though of before.
ANNEX:
Someone else’s code displayed on the Neopixel: