Categories
interaction lab recitations

Media Controller

During this recitation I did not encounter any issues with setting up the potentiometer that would control the intensity of the tint applied to the video. This took me about 30 minutes. After that, I was struggling with the button that would not work correctly. When I sought help, it turned out that nothing was wrong with my code, it was just some unknown malfunction. This issue remained unresolved…

The video of button malfunction:

The video of working potentiometer:

The Processing Code:

import processing.serial.*;
import osteele.processing.SerialRecord.*;
import processing.video.*;
Movie myMovie;


Serial serialPort;
SerialRecord serialRecord;

boolean buttonWasPressed = false;

void setup() {
  size(512, 288);
  myMovie = new Movie(this, "Jing'An.mp4"); 
  myMovie.loop();

  size(500, 500);

  String serialPortName = SerialUtils.findArduinoPort();
  serialPort = new Serial(this, serialPortName, 9600);

  // If the Arduino sketch sends a different number of values, modify the number
  // `2` on the next line to match the number of values that it sends.
  serialRecord = new SerialRecord(this, serialPort, 2);
  background(0);

}

void draw() {
  if (myMovie.available()) {
        myMovie.read();
  }

  serialRecord.read();
  int potentiometerValue = serialRecord.values[0];
  int buttonState = serialRecord.values[1];
  
  println(buttonState);
  
  if (potentiometerValue == 1023){
    filter(INVERT);
    image(myMovie, 0, 0);
  }
  else{
  float filterValue = map(potentiometerValue, 0, 1023, 0, 255);
  tint(filterValue, 0,0);
  image(myMovie, 0, 0);
  //if (buttonState == 1){
  //  tint(filterValue, 0, 0);
  //  image(myMovie, 0, 0);
  //  buttonWasPressed = true;
  //} else if (buttonState == 0 && buttonWasPressed == false){
  //  fill(255);
  //  rect(0, 0, width, height);
  //}
  }
}

The Arduino Code (just SendMultipleValues code with corrections):

#include "SerialRecord.h"

// Change this number to send a different number of values
SerialRecord writer(2);
int BUTTON_PIN = 9;

void setup() {
  Serial.begin(9600);
  pinMode(BUTTON_PIN, INPUT);
}

void loop() {
  int potentiometerValue = analogRead(A0);
  writer[0] = potentiometerValue;
  writer[1] = digitalRead(BUTTON_PIN);
  // if (digitalRead(BUTTON_PIN) == HIGH){
  //   writer[1] = 2;
  // }
  // else {
  //   writer[1] = 1;
  // }
  writer.send();

  // This delay slows down the loop, so that it runs less frequently. This can
  // make it easier to debug the sketch, because new values are printed at a
  // slower rate.
}

The rest of the recitation (like 15 min) I ended up just working on my final project. 

Categories
interaction lab recitations

Digital Fabrication

step 1.1: stand design

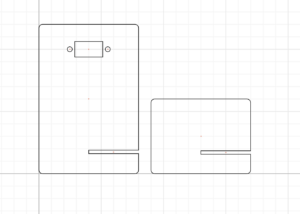
I was the partner “A” and it took me about 15-20 minutes to get all the parameters right. I did not encounter any particular issues as the instruction was fairly clear. The most confusing thing were the little circles that were meant to later hold the servo inside (like the distance from the rectangle). At first, I didn’t realize that the GIF in the instructions showed how to do it, so it took me a little longer.

My parter got her part done even faster:) so we decided to merge the design and.. well, it went good. 

I was very confused why the gaps on the left down side of the parts were not on the same y-axis and checked the measurements like a 100 times. I sought for help and one of the fellows reassured me that it is alright. It indeed turned out to be alright (as I later saw how this benefited the stand). But yeah, this part went fairly quick. 
step 1.2

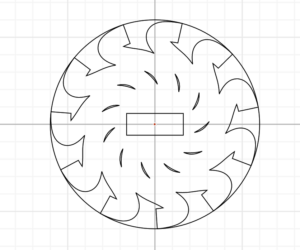
as we started to create our pattern design, in about 5 minutes, the first group of people were invited to go to FabLab. So, we decided to finish up really quick and go. I didn’t get a chance to look at my partner’s design because of that. unfortunately, she somewhat misunderstood the way the laser cutting works and created the design that would basically fall apart in a lot of pieces straightaway. 

It looked like this:

so when we went to FabLab we were unable to laser cut it from this, hence we came back and we quickly changed the design by deleting some outlines and thickening the others.

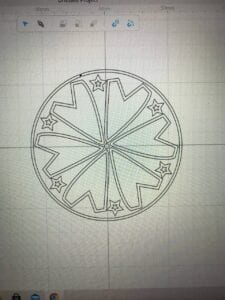
My design looked like this:

step 2: Laser cut

when we returned, everything worked great! absolutely no issues occurred here!

step 3: assemble

here as well, we assembled the thing pretty quickly, making it in time by the end of the recitation! we did not need the screws to make it work. you can see it running on the sweep example down below:

it was definitely a great experience and the fact that we were able to create something this cool so fast is fascinating! 

Categories
interaction lab recitations

Serial Communication

task #1 

So, I didn’t have much issues with completing the first task as it was mostly just using two codes and putting them together. (just mapping the numbers I get from the potentiometers with the width/height of the screen and then these were the coordinates of a position of a circle)

and then I had to just manipulate code so that i will have global variables that store previous position (x1 and y1) and create a line with the current coordinates (x0 and y0). both of them update every loop.

the Processing code is the following:

import processing.serial.*;
import osteele.processing.SerialRecord.*;
Serial serialPort;
SerialRecord serialRecord;
float x2 = 0;
float y2 = 0;
void setup() {
  size(500, 500);
  String serialPortName = SerialUtils.findArduinoPort();
  serialPort = new Serial(this, serialPortName, 9600);
  // If the Arduino sketch sends a different number of values, modify the number
  // `2` on the next line to match the number of values that it sends.
  serialRecord = new SerialRecord(this, serialPort, 2);
  background(0);
}
void draw() {
  serialRecord.read();
  int value1 = serialRecord.values[0];
  int value2 = serialRecord.values[1];
  float x1 = map(value1, 0, 1023, 0, width);
  float y1 = map(value2, 0, 1023, 0, height);
  stroke(255);
  line(x2, y2, x1, y1);
  x2 = x1;
  y2 = y1;
}

for the Arduino it was “SendMultipleValues” example. 

task#2 

for the second task I had to play around with the code a bit. I decided not to send two variables from processing but to send only 1 that would say wether the ball reached the right side or the left side (otherwise it would not send anything). And then based on that the Arduino would activate the right servo. 

I had issues with it at first as apparently Processing doesn’t like “-1” as a number to send. and “0”. so i had to change those for “1” and “2” eventually (professor told me that feature of Processing). it also doesn’t like delay() function.

I didn’t do the FullScreen() thing, but I don’t think that it would be a problem as I would only need to change one thing. (add the fullscreen())

anyway, after I fixed that, everything was fine and the thing worked perfectly:

Arduino code:

#include "SerialRecord.h"
#include <Servo.h>

// Change this number to the number of values you want to receive
SerialRecord reader(1);
Servo myservo;
Servo myservo2;
int pos = 0;


void setup() {
  Serial.begin(9600);
  myservo.attach(9);
  myservo2.attach(10);
}

void loop() {
  if (reader.read()) {
    if (reader[0] == 2) {
      myservo.write(180);
      delay(100);
      myservo.write(0);
    } else if (reader[0] == 1) {
      myservo2.write(180);
      delay(100);
      myservo2.write(0);
    }
  }
  //delay(20);
}

Processing code:

import processing.serial.*;
import osteele.processing.SerialRecord.*;
float acceleration = 5;
float ballsize = 30;
float y = height/2;
float x = width/2;
int where = 0;

Serial serialPort;
SerialRecord serialRecord;

void setup() {
  size(1000, 600);

  String serialPortName = SerialUtils.findArduinoPort();
  serialPort = new Serial(this, serialPortName, 9600);

  // In order to send a different number of values, modify the number `2` on the
  // next line to the number values to send. In this case, the corresponding
  // number in the Arduino sketch should be modified as well.
  serialRecord = new SerialRecord(this, serialPort, 1);
}

void draw() {
  background(0);
  circle(x, height/2, ballsize);
  if (x + ballsize/2 > width) {
    acceleration *= -1;
    where = 1;
  } else if (x - ballsize/2 < 0) {
    acceleration *= -1;
    where = 2;
  } else {
    where = 0;
  }

  x+= acceleration;
  if (where != 0) {
    serialRecord.values[0] = where;
    serialRecord.send();
    println(where);
  }
}


Categories
interaction lab recitations

Neopixel Music Visualization

I had already installed all the libraries before the lesson, so I started right with the work. 

From the beginning, I had struggles with sounds (with playing the sounds). 

Spent wayyy to much time on that. However when I figured that out, the initial sketches (code provided in the recitation webpage) worked:

then, for some reason it stopped working again, so I decided to continue my work during the weekend.

on Saturday, I continued and manipulated some code to link the colors of the LED to the volume:

and then also added some code so that the number of LED that lights up also depend on the volume level:

then, I started working on the visualization, however the LED stopped lighting up. I tried uploading solely Arduino code (just trying to light up LEDs all red), however they still did not work. The code I have now is displayed below:

P.S. I will try to run it again on some other day or will replace the LED strip on Monday. 

import processing.serial.*;
import processing.sound.*;
import osteele.processing.SerialRecord.*;


Serial serialPort;
SerialRecord serialRecord;
SoundFile sample;
Amplitude analysis;

int W;    //width of the tiles
int NUM = 60;  //amount of pixels
int[] r = new int[NUM]; //red of each tile
int[] g = new int[NUM]; //red of each tile
int[] b = new int[NUM]; //red of each tile


void setup() {
  String serialPortName = SerialUtils.findArduinoPort();
  serialPort = new Serial(this, serialPortName, 9600);
  serialRecord = new SerialRecord(this, serialPort, 4);
  serialRecord.logToCanvas(false);
  size(640, 480);

  // load and play a sound file in a loop
  sample = new SoundFile(this, "finalTamacun.wav");
  sample.loop();

  // create the Amplitude analysis object
  analysis = new Amplitude(this);
  // analyze the playing sound file
  analysis.input(sample);
}

void draw() {
  //long t = millis();
  println(analysis.analyze());
  noStroke();
  background(255);

  // analyze the audio for its volume level
  float volume = analysis.analyze();


  //if (floor(t/1000) % 2 == 0) {
  //  background(255, 0, 0);
  //  fill(0);
  //  println(t);
  //} else {
  //  fill(255, 0, 0);
  //}
  //float diameter = map(volume, 0, 1, 0, width);

  //ellipse(width/2, height/2, diameter, diameter);
  float numberOfLedFromVolume = int(floor(map(volume, 0, 1, 0, 60)));

  for (int i=0; i< NUM; i++) {
    float volumeToColor1 = map(volume, 0, 1, 150, 255);
    float volumeToColor2 = map(volume, 0, 1, 50, 150);
    float volumeToColor3 = map(volume, 0, 1, 0, 50);
    if (i < numberOfLedFromVolume) {
      r[i] = floor(volumeToColor1);
      g[i] = floor(volumeToColor2);
      b[i] = floor(volumeToColor3);
      serialRecord.values[0] = i;
      serialRecord.values[1] = r[i];
      serialRecord.values[2] = g[i];
      serialRecord.values[3] = b[i];
    } else {
      serialRecord.values[0] = i;
      serialRecord.values[1] = 0;
      serialRecord.values[2] = 0;
      serialRecord.values[3] = 0;
      serialRecord.send();
    }
    serialRecord.send();
  }
}
Categories
interaction lab recitations

Animating an Interactive Poster

My poster is kind of like a game. It has an interactive “eye” that I spent the most time on coding. Also there are rectangles of different sizes and text. 

Some cool features: the color of the background changes depending on in how much frames (rectangle) the cursor is inside (basically how far from the center the cursor is); The color of the eye gradually changes as well. If you press “a” or “A” button, the poster resets.

This is the video of how it works:

this is the code:

String s1 = "IMA Fall 22 ";
String s5 = "End-Of-Semester";
String s6 = "Show";
String s2 = "Location: 8th floor";
String s3 = "Friday December 16";
String s4 = "6-8PM";
float angle = 0.0;
Eye e1;
float count = 0;
boolean state = false;

void setup() {
  size(1024, 768);
  background(255);
  e1 = new Eye(width/2, height - 120, 120);
}

void draw() {
  for (int i = 0; i < 1024/3 + 40; i+= 20) {
    if (count < 19) {
      rectangle(width, height, i);
    } else {
      background(255, 0, 255);
      displayText();
      if (keyPressed) {
        if (key == 'a' || key == 'A') {
          count = 0;
        }
      }
    }
  }
  stroke(0);
  e1.update(mouseX, mouseY);
  e1.display(state);
}

void rectangle(float x, float y, float i) {
  if (dist(mouseX, mouseY, x/2, y/2) < i) {
    stroke(255, 0, 255);
    count++;
  } else {
    stroke(255);
    count = 0;
  }
  strokeWeight(4);
  rect(i, i, x - i*2, y - i*2);
}

void displayText() {

  fill(255, 255, 0);
  textSize(60);
  //ima fall 22
  text(s1, width/23, 120);
  textSize(100);
  //end-of-semester
  fill(255);
  text(s5, width/26, 260);
  //show
  text(s6, width/26, 340);
  textSize(50);

  fill(255, 255, 0);
  //location
  text(s2, width/26, 440);
  fill(0, 255, 255);
  text(s3, width/26, 500);
  text(s4, width/26, 560);
  fill(255);
  text("Press 'A' to reset", width/26, 620);
}

class Eye {
  int x, y;
  int size;
  float angle = 0.0;

  Eye(int tx, int ty, int ts) {
    x = tx;
    y = ty;
    size = ts;
  }

  void update(int mx, int my) {
    angle = atan2(my-y, mx-x);
  }

  void display(boolean state) {
    pushMatrix();
    translate(x, y);
    fill(255);
    ellipse(0, 0, size, size);
    rotate(angle);
    if (state == false) {
      fill(count*10, 0, count * 10);
    } else {
      fill (255, 0, 255);
    }
    ellipse(size/4, 0, size/2, size/2);
    popMatrix();
  }
}

The format is not ideal, but thats the best one I found. 


Homework

For homework, I decided to experiment with triangles. Just in case it won’t count for complex shapes, I will first introduce arrows as evidence that I am capable of working with “complex shapes”:

float ballY = 0;
float ballX = mouseX;
float ballSpeed = 0;
float count = 0;

void setup(){
  size(600, 600);

}

void draw(){
  background(0);
  
  fill(255);
  noStroke();
  for (int i = 20; i < width; i+=50){
    for (int k = 20; k < height; k+=50){
      arrowRandom(i, k, random(10, 30), random(10, 30));
    }
  }
  delay(100);
}

void arrowRandom(float x, float y, float lengthArrow, float sizeArrow){
  fill(x-75, y-75, 255);
  triangle(x - sizeArrow, y, x, y-sizeArrow, x + sizeArrow, y);
  rect(x-sizeArrow/2, y, sizeArrow, lengthArrow);
}

Here I have random sizing of the arrows, way more than 100 of them. 


Moving forward to my triangle experimentation that I was doing further. 

Here, I have started from the same thing as the task wanted, however went wayy further with it. 

Here I have different colors for each positioned triangle and the position is chosen randomly, as well as the size of the triangles. 

code for this:

float type = 0;
int size = 0;

void setup() {
  size(1000, 800);
}

void draw() {
  background(0);
  size = int(random(10, 200));
  for (int i = size; i <= width-size; i += size) {
    for (int j = size; j <= height-size; j += size) {
      type = int(random(1, 5));
      trianglePatternDisplay(i, j, type);
    }
  }
}

void trianglePatternDisplay(int i, int j, float type) {
  if (type == 1) {
    fill(255, 0, 255);
    noStroke();
    triangle(i-size/2, j - size/2, i -size/2, j + size/2, i + size/2, j + size/2);
  } else if (type == 2) {
    fill(255, 0, 0);
    noStroke();
    triangle(i-size/2, j -size/2, i + size/2, j - size/2, i + size/2, j + size/2);
  } else if (type == 3) {
    fill(255, 255, 0);
    noStroke();
    triangle(i - size/2, j +size/2, i + size/2, j +size/2, i + size/2, j - size/2);
  } else {
    fill(0, 255, 255);
    noStroke();
    triangle(i-size/2, j-size/2, i+size/2, j-size/2, i-size/2, j +size/2);
  }
}

and then, as I needed to make it more interactive, I decided that I will create 4 pallets that are going to be controlled by the user. It looks like that (I included the instruction on the setup):

*in the video I pressed ‘1’ one time, ‘2’ two times, ‘3’ three times and ‘4’ four times. 

the code:

float type = 0;
int size = 0;
boolean state = false;

void setup() {
  size(1000, 800);
}

void draw() {
  if (state == false) {
    background(0);
    textSize(50);
    fill(255, 255, 0);
    text("Press '1' or '2' or '3' or '4'", 50, height/2-100);
    text("to start the pattern", 50, height/2);
    fill(255);
    textSize(30);
    text("hint: each number represents a color palette", 50, height/2 + 200);
  }
  if (keyPressed && (key == '1' || key == '2' || key =='3' || key == '4')) {
    background(0);
    state = true;
    size = int(random(10, 200));
    for (int i = size; i <= width-size; i += size) {
      for (int j = size; j <= height-size; j += size) {
        type = int(random(1, 5));
        trianglePatternDisplay(i, j, type, key);
      }
    }
    delay(100);
  }
}

void trianglePatternDisplay(int i, int j, float type, char key) {
  int userChosen = -1;
  if (key == '1') {
    userChosen = 0;
  } else if (key == '2') {
    userChosen = 255;
  } else if (key == '3') {
    userChosen = 175;
  } else {
    userChosen = 75;
  }
  if (type == 1) {
    fill(255, 0, userChosen);
    noStroke();
    triangle(i-size/2, j - size/2, i -size/2, j + size/2, i + size/2, j + size/2);
  } else if (type == 2) {
    fill(255, userChosen, 0);
    noStroke();
    triangle(i-size/2, j -size/2, i + size/2, j - size/2, i + size/2, j + size/2);
  } else if (type == 3) {
    fill(userChosen, 255, 0);
    noStroke();
    triangle(i - size/2, j +size/2, i + size/2, j +size/2, i + size/2, j - size/2);
  } else {
    fill(userChosen, 0, 255);
    noStroke();
    triangle(i-size/2, j-size/2, i+size/2, j-size/2, i-size/2, j +size/2);
  }
}

if I had more time, I would’ve probably experimented a bit more with interaction (add mouseX and mouseY to control something). Also would’ve added the reset button that returns to the intruction.