Categories
interaction lab midterm project

midterm project: make, present & report

Turn & Link – Anya Zhukova (& Isabel)– Haider Gottfried

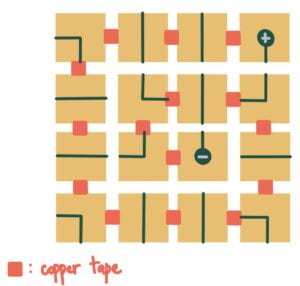
Our project was inspired by a minimalistic game “Linko” as it is mentioned in the proposal. We did not end up creating a kids-friendly game, however we have, in my opinion, succeeded in creating a fun interactive iteration of a linking game. Our goal was to make people want to engage with the pieces and feel rewarded when solving the puzzle, which we were striving to achieve by incorporating bright colors, the song and rainbow LEDs.

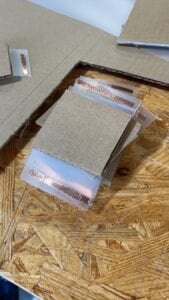
In the first week of making, we had a lot of problems with actually finding out ways how to connect the pieces (they should form a circuit when turned at a certain way). Cardboard pieces were too light to be pressing themselves onto the copper tape. So we sought help from Andy and he proposed this idea of attaching the plastic in a certain way and then fixating the position of a piece for it to apply pressure on the plastic, so that the copper tape is pressed onto another copper tape. So, as we spent a very long time figuring out the mechanics of that, our code and the game overall was not as finished as we wanted it to be. Regardless, we hoped that it would be just enough for the first User Testing, as it might give us an idea/inspiration regarding how we should approach future enhancements of our prototype. So, during the User Testing we have received tons of valuable feedback such as: 

  • to make the the paths more evident (to be evident that it should be solved)
  • make everything (especially the pieces) more colorful overall
  • add LEDs! our weak LEDs were not providing much reward. + they were so dim
  • maybe add some sound as well

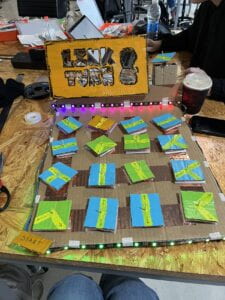
so, we did all of that. we added the LED strip, we added the sound and we added bright and fun colors. (code and photos could be seen in the end of the post). 

I believe we have dealt with the feedback in a best way possible. 

As for this process of enhancement, we were meeting pretty much everyday with Isa to do the work and we were finishing up the thing on Tuesday. As I was in charge of the code, I can share something that I was making the mistake with like an hour before the presentation and which, I thought at the time, would be the reason for our fail. Basically, as we added the LED strip, our dim single-LED did not serve any purpose other than to receive a signal that the circuit is connected (I was using INPUT_PULLOUT) however I didn’t know that by leaving OUTPUT mode has affected the precision with which the LED was detecting the absence or occurrence of the signal. So yeah, some LED were transferring “undetected” signal even when were connected and visa-versa. So, yeah, that took me a while to fix. Then also the LED strip had some issue with any tape other than the paper one. Not sure why, but they did, so we had re-attach it. We also thought that maybe copper tape sometimes reserving some energy which sometimes resulted in incorrect reaction. But that was rare. 

As for the cardboard and painting, we didn’t have many issues, except for that on the last day we had to replace some LEDs and one cardboard piece (as it kind of loosened up and wan’t connecting the circuits) in the right places we didn’t have the right paint. But that was a minor issue. During the process we also had some copper tape issues so we have soldered two places manually. 

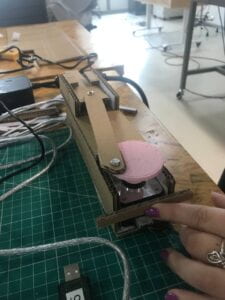
On the last day, I also had an idea of displaying the turning movement using a motor to showcase what the players are supposed to do. We just did the Sweep example and attached the thing using a hand-made cardboard box next to the sign “Turn and Link”. 

I believe our presentation went good. I believe copper tape has been storing some energy on the pieces so it sometimes transferred the “connected” signal regardless of whether the puzzle has or has not been solved.

Speaking of the areas for the improvement, I believe  we could:

  • make the game work better (maybe enhance the copper tape or connectivity)
  • add some levels (so that there is not only 1 solution/one reward (maybe add a different song for something that did not work)
  • the single-LEDs should not be visible if they only are used as a signal determinator. 
  • handles on the pieces to enhance the 

It was interesting that the motor with the piece was perceived as something intimidating, that was hinting that players should go faster in solving the puzzle. Maybe the clock could be actually added. 

The photos: 

video of how i works: 304


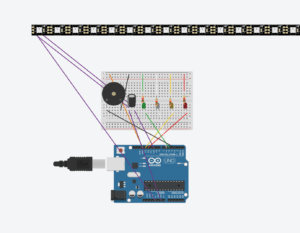
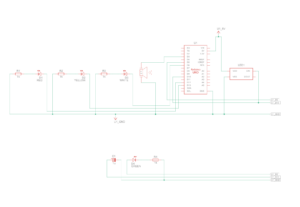
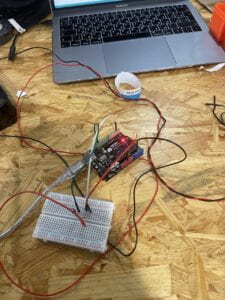
the circuit:

the circuit is very close to the reality (the pins are right). One big difference is that the LED strip is much bigger (in number of pixels).

code:

//SOUND!
const int songspeed = 1.5; //Change to 2 for a slower version of the song, the bigger the number the slower the song
//*****************************************
#define NOTE_C4 262 //Defining note frequency
#define NOTE_D4 294
#define NOTE_E4 330
#define NOTE_F4 349
#define NOTE_G4 392
#define NOTE_A4 440
#define NOTE_B4 494
#define NOTE_C5 523
#define NOTE_D5 587
#define NOTE_E5 659
#define NOTE_F5 698
#define NOTE_G5 784
#define NOTE_A5 880
#define NOTE_B5 988
//*****************************************
int notes[] = { //Note of the song, 0 is a rest/pulse
NOTE_E4, NOTE_G4, NOTE_A4, NOTE_A4, 0,
NOTE_A4, NOTE_B4, NOTE_C5, NOTE_C5, 0,
NOTE_C5, NOTE_D5, NOTE_B4, NOTE_B4, 0,
NOTE_A4, NOTE_G4, NOTE_A4, 0,
 
NOTE_E4, NOTE_G4, NOTE_A4, NOTE_A4, 0,
NOTE_A4, NOTE_B4, NOTE_C5, NOTE_C5, 0,
NOTE_C5, NOTE_D5, NOTE_B4, NOTE_B4, 0,
NOTE_A4, NOTE_G4, NOTE_A4, 0,
 
NOTE_E4, NOTE_G4, NOTE_A4, NOTE_A4, 0,
NOTE_A4, NOTE_C5, NOTE_D5, NOTE_D5, 0,
NOTE_D5, NOTE_E5, NOTE_F5, NOTE_F5, 0,
NOTE_E5, NOTE_D5, NOTE_E5, NOTE_A4, 0,
 
NOTE_A4, NOTE_B4, NOTE_C5, NOTE_C5, 0,
NOTE_D5, NOTE_E5, NOTE_A4, 0,
NOTE_A4, NOTE_C5, NOTE_B4, NOTE_B4, 0,
NOTE_C5, NOTE_A4, NOTE_B4, 0,
NOTE_A4, NOTE_A4,
//Repeat of first part
NOTE_A4, NOTE_B4, NOTE_C5, NOTE_C5, 0,
NOTE_C5, NOTE_D5, NOTE_B4, NOTE_B4, 0,
NOTE_A4, NOTE_G4, NOTE_A4, 0,
NOTE_E4, NOTE_G4, NOTE_A4, NOTE_A4, 0,
NOTE_A4, NOTE_B4, NOTE_C5, NOTE_C5, 0,
NOTE_C5, NOTE_D5, NOTE_B4, NOTE_B4, 0,
NOTE_A4, NOTE_G4, NOTE_A4, 0,
 
NOTE_E4, NOTE_G4, NOTE_A4, NOTE_A4, 0,
NOTE_A4, NOTE_C5, NOTE_D5, NOTE_D5, 0,
NOTE_D5, NOTE_E5, NOTE_F5, NOTE_F5, 0,
NOTE_E5, NOTE_D5, NOTE_E5, NOTE_A4, 0,
 
NOTE_A4, NOTE_B4, NOTE_C5, NOTE_C5, 0,
NOTE_D5, NOTE_E5, NOTE_A4, 0,
NOTE_A4, NOTE_C5, NOTE_B4, NOTE_B4, 0,
NOTE_C5, NOTE_A4, NOTE_B4, 0,
//End of Repeat
NOTE_E5, 0, 0, NOTE_F5, 0, 0,
NOTE_E5, NOTE_E5, 0, NOTE_G5, 0, NOTE_E5, NOTE_D5, 0, 0,
NOTE_D5, 0, 0, NOTE_C5, 0, 0,
NOTE_B4, NOTE_C5, 0, NOTE_B4, 0, NOTE_A4,
NOTE_E5, 0, 0, NOTE_F5, 0, 0,
NOTE_E5, NOTE_E5, 0, NOTE_G5, 0, NOTE_E5, NOTE_D5, 0, 0,
NOTE_D5, 0, 0, NOTE_C5, 0, 0,
NOTE_B4, NOTE_C5, 0, NOTE_B4, 0, NOTE_A4
};
//*****************************************
int duration[] = { //duration of each note (in ms) Quarter Note is set to 250 ms
125, 125, 250, 125, 125,
125, 125, 250, 125, 125,
125, 125, 250, 125, 125,
125, 125, 375, 125,
 
125, 125, 250, 125, 125,
125, 125, 250, 125, 125,
125, 125, 250, 125, 125,
125, 125, 375, 125,
 
125, 125, 250, 125, 125,
125, 125, 250, 125, 125,
125, 125, 250, 125, 125,
125, 125, 125, 250, 125,
125, 125, 250, 125, 125,
250, 125, 250, 125,
125, 125, 250, 125, 125,
125, 125, 375, 375,
250, 125,
//Rpeat of First Part
125, 125, 250, 125, 125,
125, 125, 250, 125, 125,
125, 125, 375, 125,
 
125, 125, 250, 125, 125,
125, 125, 250, 125, 125,
125, 125, 250, 125, 125,
125, 125, 375, 125,
 
125, 125, 250, 125, 125,
125, 125, 250, 125, 125,
125, 125, 250, 125, 125,
125, 125, 125, 250, 125,
125, 125, 250, 125, 125,
250, 125, 250, 125,
125, 125, 250, 125, 125,
125, 125, 375, 375,
//End of Repeat
 
250, 125, 375, 250, 125, 375,
125, 125, 125, 125, 125, 125, 125, 125, 375,
250, 125, 375, 250, 125, 375,
125, 125, 125, 125, 125, 500,
250, 125, 375, 250, 125, 375,
125, 125, 125, 125, 125, 125, 125, 125, 375,
250, 125, 375, 250, 125, 375,
125, 125, 125, 125, 125, 500
};
int redLED = 12;
int yellowLED = 13;
int whiteLED = 6;
int greenLED = 5;
int buzzer = 3;
int redState = -1;
int yellowState = -1;
int whiteState = -1;
int greenState = -1;
 
//definitions for the LEDS
#include <FastLED.h>
#define LED_PIN 10
#define NUM_LEDS 54
#define BRIGHTNESS 64
#define LED_TYPE WS2811
#define COLOR_ORDER GRB
CRGB leds[NUM_LEDS];
#define UPDATES_PER_SECOND 100
CRGBPalette16 currentPalette;
TBlendType currentBlending;
extern CRGBPalette16 myRedWhiteBluePalette;
extern const TProgmemPalette16 myRedWhiteBluePalette_p PROGMEM;
void setup() {
 
 
//pinMode(redLED, OUTPUT);
//pinMode(yellowLED, OUTPUT);
//pinMode(whiteLED, OUTPUT);
//pinMode(greenLED, OUTPUT);
//pinMode(buzzer, OUTPUT);
pinMode(redLED, INPUT_PULLUP);
pinMode(yellowLED, INPUT_PULLUP);
pinMode(whiteLED, INPUT_PULLUP);
pinMode(greenLED, INPUT_PULLUP);
pinMode(buzzer, INPUT_PULLUP);
Serial.begin(9600);
delay( 3000 ); // power-up safety delay
FastLED.addLeds<WS2812, LED_PIN, RGB>(leds, NUM_LEDS);
FastLED.setBrightness( BRIGHTNESS );
currentPalette = RainbowStripeColors_p;
currentBlending = LINEARBLEND;
}
void loop() {
digitalWrite(redLED, LOW);
digitalWrite(yellowLED, LOW);
digitalWrite(whiteLED, LOW);
digitalWrite(greenLED, LOW);
 
redState= digitalRead(redLED);
Serial.print(“red “);
Serial.println(redState);
if (redState == 0){
//digitalWrite(redLED, HIGH);
leds[43] = CRGB(0,255,0);
leds[42] = CRGB(0,255,0);
FastLED.show();
tone(buzzer, 800);
delay(1000);
noTone(buzzer);
//digitalWrite(redLED, LOW);
}
else{
noTone(buzzer);
leds[43] = CRGB(0,0,0);
leds[42] = CRGB(0,0,0);
FastLED.show();
}
yellowState = digitalRead(yellowLED);
Serial.print(“yellow “);
Serial.println(yellowState);
if (digitalRead(yellowLED) == 0){
//digitalWrite(yellowLED, HIGH);
tone(buzzer, 600);
leds[46] = CRGB(255, 255 ,0);
leds[45] = CRGB(255, 255, 0);
FastLED.show();
delay(1000);
noTone(buzzer);
//digitalWrite(yellowLED, LOW);
}
else{
noTone(buzzer);
leds[46] = CRGB(0,0,0);
leds[45] = CRGB(0,0,0);
FastLED.show();
}
whiteState = digitalRead(whiteLED);
Serial.print(“white “);
Serial.println(whiteState);
if (whiteState == 0){
//digitalWrite(whiteLED, HIGH);
leds[48] = CRGB(255,255,255);
leds[49] = CRGB(255,255,255);
FastLED.show();
tone(buzzer, 400);
delay(1000);
noTone(buzzer);
//digitalWrite(whiteLED, LOW);
}
else{
noTone(buzzer);
leds[48] = CRGB(0,0,0);
leds[49] = CRGB(0,0,0);
FastLED.show();
}
greenState = digitalRead(greenLED);
Serial.print(“green “);
Serial.println(greenState);
if (greenState == 0){
//digitalWrite(greenLED, HIGH);
leds[51] = CRGB(255,0,0);
leds[52] = CRGB(255,0,0);
FastLED.show();
tone(buzzer, 200);
delay(1000);
noTone(buzzer);
//digitalWrite(greenLED, LOW);
}
else{
noTone(buzzer);
leds[51] = CRGB(0,0,0);
leds[52] = CRGB(0,0,0);
FastLED.show();
}
 
if (redState == 0 && yellowState == 0 && whiteState == 0 && greenState == 0){
int color = 0;
for (int i=0;i<203;i++){
int k = 0;
uint8_t brightness = 255;
 
int wait = duration[i] * songspeed;
tone(buzzer,notes[i],wait);
delay(wait);
if (i < 56){
leds[i] = CHSV(color, 255, 255); /* The higher the value 4 the less fade there is and vice versa */
color+=4;
FastLED.show();
}
else if (i – 56 < 56){
leds[i-56] = CHSV(color, 255, 255); /* The higher the value 4 the less fade there is and vice versa */
color+=4;
FastLED.show();
}
else if (i < 112 < 56){
leds[i-112] = CHSV(color, 255, 255); /* The higher the value 4 the less fade there is and vice versa */
color+=4;
FastLED.show();
}
else {
leds[i-168] = CHSV(color, 255, 255); /* The higher the value 4 the less fade there is and vice versa */
color+=4;
FastLED.show();
}
}
}
}
//leds[2] = CRGB(0,255,0);
//leds[3] = CRGB(0,0,255);
// leds[4] = CRGB(0,0,255);
// leds[5] = CRGB(0,0,255);
// leds[6] = CRGB(0,0,0);
Categories
interaction lab recitations

Actuators & Mechanisms

In the beginning of this recitation me and my partner (Dana) briefly went through the tasks and then divided responsibilities: I was in charge of the cardboard work, while Dana was following the instructions and connecting the wires. 

  • Cardboard struggles (none)

As I spent past two weeks with a glue gun in hand for another class, the gluing and folding part were quite easy for me. I found the paper cutouts a very useful and great idea! It took me approximately 20 minutes to assemble. 

  • Wiring struggles 

Dana has followed the instructions precisely, and got that as she forgot to connect it to the higher power:

After I reminded her of that, we were basically done with the base. 

Then, when we put the motor into the construction, we realized that due to the movement it kept falling out, so we added this cardboard “fence” to prevent that:

and moved forward to personalizing the construction.

  • personalization: idea

from the very moment we have assembled the construction we had an idea of making it look like a frog that moves her tongue to catch a fly (doing that at the same speed but random intervals). so we decided to make the tongue look like an actual tongue by painting it read in some places + adding two eyes and add some green details as well. 

  • code

as for the code, i have already mentioned the random() delay idea. we also personalized the steps per revolution. //you can find the code in the end of the post//

the final result:

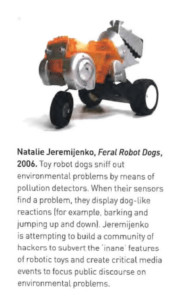
Question 1: Choose an art installation mentioned in the reading ART + Science NOW, Stephen Wilson (Kinetics chapter). Post your thoughts about it and make a comparison with the work you did during this recitation. How do you think that the artist selected those specific actuators for his project.This is the project I have chosen called Feral Robot Dogs by Natalie Jeremijenko. This use of actuators is similar to what we did they are used to mimic animal part’s movement. Our was the tongue, here is the movement of a dog. Also this project is quite interesting as it has an element of environmental activism to it, which is always great! I am curious how the sensors work though, do they somehow detect the clarity of the air? fascinating. 
Question 2: What kind of mechanism would you be interested in building for your midterm project? Explain your idea using a sketch (conceptual or technical) with a list of materials that you plan to use. Include details about the ways that you expect the user to embrace in a physical interaction with your project. In particular, explain how would your motor (or motors) with a mechanism will be different than using an animation on a digital screen.

this is my midterm proposal:

midterm project: proposal

The mechanism that I am planning to build for the midterm does not really involve motors. We might use it to display how our puzzle work. Me and my partner are going to experiment with how we can make the interaction a bit more interesting and complex (from technical side). 

*
 This program drives a unipolar or bipolar stepper motor.
 The motor is attached to digital pins 8 - 11 of the Arduino.

 The motor should revolve one revolution in one direction, then
 one revolution in the other direction.


 Created 11 Mar. 2007
 Modified 30 Nov. 2009
 by Tom Igoe

 */

#include <Stepper.h>

const int spr = 400;  // change this to fit the number of steps per revolution
// for your motor

// initialize the stepper library on pins 8 through 11:
Stepper myStepper(spr, 8, 9, 10, 11);

void setup() {
  // set the speed at 60 rpm:
  myStepper.setSpeed(56);
  // initialize the serial port:
  Serial.begin(9600);
}

void loop() {
  // step one revolution  in one direction:
  Serial.println("clockwise");
  myStepper.step(spr);
  delay(random(200-400));
/*
  // step one revolution in the other direction:
  Serial.println("counterclockwise");
  myStepper.step(-stepsPerRevolution);
  delay(500);
  */
}
Categories
interaction lab midterm project

midterm project: proposal

A. Turn and Link – Anna Zhukova (& Isabel) – Gottfried Haider

B. Sketches

C. Project Explanation

Our project is a fun game that boosts creativity and critical thinking. We were inspired by the “Linko” game and wanted to recreate it in physical form: https://www.youtube.com/watch?v=mRw0AHN_7Fw. Our intended audience is kids, so the puzzle is a floor-friendly and vibrant-colored game that engages and entertains. 

Categories
group research project interaction lab

step2&3&4: make, perform & report

Results/processes in terms of script, roles and ideas are reflected in our google doc: https://docs.google.com/document/d/14zxwJo6eB24SLhWYegINjtrimZ3LWMK9ZRYbWlZN47k/comment 

It would be helpful to look at it when i refer to it. 

The first thing we did when we met for the first time with our group is that we created a google doc where everyone has included what ideas they came up with for the “read” step. After further discussion, we decided to brainstorm two days later, when everyone has gone through all the other’s ideas. 

Next time we met, we spent about an hour going back in forth about what we can do. We all really liked the idea of Douaa’s crime detection device + we came up with the glasses idea, (it perfectly aligns with the environment described by Ray Bradbury “The Veldt”, as it is a very advanced technology and could actually help parents detect that their children are attempting crime against them). 

Then we started to think about the actual performance to further develop what our glasses are going to be doing and how we can show that. 

We agreed that our performance should be entertaining, however kind of educational (in terms of how the glasses work) so that we don’t have to explain much, the show will be sufficient. Plus, we thought it would be relatable to set the scene in the classroom and involve some funny drama that would also make the performance more entertaining. Of course, we needed everyone to have a valuable role in that, so we almost evenly divided the roles (the google doc attached in the beginning of the blogpost has it on the first page).

And then, we remembered the dongles (Luciana said thats American for USB-C adapters). So yeah, we started writing the script and we were done in an hour. We suspected it was too short, but we decided to fix it during our first rehearsal that was happening the next day. We also needed some stuff to be done:

  • signs “The following day”, “Next recitation” for transitions
  • glasses 
  • (we would find out later that we also need a video frame, however at that time we were not planning on doing that as that scene did not exist)

As Zhuang Yi (I am not sure whats her english name) volunteered to be the narrator, so she also volunteered to create and to print out the signs. She had two days and had to bring them to out rehearsal. Spoiler: she has done a wonderful job! plus, apparently, she had to paint the letters herself! i was so amazed by the dedication she showed! (I’m just mentioning that in case she forgot to give herself credit for that in her own blogpost)

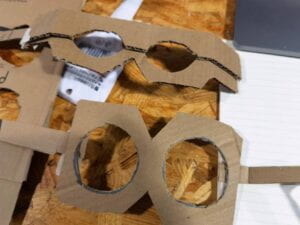
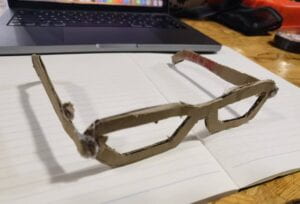
Anyway, the rest of the group, including me, gathered up the next day and started cutting out glasses out of the cardboard. At first, i thought that it would be better to cut out some huge glasses so that during the performance it would be extremely obvious that a teacher has put them on and (+ we settled for the idea of creating two glasses so that the second one could be painted red (spoiler: this would change later)) that they turned red when they do. I have created stuff like that:

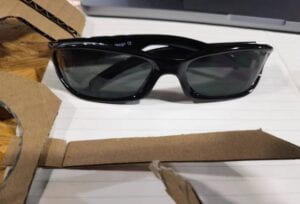
while I was trying to turn Ricky into a character from Marvel/DC instead of a teacher, Joy decided to shape glasses similarly to the glasses I had with me:

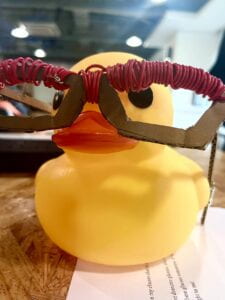
and, that was a great idea as they were the only ones that would actually fit Ricky (not fall down or make him look like Daredevil (Matt Murdock) the last reference to DC i promise). So, we decided to stick with it. The next challenge was that we had to come up with a way to actually show the interaction (the signal coming from the glasses). As I mentioned, the glasses were supposed to turn red. However, we didn’t have anything red that we could paint the glasses with. So we thought that we are going to go to FabLab the next day and hope they let us spray-paint the glasses red.

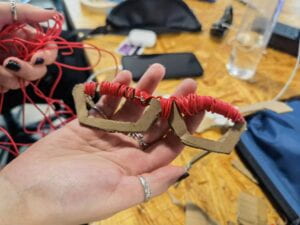
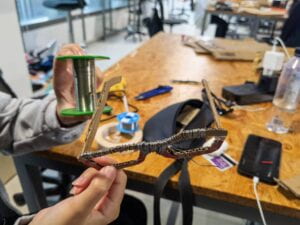
But everything changed as we thought that we would also like to do something with the non-red glasses as they looked kind of unfinished. And then the rolls of wire caught mine and Douaa’s attention. We had both red and soldering metallic wire there! So we took our chance and wrap the glasses with it. In the beginning, I was doing the soldering-wire, Douaa was doing the red one. However, We changed later as Douaa was struggling with keeping the wire wrapped around the glasses as she was using glue for that and it didn’t really work. I had an idea of using the soldering wire to do that (as it was much more “obedient” in that sense. And it happened! We spent around 15-20 min of that, and it was totally worth it!

So yeah! the glasses were perfect and easy-to-comprehend artifact! And they were complete. 

Moving on to the next day – the rehearsal – we spent some time working on the script as the initial one took place for 2 min only)))) so yeah, we extended the script, added some scenes (including the last one where the authority holds glasses and shows the projection of the video it recorded (the video of the crime). We added a couple of jokes, worked on our performance nuances such as the change of glasses and slow-mo scene and yellow duck to produce the beep sounds (initially the narrator, Zhuang, was supposed to do that)! I believe everyone has done a terrific job being as loud and clear in their speech and, I am proud of our performance and idea. 

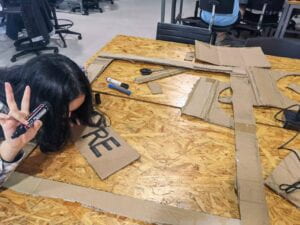
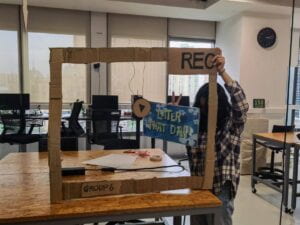
Side note: when we came up with the slow-mo scene (the last one) to show how the glasses work exactly, we decided to do this cardboard frame and Zhuang and Ricky went and started working on that, while me, Joy, Luciana and Douaa were finishing up the script! Later I helped Ricky and Zhuang to complete the frame (I glued some pieces together). I believe the frame turned out perfectly fine!

The day of performance we decided to rehearse our quotes once again and gathered up an hour before the class. We were kind of nervous, however dealt with it perfectly by reassuring each other that everything will be fine! 

Performance went great! We were really happy that our invention also attracted some questions later and were very happy to answer them. Of course, there were some minor inconveniences, maybe we could’ve talked a bit louder and things like that, however, if i am being honest, this was the best one we have ever done! No one forgot their quotes or the times they enter the scene, everything was smooth and clear. I am not sure If we are supposed to attach the video here, but I will include it below in the blogpost. 

Speaking of the questions, the following paragraph will describe the artifact that we have presented, including some details that came up during the Q&A:

Our invention was the Crime Detection glasses. This is an invention that perfectly fits into advanced-technologies environment of Ray Bradbury’s “The Veldt” as, besides being very fitting into the high-tech environment, it would also be a very helpful thing to have to detect the crime the children were plotting. Our glasses is basically merge of security cameras (recording), AI (algorithm that can actually record and show the needed footage, “understand” when the crime happens) and Google glasses (shape inspiration). The reason why we chose glasses (not just some sort of camera) is that it is, firstly, looks cooler, the second is that they would be more interactive (with the buttons that show the crime scene and instant reaction: turning red and beeps), and finally, more personalized experience (the person who wears them can control them). It also is more fitting into our understanding of interaction. So yeah, this object was unique, quite comprehensive in the way it works and fun to show to everyone else! 

Again, I am very proud of our team for investing quite a lot of time and energy in brainstorming ideas, creating the artifact and other things for the performance and doing our best showing our invention! We were able to divide tasks efficiently, be creative, improvise and react rapidly to unforeseen circumstances (e.g. the absence the frame)!

the video:

Categories
interaction lab recitations

Workout

STEP #1: all of the tasks && STEP #2

Soldering is something I have done on the first recitation, however that time I had Lydia to assist me almost all the way through. This time, on the other hand, I had my friend by my side, however I really wanted to do it myself first. In retrospective, probably spent way too much time on that, next time going to ask for help sooner. The problem I had was that the silver wire was melting but i couldn’t attach it to the wires (it kept sticking to the soldering machine instead of leaving to connect two wires). I then asked my friend how she was handling that and she showed me those king of circling movements that she was doing to stick the melted pieces of wire when they are supposed to go. Anyways, after 30 min or more, I managed to solder the wires, put the circuit together and even start programming. However, my computer decided to give up on me again, so when my friend was busy with something else, I create a file on her computer, refined the given code and tried out my circuit.

and it worked! (u can see my computer going crazy there in the beginning). So, so far the only issue I had was the soldering and my lazy computer. 

STEP #3

my friend helped my film those videos as we wore the sensor to test the code. 

STEP #4 && #5

As my computer was not exactly working with my Arduino, I used my friend computer to complete the last steps. 

  1. We increased the delay to 1000 to count only LOW to HIGH changes
  2. We added the conditionals and installed the buzzer to the 6th pin: 

if  (count == 8) {

Serial.println(“Yay, you made it!”);

tone(6, 440);

count = 0;

}

3. We didn’t have that much time left so we just recorded the video and disassembled everything. 

Anyway, I believe that given the limited time that we had – we did a great job! Special thanks to my friend who let me use her computer.

I probably need to do something about my computer. Not sure what yet.