Categories
final project interaction lab

(three) project proposals

I already mentioned two of my ideas in my previous blogpost, however here i will expand on the strongest idea (as I have already discussed it with a professor) a bit more and provide some sketches. I will discuss three ways in which I am thinking of building this project. 

first, general description:

  1. “Screaming Gallery” 
  2. A place where one can create an artwork using their voice. The purpose of the installation is to reimagine ways to create art and highlight the beauty of uniqueness each of us possesses. Wether it is a uniqueness of one’s voice or the way one could create art. 

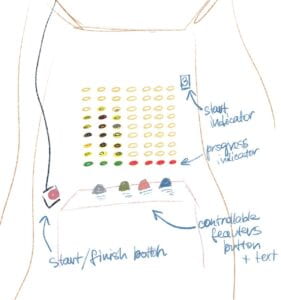
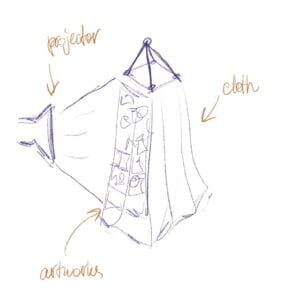
The installation going to include a relatively secluded space where the intimacy is reinforced and one can feel free to use (voice analysis) technology to create an artwork using their voice. Inside the space there are going to be some buttons that provide some additional control over what and when is being drawn. The room is going to be equipped with Neopixel matrix/strip that are going to guide a person through the experience and reflect what is being drawn. Outside there is going to be shown a projection of the artwork person is creating on the inside (when the drawing is in process) and when the drawing is done, their artwork is going to be added to the collage of all the artworks created and projected on the surface of the installation or just shown on the computer on the pedestal. 

the three options:

Here, there are three ways all of this could be done:

first way

1. Color  – frequency

2. Position – depends on the time (the running “progress” line going parallel to Y axis and perpendicular to X axis)

3. Shape – controlled with a button (chosen by a person)

4. Size – volume

second way

1. Color – volume

2. Position – chosen randomly (blinking LED indicates the current position)

3. Shape – randomly

4. Size – frequency

third way

1. Color palette – chosen

2. Position – “Progress line”/random

3. Shape – randomly

4. Size – frequency

All of these ways have their upsides and downsides. Throughout the next week I am going to start coding the Processing code and implementing voice analysis to figure out the best way to move forward. 

Some sketches:

Categories
final project interaction lab

preparatory research and analysis

I really liked this “Iamascope” project as it has this element of anticipation: what kind of pattern will it produce when i stand there?? this is very interesting as even though a person does have a certain control over the displayed pattern, there are still some computer-generated details that seem unpredictable hence exciting! Moreover, the music as well adds on to that unpredictability and excitement that comes with interacting with the object. 

Also I realized that my midterm project was similar to Jigsaw in a sense that it was the third type (dynamic – interactive). I mean, of course, we could have done a bit more in terms of various responses, however the intention was there 🙂

Anyway, I digress. 

Some ideas that I have generated while reading:

  • games for people: not sure if i will move forward with any kind of game (in terms of a game that requires 2+ people), however i have an idea of using LEDs and sounds (as well as some sensors maybe to record what people do (I was thinking about giving people the area to completely cover by stepping on it and then who does it faster – wins). So like the shade would be like a drawing force on the floor/wall at which the light is directed. (maybe not shade, maybe it could be some thing that resembles a pen or like a VR thing)
    • attraction: bright LEDs on the floor, cool installation
    • sustaining: competition element
    • relation: want to win again/try again – winning should be quite rewarding
  • “screaming gallery”: build a cardboard box that would have led all over it. Invite a person inside and then maybe it could be a screaming-drawing machine! and then on the outside of the box there would be a projectory of the artwork that a person is “screaming” inside. (some ideas not to forget: add a time limit/stop button, buttons to switch the color of the thing, save all the artworks and display as a collage when no one is in there, can i use projector? maybe add an option to send out the artwork (the name could be put in)) should it be LEDS that the person is drawing on? or maybe the color is going to depend on the position where the person stands/the volume of their scream? (on idea is to divide spaces on the floor corresponding to the areas on the screen? and then each person just going to show the color)
    •  
    •  
    • attraction: cool room, LEDs, maybe some attractive sins
    • sustaining: a person creates its own artwork using unconventional way (they are curious how it works, what are they going to end up with
    • relating: people might want to create different types of artwork
        • so, for this project I am struggling with, of course, finalizing what mechanisms imma be using to draw (is the drawing going to be LED matrix? or should be the whiteboard? How a person going to position where to paint

these two ideas are utilizing “ambient” approach described by Edmond (16). 

both of them are “varying” and “influencing” artworks. 

Shaping Forms by Ernest Edmond is a big one, of course. It is mentioned in the book and, surely, my ideas have a certain similarity to it. 

also the idea that “engagement can grow with experience”. indeed, if the engagement is successfully sustained in the process of interaction, the initial attraction might not be as important. gon note that,

Categories
interaction lab recitations

Neopixel Music Visualization

I had already installed all the libraries before the lesson, so I started right with the work. 

From the beginning, I had struggles with sounds (with playing the sounds). 

Spent wayyy to much time on that. However when I figured that out, the initial sketches (code provided in the recitation webpage) worked:

then, for some reason it stopped working again, so I decided to continue my work during the weekend.

on Saturday, I continued and manipulated some code to link the colors of the LED to the volume:

and then also added some code so that the number of LED that lights up also depend on the volume level:

then, I started working on the visualization, however the LED stopped lighting up. I tried uploading solely Arduino code (just trying to light up LEDs all red), however they still did not work. The code I have now is displayed below:

P.S. I will try to run it again on some other day or will replace the LED strip on Monday. 

import processing.serial.*;
import processing.sound.*;
import osteele.processing.SerialRecord.*;


Serial serialPort;
SerialRecord serialRecord;
SoundFile sample;
Amplitude analysis;

int W;    //width of the tiles
int NUM = 60;  //amount of pixels
int[] r = new int[NUM]; //red of each tile
int[] g = new int[NUM]; //red of each tile
int[] b = new int[NUM]; //red of each tile


void setup() {
  String serialPortName = SerialUtils.findArduinoPort();
  serialPort = new Serial(this, serialPortName, 9600);
  serialRecord = new SerialRecord(this, serialPort, 4);
  serialRecord.logToCanvas(false);
  size(640, 480);

  // load and play a sound file in a loop
  sample = new SoundFile(this, "finalTamacun.wav");
  sample.loop();

  // create the Amplitude analysis object
  analysis = new Amplitude(this);
  // analyze the playing sound file
  analysis.input(sample);
}

void draw() {
  //long t = millis();
  println(analysis.analyze());
  noStroke();
  background(255);

  // analyze the audio for its volume level
  float volume = analysis.analyze();


  //if (floor(t/1000) % 2 == 0) {
  //  background(255, 0, 0);
  //  fill(0);
  //  println(t);
  //} else {
  //  fill(255, 0, 0);
  //}
  //float diameter = map(volume, 0, 1, 0, width);

  //ellipse(width/2, height/2, diameter, diameter);
  float numberOfLedFromVolume = int(floor(map(volume, 0, 1, 0, 60)));

  for (int i=0; i< NUM; i++) {
    float volumeToColor1 = map(volume, 0, 1, 150, 255);
    float volumeToColor2 = map(volume, 0, 1, 50, 150);
    float volumeToColor3 = map(volume, 0, 1, 0, 50);
    if (i < numberOfLedFromVolume) {
      r[i] = floor(volumeToColor1);
      g[i] = floor(volumeToColor2);
      b[i] = floor(volumeToColor3);
      serialRecord.values[0] = i;
      serialRecord.values[1] = r[i];
      serialRecord.values[2] = g[i];
      serialRecord.values[3] = b[i];
    } else {
      serialRecord.values[0] = i;
      serialRecord.values[1] = 0;
      serialRecord.values[2] = 0;
      serialRecord.values[3] = 0;
      serialRecord.send();
    }
    serialRecord.send();
  }
}
Categories
interaction lab recitations

Animating an Interactive Poster

My poster is kind of like a game. It has an interactive “eye” that I spent the most time on coding. Also there are rectangles of different sizes and text. 

Some cool features: the color of the background changes depending on in how much frames (rectangle) the cursor is inside (basically how far from the center the cursor is); The color of the eye gradually changes as well. If you press “a” or “A” button, the poster resets.

This is the video of how it works:

this is the code:

String s1 = "IMA Fall 22 ";
String s5 = "End-Of-Semester";
String s6 = "Show";
String s2 = "Location: 8th floor";
String s3 = "Friday December 16";
String s4 = "6-8PM";
float angle = 0.0;
Eye e1;
float count = 0;
boolean state = false;

void setup() {
  size(1024, 768);
  background(255);
  e1 = new Eye(width/2, height - 120, 120);
}

void draw() {
  for (int i = 0; i < 1024/3 + 40; i+= 20) {
    if (count < 19) {
      rectangle(width, height, i);
    } else {
      background(255, 0, 255);
      displayText();
      if (keyPressed) {
        if (key == 'a' || key == 'A') {
          count = 0;
        }
      }
    }
  }
  stroke(0);
  e1.update(mouseX, mouseY);
  e1.display(state);
}

void rectangle(float x, float y, float i) {
  if (dist(mouseX, mouseY, x/2, y/2) < i) {
    stroke(255, 0, 255);
    count++;
  } else {
    stroke(255);
    count = 0;
  }
  strokeWeight(4);
  rect(i, i, x - i*2, y - i*2);
}

void displayText() {

  fill(255, 255, 0);
  textSize(60);
  //ima fall 22
  text(s1, width/23, 120);
  textSize(100);
  //end-of-semester
  fill(255);
  text(s5, width/26, 260);
  //show
  text(s6, width/26, 340);
  textSize(50);

  fill(255, 255, 0);
  //location
  text(s2, width/26, 440);
  fill(0, 255, 255);
  text(s3, width/26, 500);
  text(s4, width/26, 560);
  fill(255);
  text("Press 'A' to reset", width/26, 620);
}

class Eye {
  int x, y;
  int size;
  float angle = 0.0;

  Eye(int tx, int ty, int ts) {
    x = tx;
    y = ty;
    size = ts;
  }

  void update(int mx, int my) {
    angle = atan2(my-y, mx-x);
  }

  void display(boolean state) {
    pushMatrix();
    translate(x, y);
    fill(255);
    ellipse(0, 0, size, size);
    rotate(angle);
    if (state == false) {
      fill(count*10, 0, count * 10);
    } else {
      fill (255, 0, 255);
    }
    ellipse(size/4, 0, size/2, size/2);
    popMatrix();
  }
}

The format is not ideal, but thats the best one I found. 


Homework

For homework, I decided to experiment with triangles. Just in case it won’t count for complex shapes, I will first introduce arrows as evidence that I am capable of working with “complex shapes”:

float ballY = 0;
float ballX = mouseX;
float ballSpeed = 0;
float count = 0;

void setup(){
  size(600, 600);

}

void draw(){
  background(0);
  
  fill(255);
  noStroke();
  for (int i = 20; i < width; i+=50){
    for (int k = 20; k < height; k+=50){
      arrowRandom(i, k, random(10, 30), random(10, 30));
    }
  }
  delay(100);
}

void arrowRandom(float x, float y, float lengthArrow, float sizeArrow){
  fill(x-75, y-75, 255);
  triangle(x - sizeArrow, y, x, y-sizeArrow, x + sizeArrow, y);
  rect(x-sizeArrow/2, y, sizeArrow, lengthArrow);
}

Here I have random sizing of the arrows, way more than 100 of them. 


Moving forward to my triangle experimentation that I was doing further. 

Here, I have started from the same thing as the task wanted, however went wayy further with it. 

Here I have different colors for each positioned triangle and the position is chosen randomly, as well as the size of the triangles. 

code for this:

float type = 0;
int size = 0;

void setup() {
  size(1000, 800);
}

void draw() {
  background(0);
  size = int(random(10, 200));
  for (int i = size; i <= width-size; i += size) {
    for (int j = size; j <= height-size; j += size) {
      type = int(random(1, 5));
      trianglePatternDisplay(i, j, type);
    }
  }
}

void trianglePatternDisplay(int i, int j, float type) {
  if (type == 1) {
    fill(255, 0, 255);
    noStroke();
    triangle(i-size/2, j - size/2, i -size/2, j + size/2, i + size/2, j + size/2);
  } else if (type == 2) {
    fill(255, 0, 0);
    noStroke();
    triangle(i-size/2, j -size/2, i + size/2, j - size/2, i + size/2, j + size/2);
  } else if (type == 3) {
    fill(255, 255, 0);
    noStroke();
    triangle(i - size/2, j +size/2, i + size/2, j +size/2, i + size/2, j - size/2);
  } else {
    fill(0, 255, 255);
    noStroke();
    triangle(i-size/2, j-size/2, i+size/2, j-size/2, i-size/2, j +size/2);
  }
}

and then, as I needed to make it more interactive, I decided that I will create 4 pallets that are going to be controlled by the user. It looks like that (I included the instruction on the setup):

*in the video I pressed ‘1’ one time, ‘2’ two times, ‘3’ three times and ‘4’ four times. 

the code:

float type = 0;
int size = 0;
boolean state = false;

void setup() {
  size(1000, 800);
}

void draw() {
  if (state == false) {
    background(0);
    textSize(50);
    fill(255, 255, 0);
    text("Press '1' or '2' or '3' or '4'", 50, height/2-100);
    text("to start the pattern", 50, height/2);
    fill(255);
    textSize(30);
    text("hint: each number represents a color palette", 50, height/2 + 200);
  }
  if (keyPressed && (key == '1' || key == '2' || key =='3' || key == '4')) {
    background(0);
    state = true;
    size = int(random(10, 200));
    for (int i = size; i <= width-size; i += size) {
      for (int j = size; j <= height-size; j += size) {
        type = int(random(1, 5));
        trianglePatternDisplay(i, j, type, key);
      }
    }
    delay(100);
  }
}

void trianglePatternDisplay(int i, int j, float type, char key) {
  int userChosen = -1;
  if (key == '1') {
    userChosen = 0;
  } else if (key == '2') {
    userChosen = 255;
  } else if (key == '3') {
    userChosen = 175;
  } else {
    userChosen = 75;
  }
  if (type == 1) {
    fill(255, 0, userChosen);
    noStroke();
    triangle(i-size/2, j - size/2, i -size/2, j + size/2, i + size/2, j + size/2);
  } else if (type == 2) {
    fill(255, userChosen, 0);
    noStroke();
    triangle(i-size/2, j -size/2, i + size/2, j - size/2, i + size/2, j + size/2);
  } else if (type == 3) {
    fill(userChosen, 255, 0);
    noStroke();
    triangle(i - size/2, j +size/2, i + size/2, j +size/2, i + size/2, j - size/2);
  } else {
    fill(userChosen, 0, 255);
    noStroke();
    triangle(i-size/2, j-size/2, i+size/2, j-size/2, i-size/2, j +size/2);
  }
}

if I had more time, I would’ve probably experimented a bit more with interaction (add mouseX and mouseY to control something). Also would’ve added the reset button that returns to the intruction.
Categories
interaction lab recitations

Processing Basics

step1: 

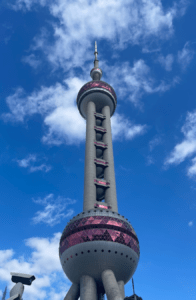
I chose this photo as a reference:

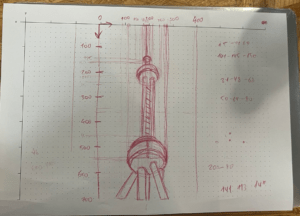
step 2: image on paper:

step 3: 

As could be seen in the picture, I took me way to much time to figure out the numbers and position of the objects that by the end of the recitation I didn’t have that much done. But I had added some details at home. 

if i had an opportunity to spend a bit more time on this, i would’ve added a bit more shadows/volume to this.

In the code, i used vertex(), strokes() and ellipse() to create this. It was pretty effective to divide the Pearl in these shapes.

the code: 

int i = 0;

void setup(){
  size(400, 700);
  background(40, 120, 212);
}

void draw(){
  fill(141, 145, 150);
  noStroke();
   ellipse(200, 125, 30, 30);
   stroke(50, 64, 80);
   strokeWeight(20);
   line(200, 130, 200, 150);
    fill(141, 145, 150);
    noStroke();
  ellipse(200, 200, 100, 100);
  strokeWeight(20);
  stroke(141, 145, 150);
  line(185, 220, 185, 460);
  line(215, 230, 215, 460); 
  noStroke();
  ellipse(200, 540, 160, 160); 
  strokeWeight(30);
  stroke(141, 145, 150);
  line(160, 600, 90, 700);
  line(180, 580, 180, 700);
  stroke(50, 64, 80);
  line(240, 600, 240, 700);
  stroke(141, 145, 150);
  line(210, 560, 260, 700);
  stroke(0);
  strokeWeight(10);
  beginShape();
  vertex(120, 550);
  stroke(141,113, 140);
  strokeWeight(40);
  quadraticVertex(200, 480, 280, 550);
  endShape();
  //upper curve
  beginShape();
  vertex(150, 210);
  stroke(141,113, 140);
  strokeWeight(30);
  quadraticVertex(200, 150, 250, 210);
  endShape();
}