Categories
group research project interaction lab

step1.2: read

The Veldt (Ray Bradbury): 

  • The device I thought of is the automatic windows dimmer that could exist in the “smart home” described in the story. It would react to the sound of hand clapping.

This idea is basically a merge between the dimming windows on some aircrafts (I saw them on one of Etihad airways’s aircrafts https://thepointsguy.com/guide/how-do-those-dimming-dreamliner-windows-work/) and “the clapper” that was first introduced by the google home, but now can be even purchased on Amazon (https://www.amazon.com/Clapper-Activated-Detection-Appliances-Technology/dp/B0000CGKLR).

I don’t really see any problem with the invention of this mechanism, except for the idea that people are gonna move less and less and become very lazy. But that is a very long-term and individual-choice issue. 

___________________________________________________________

The Ones Who Walk Away from Omelas (Ursula K. Le Guin):

  • Device that determines your mood by facial expressions and shows some videos/pictures/anything else to get your mood back up. This device would very much likely fit into this never-ending happiness lifestyle that people of Omelas are trying to preserve. When entering buildings/homes/etc. they could be monitored (as we were/are with the temperature in COVID-19 times) by the face expressions and being advised to visit the “fun room” where you go and watch something funny to you (based on your browsing history/manually found). This would allow the people of Omela track those who are losing their happiness (maybe because of the disturbing thoughts about the suffering child and guilt that comes with it) and help them restore it.

As I have already mentioned, we already have sensors that measure our temperature everywhere (https://www.heimannsensor.com/body-temperature), the establishment seems familiar. I found this paper on the facial recognition technologies (chrome-extension://efaidnbmnnnibpcajpcglclefindmkaj/https://edps.europa.eu/system/files/2021-05/21-05-26_techdispatch-facial-emotion-recognition_ref_en.pdf) that basically says that the data results are still not as accurate as they should, however given the rapid development of biometric recognition technologies over the past years, I would say, give it a year or two and we will have the machine learning algorithms for that. As for the customized “fun”, we already have browsers and social media that adjust out searches based on location/bookmarks/likes/reposts/time/etc (e.g. instagram algorithms https://later.com/blog/how-instagram-algorithm-works/). So there is nothing new here. 

The danger of these kind of technologies is the data that gets exposed to the government/other parties that might be threatening to individuals as anything one does could be tracked and that makes any kind of freedom of expression vanish, which for a lot of people is incompatible with happiness. Moreover, the Omela  society’s strive to prioritize happiness above anything else is itself somewhat problematic (which makes this keeping-a-happy-face invention problematic as well): with constant happiness there is no space or time left for contemplation, no struggles often reflect in a very slow personal/professional growth. At least that is the deal in the real world, maybe the people of Omela are different. 

___________________________________________________________

The Plague (by Yan Leisheng):

  • Device that can completely cuts-out any air to come from the inside to the outside if some bacteria’s certain concentration in the air is reached. I believe that in this utopian reality this invention would very much help to prevent the decease from spreading that fast. As people were trying to isolate to prevent the spread of decease, every house could be provided with sensors that could monitor the concentration of the bacteria (just like the pcr test but touchless and quicker) and if detected near somebody, the whole house would be momentarily “wrapped” by some plastic semicircle (like a tent) that could only get the air in from one place and, only after total purification, the air from the inside could be released back to the atmosphere.

This is the merge between something like the humidity sensor (https://www.epluse.com/products/humidity-instruments/transmitters-for-industrial-applications/?gclid=EAIaIQobChMIzZbT-7yv-gIVYdOWCh3-gwgXEAAYASAAEgKuaPD_BwE) and the blood glucose sensors (https://www.palmsens.com/oem/point-of-care/?gclid=EAIaIQobChMI4LPvzr2v-gIVlZpmAh3RcAVsEAAYASAAEgKL0_D_BwEjust the different type of measurement. 

I believe that this invention would not harm anyone, except those who were unfortunate enough to catch the decease. Also, of course, there is always some uncertainty to the instrument, so some people people could be even potentially be locked up without any reason. Plus, of course, the limitation of being monitored 24/7, living in constant fear and anticipation that something is going to go wrong. 
Categories
prototyping documentation rapid prototyping

week2: EggDrop

IDEA 1 & FAILURE

This week as i was traveling a wasn’t able to post the blog on time. However, as I was unable to do actual experimentation, I only worked on my ideas. I developed some new ideas that I most certainly will incorporate into my final prototype. 

  • After some googling i realized that there is not much options for me to create a parachute from paper. I had no idea how to do it so that i won’t use all 10 allowed A4 papers, so i decided to leave this idea for later, if the others won’t work out. 
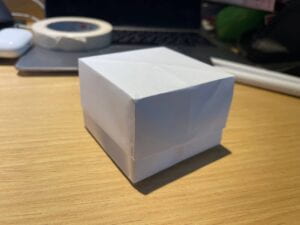
  • I decided that i will put egg in a box. I learned how to do a perfect box from 2 paper sheets a while ago, so I decided to implement this skill here. I decided to do so mainly because it would be much easier and effective for me to attach (using tape) the other parts of the construction (the ones meant to absorb the energy from the fall) to a paper box than an egg (due to symmetrical and larger shape. that is how two paper boxes look together (there is where i put my egg in. it is not exactly stable there but i thought it is not a big deal as it was my first experiment anyway). 

p.s. my personal record of folding a box reached 3 minutes. (the first box I folded in 7 minutes…..)

  • When surfing the Web, i encountered with way of folding paper (like accordion basically) and it seemed quite “jumpy”. I thought i could use it to create a “jumpy” construction by attaching it to sides of the egg’s shell   So i decided to check it out. In the video below i am demonstrating what this material is capable of, which, spoiler, was not exactly what i was looking for. 

as it turns out, this accordion style only works it falls exactly on the right spot for it to fold. plus, i didn’t really know how to attach it to the box (or anything else) using tape to reserve the jumpiness, so i decided to move on from that for now. 

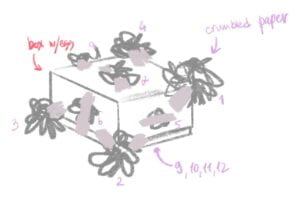
  • I also was thinking about crumbled paper as a material to observe some energy. and as i already had the needed materials and knew how to attach it to the box. So I went for it and created a sketch of the prototype.

the idea is to shell the box with the egg with multiple “balls” of crumbled paper (numbers 1-4 are created from the A4s, while numbers 5-12 (8 pieces) created from cut in half A4s) + the box, for this prototype I used up the total 2 (box) + 4 + 4(8 halves) = 10 a4 papers. which is the maximum. I know. But it is my first prototype that I decided to actually assemble so I believe it is fine. 

the final piece looked like this: 

yes, kind of messy. To be honest, the messiness came when I realized that attaching those crumbled pieces to the edges of the box (which I thought will be easy) turned out to be impossible using just one piece of tape. so, here we go. plus, i added some tape to stick the box’s parts together as well. halfway through I started revolving the construction around to check what places of the box still can potentially touch the paper. You can see it on the video as well. Also, in the video below I am showing how I was trying to increase the effectiveness of the attachment of the crumbled paper by creating this space for the edge to kind of fold into. didn’t really help but should count as a valuable attempt. 

I couldn’t wait to try the construction out already. So I did it. And it failed me.

I was kind disappointed but wasn’t really surprised. The construction involved too much tape for it to be viable and cool. I have some other ideas left, but about that in another post.

Categories
group research project interaction lab

step1.1: research

Interaction, in my opinion, is at its core communication and response to the communicated information, which helps art to achieve its purpose. i believe that without these three elements a piece of art, a game, a furniture, etc. cannot be called interactive as it does not change its state. or even if it changes, it happens not as a response to the events that happened or does not carry any meaning behind it. or both.

INTERACTIVE ART OBJECTS

last year i studied in abu dhabi for two semesters and was fortunate to visit EXPO 2020 about 10-15 times during the fall 2022 semester. one of the reasons i was coming there so often was that a lot of pavilions were extremely interesting and as there were so many, it was hard to stop coming back as something new opens. 

here is the link to some of the most interesting interactive installations that were displayed. Most of them perfectly fit into my description of interactivity as there visitors were able to see, listen, touch and that provoked the installation to change/evolve/stop/appear, etc., while communicating the message (development of the country, their initiatives, etc.)/evoking a feeling (joy, sadness, etc) that installation was supposed to convey. 

https://www.dailyartmagazine.com/expo-2020/

I, myself, would also add Germany’s pavillion as they had this very interesting core scenario to support they pro-green message for the visitors that you were supposed to follow and depending on how you did several interactive tasks, it would show how much electricity you have produced just by touching/turning/tossing things, (it supposedly was to show the importance of sustainability and to portray how small is needed from us to start making a change) this also perfectly fits into my definition of interactivity as it basically action and response format. (here is the link to the description and some info of the German pavilion https://www.expo2020germany.de/en/the-german-pavilion/)

NON-INTERACTIVE ART OBJECTS

one example of non-interactive art objects would be an oil painting “Forest road” by Ivan Shishkin. This painting is a piece of art that doesn’t interact with a viewer, except for the visual part. the only thing a person can do with the painting is to look, look more closely, look from far away and contemplate every time he changes his point of view. it is not to say that works of art like these are less valuable than the interactive ones, however they certainly have rather limited span of use. Forest road, 1892 - Ivan Shishkin - WikiArt.org

https://www.wikiart.org/en/ivan-shishkin/forest-road-1892 

Categories
interaction lab recitations

electronics & soldering

due to my absence on the actual recitation that took place on friday 16th, i attended a meeting with Lydia, interaction lab learning assistant so that i can catch up with the work! 

as i have only attended interaction lab once (this week) i only saw LED, wires, breadboard and resistor in action. i have also went through the multimeter with professor Gottfried and probably much more, however didn’t remember much straightaway. so, when it came to picking up the needed materials, i sought help from Lydia:) e.g. when i saw a variable resistor i didn’t even know how to connect it and what should i do with it. i diverge. as needed, i started with the task 1.

task 1: step 1

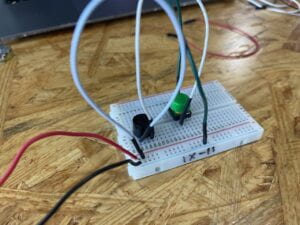
built it almost from the first try. Lydia helped me to understand how am i supposed to connect the button to the circuit (turns out if i connect two non-diagonal parts with a wire it doesn’t work, wow).  so, after a small struggle i was able to complete the task.

*in retrospective, i probably could have used a bit less wires for it too look more decent, but at the time i didn’t know that i am going to build on on this structure. 

task 1: step 2

task 2 started with the realization that it is basically a build-up for the task 1. sadly, this realization came after i already deconstructed the task 1 circuit. so i had to reassemble it again (took me a minute) and then started to do the task 2. shortly, i completed the task. the only problem i encountered was that i forgot that the LED’s long leg is supposed to go from the “+” charge, which i din’t notice i put in the “-“. Lydia reminded me of that and i got it fixed pretty quickly. so, my circuit worked perfectly again.

again, probably could’ve used less wires. however my decision to move the LED on the other side worked out perfectly as in further steps it became easier to connect the variable resistor. here, i also consulted with Lydia regarding reading a circuit scheme and she helped me to understand the algorithm of building one (usually start from the outer lap and then step-by-step build the inner laps). 

task 1: step 3

the third step was quite easy, except for figuring out the variable resistor as it took me some googling to find out how to connect it properly (that one leg should be connected to the +, another to the – and the middle one to the object (LED in this case)).

only after assembling it i realized what the variable resister actually was doing (varying the potential charge going through the LED). it didn’t stop me from building it though, so i believe it is fine. also, less wires next time (going to try).

task 2

as for the second task, Lydia showed me what i was supposed to make and walked me through the steps. doing the soldering was probably the hardest part, however as i had some previous

knowledge and some skill (two years ago i tried soldering at school) it didn’t take me too much time to figure out what to do. and then i connected the wires to the breadboard and finished the circuit! I personally really liked this DIY part as it made the whole work a tiny bit more personal and handy! 

I didn’t really had a partner to complete the morse code thing, but i hope it is fine! the fun part wasn’t that important to the circuit anyway! 

additional questions

  • Question 1: What is the function of the resistor R1? (You can read about the reason why LEDs need resistors here)  

The function of the resistor is to limit the amount of current (that comes from the power source) to a value that is in the range of LED’s forward current ratings (not higher for sure). Because usually the range of the LED’s forward current is lower than 5V and we usually use 5V power source. If we don’t use resistors the LED will burn out. 

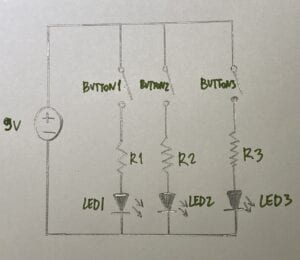
  • Question 2:  Looking at the following circuit, draw its diagram by yourself. 

*not sure about the labels

  • Question 3: After reading The Art of Interactive Design, in what way do you think that the circuit you built today includes interactivity? Which degree of interactivity does it possess? Please explain your answer.

I believe that the circuit that we build today includes three main ways of how we receive information: we can listen to the buzzer (if its on – it means the circuit is active), then we can touch it (as it reacts to when the button is pressed + when we use variable resistor to dim or brighten the second LED), and we can also see the change in the LED’s behavior when the button is pressed. we can’t really speak to it, however we can use it to speak Morse code, which should definitely count for something! overall, i believe this pretty much prosaic system is quite interactive, while having quite a limited number of its state variations (buzz on/of (long/short), light on/of, dimmed light/bright light).

  • Question 4: How can Interaction Design and Physical Computing be used to create Interactive Art? You can reference Zack Lieberman’s video or any other artists that you know.

I believe that using Physical computing (a bit more advanced ones though than we used today, such as scanners or trackers of movement, eyesight, voice, face expressions) there are numerous ways of creating something quite extraordinary as any human will be attracted to something that reacts to it (especially if it is some engaging, intriguing way). For example the clothing that was reacting to the direction of the person’s view. i believe that it is such an interactive and novel idea!

Categories
prototyping documentation rapid prototyping

week1: EggDrop

As I am currently in quarantine, I am unable to access the necessary materials at the moment to fully explore the possibilities of paper. However, I was able to find numerous videos on the internet on how people do the Egg Drop challenge. 

As for now, while I am waiting to receive some paper from the hotel, I would like to put down main ideas that I have now:

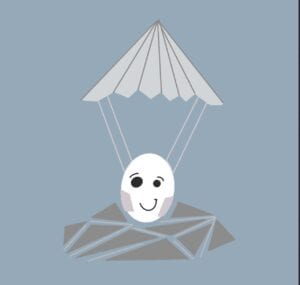
  1. Creating a parachute for the egg. I would connect the egg to the parachute. And maybe add a platform at the bottom. 
  2. Wrap the egg around using paper and fix the egg inside of the paper cocoon. 

The main idea would be to either slow down the falling of the egg or to create a bottom platform that could fold so that the energy from the egg falling would go into this paper deformation (instead of applying this energy to the egg). Or both: