Categories
Interaction Lab

Final Project: Get Up Grandma

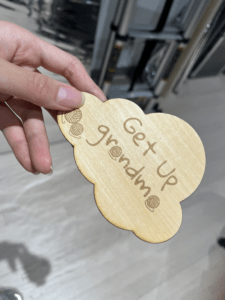
Project Title: Get Up Grandma
Designer: Calista
Instructor: Andy

Concept and Design

Many people in modern society have two “selves” in their hearts: one yearning to return home and another longing to travel far away. On one hand, we follow the appeal of distant places, dreaming of exploring a larger world. On the other hand, we have warmth and concern for our families that we cannot sever. My project tells the story of a girl raised by her grandma since childhood. When she was young, she was very naughty, but her grandma always tolerated her innocence. As she grew older, she left home. Despite still loving her grandma dearly, the distance between them grew, and they could never return to the intimate relationship they once shared. So, she made this alarm clock as a gift for her grandma, hoping that on the days when she was not home, the alarm clock could accompany her every morning, waking her from sleep with the songs they sang together, the games they played, and the warm memories they shared.

final product

I drew inspiration from this video game called One Hand Clapping, which is an inspiring puzzle 2D platformer that anglyzes players’ vocal input to progress through its vibrant world.  By singing or humming into microphone, players find confidence in the power of voice as it changes the world around them.

This feature inspired my design of voice analysis so that my users can get the chance to sing a song with their pitch visualize on the screen. This visualization is a metophor of grandma’s ball of yarn rolled slowly across the sky of memory, also serving as the central interction of my project. Through this user interaction, I hope to bring back memories of the old days when grandma was knitting in the afternoon sunlight, and the girl sat by her side leisurely humming a little song. This is a typical scene that haunts my memories, and I think it might also be a shared childhood experience for many people. 

screenshot from my project 

Here I want to briefly explain how my voice visualization works technically. As the code shown above, I first got the frequency spectrum of the microphone input, which is an array of amplitute values at 1024 frequecies. Then I iterated a small range of them (to simplify the problem, the song I chose only involve note C to A, so I manage to determine this range which has the best sensitivity), and find the peak amplitude value, whose index is just the frequency value I want. 

void findPeakFrequency() {
for (int i = 5; i < 45; i++) {
if (freqAnalysis.spectrum[i] > freqAnalysis.spectrum[peakIndex]) {
peakIndex = i;
}
}
peakFreq = freqAnalysis.spectrum[peakIndex];
if(peakFreq<0.01){
check = false;
}else{
check = true;
}
}

testing the feasibility of the frequency analysis code

I got a lot of useful and constructive suggestions from the user test. In my original design, users need to pat the cloud the to start the journey (I used a press sensor). Then professor Andy suggested me add a clue, like having a LED blinking. I adopted this sugggestion because I agreed that I need something to indicate user what I want them to do, and it’s better not in the form of a written instruction but through certain visual clue. It didn’t help a lot in IMA because the surroundings were to bright for anyone to notice the blinking LED. But it was okay when I was testing it in a darker room.


the blinking led indicating the press sensor

I also got some feedback from user test that my physical alarm clock was made into the shape of a cloud but it’s not quite related to my theme of childhood memory with gramma, which could be somewhat confusing. Therefore, Kevin sugested that this page can also have some clouds. After the user test, not only did I add cloud as a visual element but also tried to animate it, which effectively matched with my stroytelling.

Fabrication and production

Every project is completed through trail and error, and it’s through all these experiments and iterations that your work finally took on a satisfactory outcome. I’m going to go through some iterations I had in my fabrication and production:

  • The cloud alarm clock
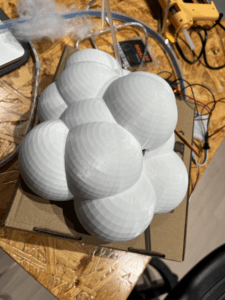
  1. 3D printing the cloud modle
    ( I tried to modle it my self by combining several spheres, but I found that the stl I downloaded from the website Printables worked better)

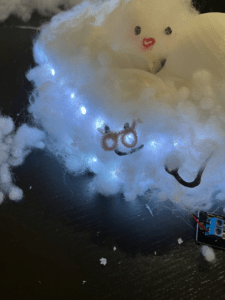
2. stick neopixel leds onto the cloud
( Applying hot glue to the back of the strip doesn’t work well because the glue sticks to the 3D printed material much more than the strip material. So I changed it to hot glue rings like this.)

3. add servos
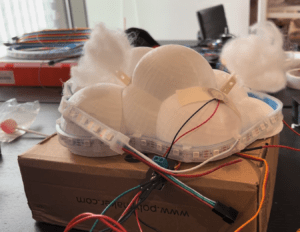
(At first I used delay when coding the servos, but that caused problems to the fastleds. Professor Rudi pointed out that it’s because leds require very fast signal transmission, so I can’t slow down the pace with delay, instead, I should use millis to control servo)
IMG_2205

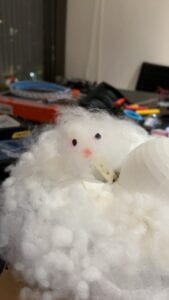
4. customize the design

The two small clouds represent the two moods of the girl, indicating that the girl likes to stick to her grandma (the big cloud) whatever mood she is in.

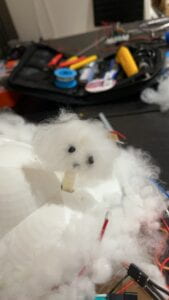
5. some more decoration

  • The voice pitch visualization interface 1. As I mentioned before, I tried to add anitations to this page and there were also some challenges in achieving this technically. Unlike static images like my cloud and bachground which is easy to animate, each point of this line is drawn with a dynamically changing array based on the real-time data collected from the microphone, which increased the difficulty. I thought for a whole day before I came up with the solution, and of course I was grateful to my friend Daisy for her help and inspiration. Basically, I don’t need to change how I store the the value in dot.y array every frame, I just need to scatter dotx to three times their original length and have every one of them move to the left at a fixed speed, just as the code shown below.
    dotx.add(cx);
    doty.add(smoothed);
    for (int i = 1; i < dotx.size(); i++) {
    stroke(25,7,94);
    strokeWeight(5);
    float newValue = dotx.get(i) - 2;
    dotx.set(i, newValue);
    line(dotx.get(i-1), doty.get(i-1), dotx.get(i), doty.get(i));
    stroke(13,100,9);
    strokeWeight(3);
    line(dotx.get(i-1), doty.get(i-1)+5, dotx.get(i), doty.get(i)+5);
    line(dotx.get(i-1), doty.get(i-1)-5, dotx.get(i), doty.get(i)-5);
    }
  1.  
  2. What’s more, I smoothed the y value to make it no only more pleasant to the eye, but also simulate the yarn more vividly.
    cx += 2;
    cy = height - peakIndex2*30;
    smoothed = smoothed * (1.0 - smoothing) + cy * smoothing;
  3. Many users said that their musicality is not strong, and can not sing in a key with the original song (that is, the piano prompt). Therefore, I added the numbered musical notation at the bottom of the page, which has the added benefit that as long as the user can match the notation, then his rhythm can easily match the song.

This page is improved a lot compared to its first version:

 before

after 

Conclusion

the final version of my documentation video 

“Get Up Grandma” combines technology and emotion to bridge the gap between a girl and her grandmother. This interactive alarm clock uses voice analysis, combined with visual elements like ball of yarn, to bring back memories through songs they used to sing together. The final product includes a 3D-printed cloud, LEDs, and animated voice pitch visualization, all working together to create a warm and nostalgic experience. In essence, “Get Up Grandma” is a heartfelt gift, ensuring the grandmother feels the granddaughter’s love and presence every morning, even when they are apart.

Video recording on the IMA show

On IMA show, although the singing part turned out to be too complicated for these children to understand, they still had a lot of fun playing with my project! Their parents are interested, too. This result made me realize the importance of audience to project design. Although my fellow students, as my targeted audience, can easily understand what my project is doing, my design is not very suitable for children. This also inspires me to take the audience more as the center when designing interactive experience in the future, and to think about my design from their perspective.

If I have more time to improve my project, I will optimize my code to keep it run more smoothly. I may also add a second stage as I imagined which is a body warm-up exercise where users can relive the memories of practicing Wuqinxi with Grandma. ( a warm-up exercise a little bit similar to Taichi but more popular in Chinese elderly group. 

Disassembly

Appendix

my code from Arduino and Processing

wiring diagram (made with TinkerCad Circuits)


Cloud 3D Model by creality_creator_1510. Retrieved from Printables under Creative Commons Public Domain License. Available at: https://www.printables.com/model/334549-cloud

Some images used in this project were generated using DALL-E, an AI model developed by OpenAI. These images were created to enhance the visual elements of the project. 

Sepecial thanks to professor Andy, Gottfried and Rodolfo for their kind guidance and support and to IMA community fellows who have assisted with this project and its ducomentation.

Categories
Interaction Lab

Hungry Pacman — Calista — Andy

Hungry Pacman — Calista — Andy

Context and Significance

We drew inspiration from a Wall Ball game, which is a fun easy backyard game to get the ball to find its way through randomly scattered holes to reach the top hole. I reckon this project is interactive because it keeps the participants engaged in the whole process. It aligns with my definition of interaction: a conversational and communication process between two or more people, where ideas and emotions ( in this case joy and happiness) are actively exchanged, enabling both parties to discover new meanings and create new things together. This is also what we would like to convey in our own project. We hope our participants can enjoy and have fun when playing with our project.


We adopted the game rule, but instead of remaking the Wall Ball game, we added new concepts and features, taking it to a new level. We added buzzer, stepper motors and sensors to optimize user experience and enhance game feedback. We also changed it to a two-player game, because we hope our users can collaborate with each other to solve the challenges. Our project is designed for people who seek relaxation from their busy workdays and enjoy laughing out loud with their friends while tackling a silly or impossible challenge (depends on their gaming skills 🙂

Conception and Design

Based on our narrative where players need to feed the hungry Pacman with “food,” we decided to use a ping pong ball as the “food” and craft the device’s body out of cardboard. This way, we can cut a hole to serve as Pacman’s mouth.

First-version of cardboard. Later recut because this was cut too much, making the game too difficult and the cardboard prone to bending

In terms of the usage of Arduino, we imagined users controlling the ball container’s movement by adjusting the height of two ropes on both sides. If they want the ball to go sideways, they need to make the rope on one side shorter and the other side longer, while being careful not to tilt too much. Therefore, we carefully considered and ultimately decided to use two sliders as the most suitable sensor for user control. We also once thought of changing the slider to other sensors that were more fun, but that made the game almost impossible because it couldn’t be accurately controlled, so we ended up going back to the original design. 

To hold the ball securely, we first experimented with cardboard, but it often tipped over. Andy came to our rescue with a V-shaped piece of wood, which proved to be an ideal solution. We later carved it into the shape of Pacman, which not only aligned /with our theme but also ensured it wasn’t too heavy for the stepper motors to handle. 

The changing process of the wood piece

Fabrication and Production
First, we began by designing the cardboard, which served as the map for our game. Next, we focused on the mechanism. Renna came up with the creative idea of using a straw to replace the pulley, considering that the material is easy to access and process. After that we designed our circuits as the diagram below.

circuits diagram

building the circuits 

We followed Andy’s suggestion to use two separate Arduino for two stepper motors, simplifying the coding process. We made sure that our fabrication and coding process is done alternatively. Additionally, I suggested incorporating a buzzer to play the Pacman music, enhancing the immersive atmosphere of the game. While I took on more responsibility for the coding aspect, Renna focused on fabrication. Throughout the entire process, we worked closely together and ensured effective communication. We also thanks our professor Andy a lot for his help, for example, when we couldn’t think of how to secure our stepper motors, he kindly suggested us to make use of the clamp:

This winding method is also a solution that we are proud to have come up with together

In terms of the technical part, I’d like to briefly go through our code (refer to the appendix). Our Arduino sketch controls a stepper motor based on the input from a potentiometer (A0) and plays a melody on a buzzer triggered by a press sensor (A1). The value read from A0 determines the direction and speed of the stepper motor. If the value falls within 0-300 or 700-1023, the stepper motor is set to move in either clockwise or counterclockwise direction at speed 600. If the value is in the middle, the motor stops.

During the user test, we recognized many things that we can improve. At that time, we did not have this board, so if you stand in front of it, you can see the mess behind through the hole. Therefore, we added this inclined board after the user test. I sketched out this idea:


In this way, the ball could be caught and rolled to the front and trigger the sensor after falling, thus effectively avoiding the trouble of picking up the ball and playing music manually.


Conclusions

In conclusion, our project, “Hungry Pacman,” aimed to create an interactive gaming experience that engaged participants in collaborative gameplay while providing moments of joy and relaxation. Our project results largely aligned with our definition of interaction as a conversational exchange between participants, where ideas and emotions are actively shared. Users got to strategize, communicate, and problem-solve together. Ultimately, our audience interacted positively with our project, showing enthusiasm and enjoyment during gameplay. In this project I not only familiarized myself with all the techniques but also learned how to solve problems through teamwork.

The final version!

There are still many things that we can improve in the future, so that we can create even more memorable experiences for our players.

  1. We could further distinguish the response between winning and losing the game, which could create a more immersive game experience. It’s hard to do because it’s already very difficult to add more sensors to our circuit as we don’t have F/M cables of enough length.
  2. We may also make the stepper remember its position at the very beginning and go back to that position whenever the game is restarted. We couldn’t figure out the code, because the rope can stop anywhere when the game breaks, so even if we count the number of steps needed to go from top to bottom, it still doesn’t help.

Disassembly


Appendix

  1. the full code

the main Arduino file: (the other Arduino only have part of the code that controls the stepper motor)

// based on ConstantSpeed example
#include <AccelStepper.h>
#include "pitches.h"

int DIR_PIN = 2;
int STEP_PIN = 3;
int EN_PIN = 4;
int value;
int press;

AccelStepper stepper(AccelStepper::DRIVER, STEP_PIN, DIR_PIN);

// notes in the melody:
int melody[] = {
NOTE_C3, NOTE_C4, NOTE_G3, NOTE_E3, NOTE_C4, NOTE_G3, NOTE_E3, 0, NOTE_CS3, NOTE_CS4, NOTE_GS3, NOTE_F3, NOTE_CS4, NOTE_GS3, NOTE_F3, 0, NOTE_C3, NOTE_C4, NOTE_G3, NOTE_E3, NOTE_C4, NOTE_G3, NOTE_E3, 0, NOTE_C3, NOTE_D3, NOTE_E3, NOTE_F3, NOTE_G3, NOTE_A3, NOTE_B3, NOTE_C4,NOTE_C4
};


// note durations: 4 = quarter note, 8 = eighth note, etc.:
int noteDurations[] = {
4, 4, 4, 4, 4, 4, 4, 4,
4, 4, 4, 4, 4, 4, 4, 4,
4, 4, 4, 4, 4, 4, 4, 4,
8,8,8,8,8,8,4,1,1,
};


void setup() {

// Enable the stepper driver by setting the EN pin to LOW
pinMode(EN_PIN, OUTPUT);
digitalWrite(EN_PIN, LOW);

stepper.setMaxSpeed(1000);
Serial.begin(9600);

}

void loop() {

value = analogRead(A0);
press = analogRead(A1);
Serial.println(press);

if (value > 0 && value < 300) {
stepper.setSpeed(600);

} else if (value >= 300 && value < 700) {
stepper.setSpeed(0);

} else if (value >= 700 && value < 1023) {
stepper.setSpeed(-600);
}

stepper.runSpeed();

if (press>50) {

/**
* A buzzer that play the Pacman melody.
* This was adapted from a the tutorial found here:
* https://docs.arduino.cc/built-in-examples/digital/toneMelody/
*/

for (int thisNote = 0; thisNote < 32; thisNote++) {

// to calculate the note duration, take one second divided by the note type.
int noteDuration = 1000 / noteDurations[thisNote];
tone(8, melody[thisNote], noteDuration);

// to distinguish the notes, set a minimum time between them.
// the note's duration + 30% seems to work well:
int pauseBetweenNotes = noteDuration * 0.80;
delay(pauseBetweenNotes);
// stop the tone playing:
noTone(8);
}
}
}

in the pitches.h file:

/*************************************************
Public Constants
*************************************************/

#define NOTE_B0 31
#define NOTE_C1 33
#define NOTE_CS1 35
#define NOTE_D1 37
#define NOTE_DS1 39
#define NOTE_E1 41
#define NOTE_F1 44
#define NOTE_FS1 46
#define NOTE_G1 49
#define NOTE_GS1 52
#define NOTE_A1 55
#define NOTE_AS1 58
#define NOTE_B1 62
#define NOTE_C2 65
#define NOTE_CS2 69
#define NOTE_D2 73
#define NOTE_DS2 78
#define NOTE_E2 82
#define NOTE_F2 87
#define NOTE_FS2 93
#define NOTE_G2 98
#define NOTE_GS2 104
#define NOTE_A2 110
#define NOTE_AS2 117
#define NOTE_B2 123
#define NOTE_C3 131
#define NOTE_CS3 139
#define NOTE_D3 147
#define NOTE_DS3 156
#define NOTE_E3 165
#define NOTE_F3 175
#define NOTE_FS3 185
#define NOTE_G3 196
#define NOTE_GS3 208
#define NOTE_A3 220
#define NOTE_AS3 233
#define NOTE_B3 247
#define NOTE_C4 262
#define NOTE_CS4 277
#define NOTE_D4 294
#define NOTE_DS4 311
#define NOTE_E4 330
#define NOTE_F4 349
#define NOTE_FS4 370
#define NOTE_G4 392
#define NOTE_GS4 415
#define NOTE_A4 440
#define NOTE_AS4 466
#define NOTE_B4 494
#define NOTE_C5 523
#define NOTE_CS5 554
#define NOTE_D5 587
#define NOTE_DS5 622
#define NOTE_E5 659
#define NOTE_F5 698
#define NOTE_FS5 740
#define NOTE_G5 784
#define NOTE_GS5 831
#define NOTE_A5 880
#define NOTE_AS5 932
#define NOTE_B5 988
#define NOTE_C6 1047
#define NOTE_CS6 1109
#define NOTE_D6 1175
#define NOTE_DS6 1245
#define NOTE_E6 1319
#define NOTE_F6 1397
#define NOTE_FS6 1480
#define NOTE_G6 1568
#define NOTE_GS6 1661
#define NOTE_A6 1760
#define NOTE_AS6 1865
#define NOTE_B6 1976
#define NOTE_C7 2093
#define NOTE_CS7 2217
#define NOTE_D7 2349
#define NOTE_DS7 2489
#define NOTE_E7 2637
#define NOTE_F7 2794
#define NOTE_FS7 2960
#define NOTE_G7 3136
#define NOTE_GS7 3322
#define NOTE_A7 3520
#define NOTE_AS7 3729
#define NOTE_B7 3951
#define NOTE_C8 4186
#define NOTE_CS8 4435
#define NOTE_D8 4699
#define NOTE_DS8 4978

Reference:

“DIY Wall Ball Game | DIY Backyard Summer Game | DIY Game.” YouTube, uploaded by Kelley, 13 May 2023, https://www.youtube.com/watch?v=TruZ5ZxAUKo


Categories
creative coding lab

Project B: Journey

link to my project:
https://calistalu.github.io/ProjectB/

link to my code:
https://github.com/calistalu/ProjectB

  • Part 1 for public readers
    Calista Lu,
    JOURNEY, 2023
    an immersive experience of rhythmic visuals
  • The Elevator Pitch.
    My project is committed to exploring a journey of self-discovery, taking the form of interactive audio visualization. The user is invited to immerse themselves in a non-narrative journey, experiencing an attractive blend of rhythmic visual elements.
  • Abstract.
    My project B is an abstract expression of the concept that everyone’s life experiences define their unique self, and invites users to think, engage, release and refresh, reflecting on their own journey of self-exploration. In this enchanting journey of audio-visual exploration, each step echoes with the heartbeat, and every scenery unfolds a symphony with the soul. It’s as if users are penning theirs unique existence on this vibrant canvas, striding forward like that solitary yet resolute silhouette. Hopefully users could be emotionally touched, purified and healed at the journey’s end.ready to start your journey 
  • Part 2 for yourself (and your instructor)
    1) Process: Design and Composition

    After deciding to use audio visualization to narrate my story, I drew inspiration for my visual elements from this video:
    I attempted to create a 3D music visualizer using WEBGL mode. However, I encountered a major challenge—the 3D canvas defaulted to a white background that covered everything. I turned to Professor Eric for help, who suggested me to use ‘CreateGraphics’ in p5, but that is only a way to combine P2D and WEBGL without resolving the overlapping issue. Despite trying various solutions, I ultimately abandoned the incorporation of my 3D music visualizer into the project.

    The website now consists of two webpages. The first serves as the initial interface and provides background information for users, while the second is the main music visualizer.

    3D music visualizer 2) Process: Technical

    I acquired advanced web development skills, including CSS animation and JS event listeners, from W3Schools with my intention of designing a visually appealing first webpage. Details on this aspect have been provided in my mini project7 documentation.

    One of the significant technical challenges was showcasing the growth process of a person in a way that cannot be reversed, because simply creating several buttons to choose the character is not what I really want, and ultimately, I used a Boolean for each stage to control the whole process.

    if (currentImage === "child") {
    if (start) {
    count1++;
    if (count1 < 150) {
    image(w1, map(count1, 0, 150, 0, width / 4), height - 100, 90, 120)
    stroke(255, 150)
    strokeWeight(10)
    line(0, height - 90, map(count1, 0, 150, 0, width / 4), height - 90)
    } else {
    count1 = 201
    stroke(255, 150)
    strokeWeight(10)
    image(w1, width / 4, height - 100, 90, 120)
    line(0, height - 90, width / 4, height - 90)
    }
    image(child, width / 2, height / 2 - 100 - 150, 150, 200);
    }
    textAlign(CENTER, CENTER);
    textSize(20);
    fill(255);
    strokeWeight(1)
    text(displayText, width / 2, height - 50);
    } else if (currentImage === "teen") {
    count2++;
    if (count2 < 150) {
    image(w2, map(count2, 0, 150, width / 4, width / 2), height - 100, 90, 120)
    stroke(255, 150)
    strokeWeight(10)
    line(0, height - 90, map(count2, 0, 150, width / 4, width / 2), height - 90)
    } else {
    count2 = 201
    stroke(255, 150)
    strokeWeight(10)
    image(w2, width / 2, height - 100, 90, 120)
    line(0, height - 90, width / 2, height - 90)
    }
    image(teen, width / 2, height / 2 - 100 - 150, 150, 200);
    } else if (currentImage === "adult") {
    count3++;
    if (count3 < 150) {
    image(w3, map(count3, 0, 150, width / 2, 3 * width / 4), height - 100, 90, 120)
    stroke(255, 150)
    strokeWeight(10)
    line(0, height - 90, map(count3, 0, 150, width / 2, 3 * width / 4), height - 90)
    } else {
    count3 = 201
    stroke(255, 150)
    strokeWeight(10)
    image(w3, 3 * width / 4, height - 100, 90, 120)
    line(0, height - 90, 3 * width / 4, height - 90)
    }
    image(adult, width / 2, height / 2 - 100 - 150, 150, 200);
    } else if (currentImage === "old") {
    count4++;
    if (count4 < 150) {
    image(w4, map(count4, 0, 150, 3 * width / 4, width), height - 100, 90, 120)
    stroke(255, 150)
    strokeWeight(10)
    line(0, height - 90, map(count4, 0, 150, 3 * width / 4, width), height - 90)
    } else {
    count4 = 201
    stroke(255, 150)
    strokeWeight(10)
    image(w4, width, height - 100, 90, 120)
    line(0, height - 90, width, height - 90)
    }
    image(old, width / 2, height / 2 - 100 - 150, 150, 200);
    } else if (currentImage === "end") {
    push()
    translate(width / 2, height / 2)
    image(end, 0, 0, width, height)
    pop()
    }

This part of code is still too long and I said I would shorten it in my presentation. So here is its optimized version:

//four stages + end
    function displayImage(imageIndex, imageRef, transitionCount, xPos, xEnd, y) {
        transitionCount++;
        if (transitionCount < 150) {
            const x = map(transitionCount, 0, 150, xPos, xEnd);
            image(imageRef, x, y - 100, 90, 120);
            stroke(255, 150);
            strokeWeight(10);
            line(0, y - 90, x, y - 90);
        } else {
            transitionCount = 201;
            stroke(255, 150);
            strokeWeight(10);
            image(imageRef, xEnd, y - 100, 90, 120);
            line(0, y - 90, xEnd, y - 90);
        }
        return transitionCount;
    }

    // Display images based on current stage
    imageMode(CENTER);
    if (currentImage === "child") {
        if (start) {
            count1 = displayImage("child", w1, count1, 0, width / 4, height);
            image(child, width / 2, height / 2 - 100 - 150, 150, 200);
        }
        textAlign(CENTER, CENTER);
        textSize(20);
        fill(255);
        strokeWeight(1)
        text(displayText, width / 2, height - 50);
    } else if (currentImage === "teen") {
        count2 = displayImage("teen", w2, count2, width / 4, width / 2, height);
        image(teen, width / 2, height / 2 - 100 - 150, 150, 200);
    } else if (currentImage === "adult") {
        count3 = displayImage("adult", w3, count3, width / 2, 3 * width / 4, height);
        image(adult, width / 2, height / 2 - 100 - 150, 150, 200);
    } else if (currentImage === "old") {
        count4 = displayImage("old", w4, count4, 3 * width / 4, width, height);
        image(old, width / 2, height / 2 - 100 - 150, 150, 200);
    } else if (currentImage === "end") {
        push();
        translate(width / 2, height / 2);
        image(end, 0, 0, width, height);
        pop();
    }

Another technical challenge involved making star particles sparkle more accurately in response to the song. The code triggers a blinking star when the amplitude level increases. I’ve experienced several versions and this one worked best.

//particles turn into star 
    let Amp = amplitude.getLevel();
    if (Amp - previousAmp > 0.05) {
        increasing = true
    } else {
        increasing = false
    }
    previousAmp = Amp;

    if (increasing) {
        randomIndex1 = floor(random(particles.length));
        randomIndex2 = floor(random(particles.length));
        randomIndex3 = floor(random(particles.length));
    }

    if (particles[randomIndex1]) {
        push()
        translate(width / 2, height / 2 + 100)
        translate(particles[randomIndex1].x, particles[randomIndex1].y)
        rotate(frameCount)
        image(star, 0, 0, 30, 30);
        pop()
    }

    if (particles[randomIndex2]) {
        push()
        translate(width / 2, height / 2 + 100)
        translate(particles[randomIndex2].x, particles[randomIndex2].y)
        rotate(frameCount)
        image(star, 0, 0, 40, 40);
        pop()
    }

    if (particles[randomIndex3]) {
        push()
        translate(width / 2, height / 2 + 100)
        translate(particles[randomIndex3].x, particles[randomIndex3].y)
        rotate(frameCount)
        image(star, 0, 0, 50, 50);
        pop()
    }

3) Reflection and Future Development

From the project proposal to its current version, many compromises were made due to time and technical limitations. While the CSS design of the first webpage was successful, I am less satisfied with how I represented my narrative in the second webpage. The initial intention was for it to be healing and inspiring.

Feedback from the audience suggested adding more differences in different life stages, a point I had also considered. Guest professors highlighted the importance of consistency between the two webpages in terms of visual style, including the design of circles and the choice of font.

What’s more, once moved to another device with a different screen ratio, some elements of my web page would be overlapping each other, which is a direction for future improvement.

4) Credits & References
https://www.bilibili.com/video/BV11N411w7Ys/?share_source=copy_web&vd_source=f652fb5afdc7d621b2d6acee94aa961c
[visually inspiration]

https://www.bilibili.com/video/BV1pr4y127Yz/?share_source=copy_web&vd_source=f652fb5afdc7d621b2d6acee94aa961c
[concept inspiration; image credit]

https://www.youtube.com/watch?v=akM4wMZIBWg&t=193s
[ Technical help: how to use the fft object to get waveform data and store them in an array; how to draw the wave into a circular shape by looping through the waveform data.]


Categories
creative coding lab

Mini Project 7: Project B Website Draft

  • Project Title
    Journey
  • Link to your project
    link to my project:
    https://calistalu.github.io/project-b-draft/
    link to my code:
    https://github.com/calistalu/project-b-draft
  • Brief Description and Concept
    My project B is committed to exploring a journey of self-discovery, taking the form of interactive audio visualization.  In my design, the whole project is composed of two web pages: the first serves as the initial interface as well as a background introduction for the users; and I plan to put my p5 sketch in the second website, inviting users to an immersive experience of rhythmic visuals.
  • Demo/Visual Documentation

  • Coding

    document.addEventListener('DOMContentLoaded', function() {
    const endOfPage=document.getElementById('box5');
    const contactBtn=document.getElementById('contactBtn');
    contactBtn.addEventListener('click', function() {
    endOfPage.scrollIntoView({ behavior:'smooth' });
    });
    });

    This portion of the code is responsible for generating a contact button that functions as a page redirect, taking the user to the bottom of the webpage upon being clicked. I sought resources like W3Schools to learn the utilization of event listeners in JavaScript to achieve this specific functionality.

    window.addEventListener("scroll", function() {
    const scrolled=window.scrollY;
    console.log(scrolled/10)
    const translationX=scrolled;
    const translationY=scrolled;
    document.getElementById("box2").style.transform="translate("+translationX+"px, "+translationY+"px) ";
    });

    Originally, my goal was to animate a brown pole’s rotation while having a circular element slide down it as users scrolled through the page. However, controlling these behaviors precisely proved challenging. Consequently, I opted to simplify the design, keeping the circle moving down to the right as the webpage is scrolled.

    \.frame1 {
    font-family: Cambria, Cochin, Georgia, Times, 'Times New Roman', serif;
    font-size: 30px;
    text-align: center;
    left: 25%;
    width: 50%;
    height: auto;
    padding: 20px;
    border-style: double;
    border-width: 6px;
    border-color: rgb(108, 95, 91);
    }
    
    .frame1 img {
    display: none;
    position: absolute;
    left: -300px;
    transform: translateY(-50%);
    width: 200px;
    height: 200px;
    }
    
    .frame1:hover img {
    display: block;
    }
    
    .frame1 img, .frame1 {
    transition: background-color 0.5s ease-out, transform 0.5s ease-out;
    }
    
    .frame1:hover{
    background-color: rgba(103, 114, 157,0.8);
    transform: rotate(5deg);
    }

    In the CSS section, I established interactive features for four distinct elements labeled “childhood, teenage, adulthood, old age.” The gif would appear when the mouse hovers over the specific bar, and disappear when mouse moves away through the use of pseudo classes, creating an engaging user experience. Initially, I assigned individual IDs to each bar, even though the interaction for the third bar is same as the first, as did the second and fourth bars. To enhance efficiency, I optimized the code by consolidating the shared interactions among bars into a single CSS class, retaining the IDs for defining their absolute positions. This approach reduced redundancy and greatly shortened the code.

  • Reflection
    1. Well-organized File Names make it easier to understand the purpose of each file, reducing confusion and the risk of misinterpreting file functionalities.2. I would use classes when multiple elements share similar style or behavior. They allow the application of the same styles to multiple elements without repeating code. Ids would be more commonly used, for in most cases an element has a distinct style or functionality that is specific on the page.

    3. I’m concerned about potential variations in the layout of my website across different devices since I haven’t utilized absolute positioning for all elements.”

    4. WYSIWYG Text Editor offers a visual, user-friendly interface for text editing and styling. It’s intuitive for those unfamiliar with coding, while HTML provides direct control over content structure and formatting.

    5. HTML/CSS defines the structure, content, and layout of web pages. JavaScript and p5.js enable interactive design, animations, and dynamic behaviors on web pages.

Categories
creative coding lab

Reading Response 3: New Media Art


In the article, New Media Art was described as projects that utilize emerging media technologies, exploring their cultural, political, and aesthetic potentials. Most examples are interactive web pages. However, almost 15 years on, the definition of New Media has been partly reconstructed due to the rapid development of digital technology.

Firstly, the wide adoption of smartphones and mobile apps have significantly impacted how people engage with digital content. The rise of social media platforms like Facebook, Instagram, Twitter, and TikTok has also influenced the way artists create and share their work.

Secondly, the integration of artificial intelligence and machine learning technologies has paved a new way for artistic exploration. Artists have been experimenting with generative algorithms and AI-driven creation. 

Thirdly, advances in VR and AR have expanded the possibilities for immersive and interactive art experiences as well. Artists have been enabled to explore new artistic practices like 3D environments, and virtual reality installations.

In summary, the landscape of New Media Art has evolved in response to technological advancements. The themes, tools, and mediums employed by new media artists have largely shifted responding to the dynamic nature of our digital age.

My first chosen art work is “My Boyfriend Came Back from the War”.

“My Boyfriend Came Back from the War” is a unique online art project made by Olia Lialina in 1996. It is an interactive story on a webpage, telling a fragmented and non-linear narrative through text and images. As you click through the story, you uncover layers of it about a romantic relationship affected by war. 

Olia Lialina is an artist from Russia, born in 1971. She’s known as a pioneer in exploring and creating new media art. Her work often explores the human experience in the digital age, using the internet as a medium for artistic expression.

“My Boyfriend Came Back from the War” is considered as a special experiment from the 1990s when artists started playing with the internet for art. I was fancinated by the way the story is told, not in a straight line but by clicking on hyperlinks, just like a puzzle. Lialina is recognized for her contributions to the early net art movement, where artists embraced the internet as a novel canvas for creative experimentation.

My second chosen art work is “Genetic response system 3.0”.

“Genetic Response System 3.0” is a thought-provoking net art project by Diane Ludin in 2000. It delves into the intersection of genetics and technology and investigates the evolving discourse surrounding the human genome project and biotechnology. 

Diane Ludin is a poet, media artist, and product manager. She is known for her work at the intersection of art, technology, and cultural critique. She has exhibited her internet and media installation work throughout the US, Europe, and Australia. 

In “Genetic Response System 3.0”, Ludin used a database to collect and reuse online materials, creating a unique visual style. Her way of mixing images and words challenges the complicated language around biotech. She did not treat media content as benign, nor did she treat audiences as passive. She’s committed to constitute a new meaning to human genome by representation. Just as Stuart Hall suggested: “Representation is not about whether media reflects or distorts reality, because this would imply that there’s only one true meaning rather there are many meanings.”

Categories
creative coding lab

Project B Proposal

https://docs.google.com/presentation/d/1bCmYGHXCRPoRBrkkXL6LG97NlYpTXS2sHdAju3mLegw/edit?usp=sharing

Working Title:

Journey

Project Description:

My project B tells a story of a journey of self-discovery, taking the form of interactive audio visualization. The user is invited to immerse themselves in a non-narrative journey, experiencing an attractive blend of rhythmic visual elements.


The foundational scene portrays the silhouette of an individual on his way to the distance. From the moment he set out, he never stoped moving forward. Regardless of the evolving surroundings, this figure remains centered in the visual field. The person’s movement, whether walking or running, as well as the changing landscape, dynamically responds to the tempo of the background music. If possible, I would show the process of the person growing up from his or her childhood. Time permitting, I would also try pixel manipulation to control the color of the canvas, probably changing as scrolling down.

My project B is an abstract expression of the concept that everyone’s life experiences define their unique self, and invites users to think, engage, release and refresh, reflecting on their own journey of self-exploration. In this enchanting journey of audio-visual exploration, each step echoes with the heartbeat, and every scenery unfolds a symphony with the soul. It’s as if users are penning theirs unique existence on this vibrant canvas, striding forward like that solitary yet resolute silhouette. Hopefully users could be emotionally touched, purified and healed at the journey’s end.

Categories
creative coding lab

Mini Project6: Particle World

Blue Tears

https://calistalu.github.io/ParticleWorld/
https://editor.p5js.org/calistalu/sketches/X0MrgBfje

Brief Description and Concept

I got my inspiration from the splendid natural phenomenon, which has an extremely romantic name: blue tears. It occurs particularly in bays and coastal areas, when certain types of microorganisms in the water emit a blueish glow when disturbed by movement or waves, creating a stunning visual display of blue light at night. 

Demo/Visual Documentation

Coding

for (let i = 0; i < others.length; i++) {
if (i !== particles.indexOf(this)) {
if (this.ron == others[i].ron) {
let distance = this.y - others[i].y;
if (distance > 100) {
this.shouldSlowDown = true;
break;
} else {
this.shouldSlowDown = false;
}
}
}
}

if (this.shouldSlowDown) {
this.spd -= 0.1;
this.spd = constrain(this.spd, 1, 2);
} else {
this.spd = 2;
}
}

the original version

Initially, I had this part of code that measures the distance between each particle and all others. If a particle moved too far away, it would be slowed down, simulating the effect of sea waves. I was thrilled to achieve this interaction between objects. However I later came up with a more beautiful and satisfactory pattern: 

update() {
this.y1 = sin(600 * this.movex1) * 10;
this.y2 = cos(400 * this.movex2) * 30;
this.movex1 += 0.0001;
this.movex2 -= 0.0001;
this.y = this.y1 + this.y2 + this.y3 + 3 * sin(frameCount * 0.1);

this.ns = noise(this.yoff);
this.yoff += 0.01;
this.y3 += this.ns * this.spd;

if (frameCount % 800 == this.time) {
this.y3 = 0;
}
}

The sine wave turned out to be perfect for simulating sea waves, nothing but the parameter of this.y1 and this.y2 were determined after numerous experiments. Furthermore, I used frameCount to control the ‘lifespan’ of each wave, and I integrated the original version to simulate the falling tide.

Reflection

  1. Object-oriented programming (OOP) is to combine group of variables and related functions into a unit. A Class is a blueprint that defines the properties and the methods common to all objects constructed. An Instance of a class is a specific object created from a particular class, which has its unique properties but shares all the methods in that class.

  2. There are two fundamental benefits of OOP: modularity and reusability. All the objects can be easily modified without affecting other parts of the project, because each of these functions can be encapsulated within the class. Additionally, some facilities can be used rather than need to be built again and again. OOP is useful especially when working on a complicated project with multiple objects to organize the code.
  3. I defined two classes for two different objects, Particle1 and Particle2.  The display ( ) method uses the properties of the object to determine its color and draw it on the screen. The properties and methods of these objects are used together to create complex behaviors and interactions. Glow( ) is my favorate method because it grabs the essence of blue tears and brings life to the waves.
  4. I’m still not quite clear about how to achieve interaction between different and separate objects. If I can figure this out, I might be able to create a falling tide that begins where the sea wave disappears, and vanishes when it meets the next wave.
Categories
creative coding lab

Mini Project 5: object dancers

https://editor.p5js.org/calistalu/sketches/VugfRka5s

https://github.com/calistalu/mini_project_5_object_dancer_2023_10_31_00_58_53

Brief Description and Concept

This particular seagull gathered significant popularity among young people, largely due to its adorable appearance and keen eyes. While it’s often seen in plush toys and internet memes, I was inspired to bring it to life through animation. Its eyes will follow your mouse’s direction. It turned out that it’s even cuter when dancing around!

Demo/Visual Documentation

 original version

demo 

Coding

update() {
angleMode(DEGREES);
this.ang = sin(frameCount * 10) * 8;
this.cute1 = sin(frameCount * 20);
this.cute2 = sin(180 + frameCount * 20);
this.e1 = map(mouseX, 0, width, 12, 18);
this.e2 = map(mouseY, 0, height, 93, 104);
this.e3 = map(mouseY, 0, height, 72, 82);
this.x += this.spd;
if (this.x >= width - 100 || this.x <= 100) {
this.spd *= -1;
}
}

Several properties are manipulated in the updated( ) method, which is a central to achieving the seagull’s dance movement. The challenge lies in determining which properties are required for the dancer (the seagull) before writing the constructer function. Initially, I individually adjusted the positions of the vertex resulting in lengthy and complex code.


update() {
angleMode(DEGREES);
this.bx5-=sin(frameCount*this.m1)
this.bx6+=sin(frameCount*this.m1)
this.bx1+=sin(frameCount*this.m1)
this.bx2+=sin(frameCount*this.m1)
this.bx3-=sin(frameCount*this.m1)
this.bx4-=sin(frameCount*this.m1)

this.ang = sin(frameCount * 10) * 8;
this.wy1 -= sin(frameCount * 10) * 3;
this.wx3 += sin(frameCount * 10);
this.wy2 -= sin(frameCount * 10) * 3;
this.wx4 -= sin(frameCount * 10);

}

However, I later discovered a more concise approach. By creating “this.cute1 = sin(frameCount * 20)” and applying it to all the vertex coordinates, I simplified the code significantly. Its additional benefit is to allow easily introduce “this.cute2 = sin(180 + frameCount * 20)” to achieve phase difference in the left and right body parts. 

Reflection/Lessons Learned

  1. By encapsulating data (properties) and behavior (methods) within a class, I ensure that the class is self-contained. This means that the class doesn’t rely on any external code for its function, which make it easier to organize the code. I can create instances of my class in various parts of my project, as well as combine everyone’s classes into one project, increasing flexibility, reducing redundancy and saving time. 
  2. When working on a project that involves multiple contributors, ensuring that your code harmonizes with others can be challenging. Differences in coding style, naming conventions, and assumptions may lead to harmonization issues. These challenges can result in debugging difficulties and delays in project progress. The application of OOP is a significant advantage when dealing with these situations.
  3. Modularity refers to the division of a project into smaller, independent components. In the case of the “Seagull” class, it has methods for construction, update and display. Each of these functions can be encapsulated within the class, allowing for easy modifications without affecting other parts of the project. For instance, I can modify the updating (dancing) algorithm in the “Seagull” class without altering the code responsible for drawing the basic shape of the seagull.

    Reusability implies that a class can be used in different contexts or projects. For the “Seagull” class, it could be employed not only in my current project but also in future projects or by our professor. This reusability is possible because the class is self-contained, making it easy to integrate into new systems without extensive modifications. For instance, when it is combined into the collection of all the dances developed by our classmates, the “Seagull” class can be utilized without rewriting the entire code.

Categories
creative coding lab

Project A: Cyberpond ecosystem

https://github.com/calistalu/projectA

https://editor.p5js.org/calistalu/sketches/GXAv3p3sl

Part 1

Project description:

Calista Lu,
CYBERPOND ECOSYSTEM, 2023
Digital water life inhabiting in a cyber world

  • The Elevator Pitch.
    Cyberpond Ecosystem revolves around exploring various creatures inhabiting in a tiny cyber pond. It simulates a school of fish gracefully navigating the pond’s water, with their predator chasing all the way behind.
  • Abstract.
    Within the Cyberpond Ecosystem,  the school of fish exhibit a range of interactive behaviors with the predator. Users are empowered to interact with these creatures using their mouse, aiming to reflect how human intervention can disrupt the delicate equilibrium of nature’s complicated operations. The core objective of this project is to provoke contemplation about ecosystems through a virtual experience, emphasizing the interconnectedness of life within nature. It serves as a reminder that every organism plays a role in sustaining the stability of an ecosystem, and any alteration has the potential to reverberate throughout the entire system.

User interaction with the school of fish

Human intervention 

Part 2

1) Process: Design and Composition

My project started from its initial concept of simulating a school of fish:

Initial design of school of fish

Then I decided to introduce vibrant colors in order to create a striking contrast with the dark background. It occurred to me that I could correlate the color with the direction of the fish’s movement, controlled by sin(a) and cos(a), and incorprate user interaction through mapping the value of mouseX. What’s more, using the noise function to create an organic feel is what I have found of value to build upon in your project. Perlin noise is smooth and continuous (and repeatable), meaning that it doesn’t exhibit sudden changes. This property makes it ideal for generating realistic, organic-looking textures. I utilized the two dimension noise to subtly shift the positions of the fish particles in each frame (picked in align with p.x and p.y, similar to vertex), creating such a flow field. It took several iterations to get to where it is now:

The ripple effect of mouse interaction

The final effect

2) Process: Technical:

One of the most significant technical challenge I faced was integrating user interaction with the predator. I specified a series of the vertex coordinates that construct the circle shape of predator by connecting them. I added noise function to their coordinates to produce the effect of blurring the edges. After I’ve decided to make the predator move towards the direction of mouse when mouse is pressed, I created two different mode for its movement when mouse is pressed or not inspired by my professor Eric. However, that brings about another problem: its position would reset when switching mode. That’s because I used a different method for the predator compared with the fish. I mapped two dimension noise to the width and height of the canvas using the following code:

translate(noise(inc/5)*width, noise(1000+inc/5)*height);

This approach ensured that the predator remained within the canvas and rarely reached its edges due to the property of noise function. However the shortcomings are also obvious: It would be impossible to control the start position of its motion after switching mode. As a result, I had to make a compromise and adapt the following code for a smoother user experience, even though the predator was more likely to approach the canvas’s edges, diminishing visual comfort:

let xspd = map(noise(inc), 0, 1, -2, 2);
let yspd = map(noise(1000 + inc), 0, 1, -2, 2);

xx = posX + xspd;
yy = posY + yspd;

posX = xx;
posY = yy;

posX = constrain(posX, 0, width);
posY = constrain(posY, 0, height);

Sometimes it would be a bit frustrating to make such compromise due to technical limitations, but it is a reflection of the real-world constraints we encounter in the creative process. Even more frustrating, Sometimes it turns out to be a very low-level error after debugging for a long time, like we should use ‘x>a && x<b’ instead of  ‘a<x<b’ in p5.js or one local value should have been set as a global value. 

3) Reflection and Future Development

I greatly benefited from the extensive feedback provided by my audience during my presentation. I incorporated some of their suggestions, such as eliminating distracting changes in stroke color and making the smaller fish also respond to mouse presses, not just the large predator. Looking ahead, for future improvements, I plan to introduce more diverse creatures into the cyber pond, each with unique behaviors. Additionally, I intend to explore aspects such as growth, reproduction, flocking dynamics, and potentially integrate sound effects to enhance user interaction.

In conclusion, the core objective of this project is to provoke contemplation about ecosystems through a virtual experience, emphasizing the interconnectedness of life within nature. It serves as a reminder that every organism plays a role in sustaining the stability of an ecosystem, and any alteration has the potential to reverberate throughout the entire system.

Tutorial credits:

Coding Challenge #36: Blobby! by The Coding Train [https://www.youtube.com/watch?v=rX5p-QRP6R4&list=PLRqwX-V7Uu6ZiZxtDDRCi6uhfTH4FilpH&index=44]

Easy Perlin Noise Flow Fields by Barney Codes [https://www.youtube.com/watch?v=sZBfLgfsvSk]

Categories
creative coding lab

Reading response 2: Long Live the Wub

The author highlighted a range of benefits the Internet offered, and universality is the foundation of them. For example, NYU Shanghai websites are typically designed to work on various devices and browsers, ensuring a broad audience can access the content globally. I can quickly research and learn about a wide range of topics, from educational resources to news articles. 

However, alongside its convenience, the internet has also given rise to some ill effects. The article recounts an incident in 2008 when a company developed an ISP capable of peering into the packets of information it transmitted. This capability raises significant privacy concerns, including unauthorized access to personal data, targeted advertising, and potential data security risks. Personally, I share similar worries and exercise utmost caution when browsing websites to safeguard my online privacy.

Universality refers to the principle that a technology or system should be accessible and usable to everyone, regardless of their location, language, or abilities. Universality is a core concept of the World Wide Web, where websites and content are designed to be accessible to a global audience. Isolation, on the other hand, stands in contrast to universality. It represents the idea of keeping something separate or restricted. In my experience on the web, certain closed app stores or subscription-based services can represent isolation by limiting access to users who meet specific criteria.

Open Standards are protocols and technologies that are openly available for anyone to implement, which develops its diversity, richness and innovation. An example is HTML that we are learning currently, a standard for creating web pages that anyone can use. Open standards have been a cornerstone of the web’s success. Closed Worlds contrast with open standards. They are platforms with technologies that restrict access and usage. For example, Apple’s iOS ecosystem is relatively closed, as it tightly controls which apps can be installed on its devices. Closed worlds can limit innovation and competition.

The Internet is the underlying network connecting devices globally. It’s the physical structure that allows data to be transmitted between devices. The Web, on the other hand, is an application layer built on top of the Internet, primarily for accessing and sharing information using protocols like HTTP. It consists of a vast collection of interconnected documents and resources that are accessible via hyperlinks. In my experience, the web has been my primary interface for accessing information, communicating, and interacting with a vast array of online services. The internet, as the underlying network, enables all of these capabilities, including the transmission of data that makes the web possible.

The author’s vision for the future of the web, as of the time of writing, placed significant emphasis on open data, social machines, web science, and freely available bandwidth. This vision aspired to create a web where data is more dynamic and readily accessible. Dazhongdianping and Meituan serve as prime examples of platforms where numerous individuals share their reviews and ratings of restaurants, which influence the decisions made by potential patrons. These platforms have gained significant popularity.

Today’s web still incorporates some of these ideals. However, issues like “fake news” and the consolidation of power by a few tech giants have emerged. These challenges threaten the original vision. Many individuals may not have as much control over their data and content as the author had hoped.

In summary, the web has evolved, and achieving the full realization of the author’s vision remains a work in progress.