Speed of Light-Victor Qiu
Professor Gottfried
Context and Significance
To beggin with we were inspired by the game whack a mole, what we were curious about is the level of interaction this game had and if we where able to replicate that. After further research we concluded that we did not want to re-create a game but create our own. Our main inspirations where arcade games such as whack a mole and the light reaction speed game. Our game is targeted to any individual as anyone can have fun playing it and it is also beneficial due to the physical movements it demands. To develop this game we included the reaction speed element of both acarde games mentioned previously and to make it unique instead of tapping lights we included punching bags so the movement is more dynamic.
Concept and design
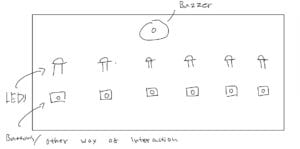
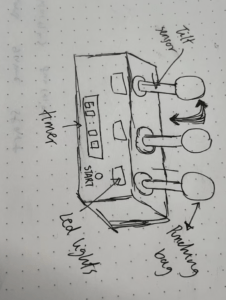
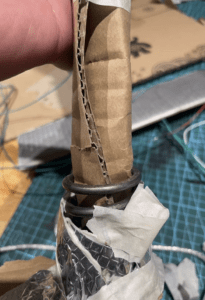
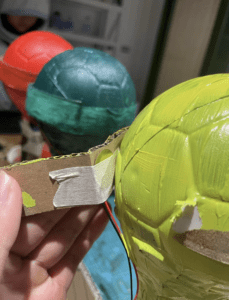
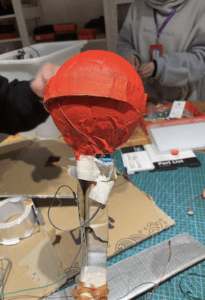
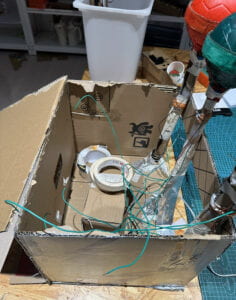
I understand that specially for a game the design has to be very intuitive, therefore, we added many elements that will help the user understand and give feedback according to their movements. First of all, we added a big start button in the front of our project, additionally we positioned the lights on the top of the box instead of the front because it was easier to see and punch the bag. We also included sound everytime a light lights up so the user cannot only see but also hear the next command. And lastly we also painted each punching bag with the color of the light to avoid any confusions. Regarding te materials we used to build our project due to the fact that we were required to use cardboard it was a challenge to ensure the durability of our project, as the user is required to punch it. But we managed to built a pretty solid project which was resistant. We used heavy duty duck tape to ensure everything will stay in its place and to build the punching bag we used metal springs instead of rubber bands which was our first consideration, as springs will give u the same results and it is much more resistant. Also, we used small soccer balls as a punching bag and we poked a PVC tube through it, then we covered the PVC still in cardboard and attached it to the metal spring on the bottom. Some additions we could of added is to cover the LED with a ping pong ball so aesthetically it would look better, and if it was possible make our project out of another material.
Fabrication and Production
The building process was pretty challenging but me and my group member worked very well as a team and managed to build the project sucessfully. The first step after deciding what idea we were going to select was to learn how to code this type of project so we both researched about it. My teammate was more focused on working on the coding part while I was designing the outer part of the project and the electrical componenets of it. During the user testings we didn’t have all the materials we needed so we just used cardboard pieces people could smack. After the materials arrived we started to building the structure, my teammate built a box where we presented our project in, and I worked on building the punching bags. This process was complicated as we had to ensure that it wouldn’t break or fall apart. Something that really helped was to use rubber bands to wrap the steam of the punching bag to make sure everything was tight and nothing would move around. We also utilized heavy duty duck tape in many parts of the project to ensure durability. Moreover, another challenge we faced is that the vibration sensors were not very sentistive in the position we placed it in, and the user had to punch hard in order to activate it. Therefore, we decided to change the position of it so the user punches directly into it. This worked very well and the sensor was very accurate.
Conclusions
I believe that the final result of our project aligns accordingly to our definition of interaction. There are many human senses involved as the user has to react based on light and sound and react with a physical movement. My project is not to a full level of interaction because it doesn’t make the user think too much but rather is a reflex and speed game. The audience interacted with the project in a very positive way, it was not challenging for the users to understand the game and it was pretty instictive. If I had another chance to recreate or improve this project I would focus on the display of the LED lights more as it doesn’t look like a finished product. Moreover, I would also add a different beep for each color instead of the same one and add a melody at the to let the user know when the time is over. Additionally I would also try to implement a timer that the user can see so he can keep track of the time. From this project I have learned to put into practice the lessons we learned both in lectures and recitations, meaning that I have a better knowledge on these skills. Furthermore, through the failures I have also imrpoved my coding skills and how to detect the problems when connceting components into the breadboard. Finally, this project not only taught me and helped me put into practice skills but also allowed me to be creative and adapt to any challenging situation.
Annex
int ledPin1 = 13;
int ledPin2 = 12;
int ledPin3 = 11;
int sensorPin1 = 4;
int sensorPin2 = 3;
int sensorPin3 = 2;
int long ranDelay = 0;
int sensorValue = 0;
float realTime;
int buttonPressed = 0;
int state = 0; // 0 .. intro, 1 .. game playing
int randomButton = 0; //the button that correlates with the LED
long startTime;
int randomLight;
void setup() {
Serial.begin(9600);
pinMode(ledPin1, OUTPUT);
pinMode(sensorPin1, INPUT); //sets up all the buttons and sensors
pinMode(ledPin2, OUTPUT);
pinMode(sensorPin2, INPUT);
pinMode(ledPin3, OUTPUT);
pinMode(sensorPin3, INPUT);
}
void loop() {
if (state == 0) {
Serial.println(“”);
Serial.println(“Push the Yellow button to start game”);
Serial.println(randomLight, LOW);
while (digitalRead(sensorPin1) == 0) { //while loop sets Sensorpin as the game starting button
}
state = 1;
buttonPressed = 0;
startTime = millis();
} else if (state == 1) {
if (randomButton == 0) {
randomLight = random(11, 14); //the random LED
if (randomLight == 13) {
randomButton = 4;
};
if (randomLight == 12) {
randomButton = 3;
};
if (randomLight == 11) {
randomButton = 2;
};
realTime = millis();
digitalWrite(randomLight, HIGH); // turns light on
}
if (digitalRead(randomButton) == HIGH) { // reads when the correct button is pressed
buttonPressed++;
digitalWrite(randomLight, LOW);
randomButton = 0;
delay(700);
} else {
tone(9, 400); //plays tone when button is not pressed, but want it to be on when wrong button pressed
noTone(9);
}
if (millis() – startTime > 20000) { //runs the code when the time is up
Serial.print (“Game finished you pressed the button “);
Serial.print(buttonPressed);
Serial.print(” times”);
Serial.println(randomLight, LOW);
randomButton = 0;
state = 0;
if(buttonPressed <= 10){
Serial.println(“”);
Serial.println(“YOU ARE BAD”);
} else if (buttonPressed > 10){
Serial.println(“”);
Serial.println(“LETS GOOOO”);
}
}
}
/*
Serial.println(“”);
Serial.println(“Get Ready!”);
delay(500);
Serial.println(“Get Set!”);
delay(1000);
ranDelay = random(3000);
delay(ranDelay);
realTime = millis();
digitalWrite(randomLight, HIGH); // turns light on
while (digitalRead(randomButton) == 0) { //recognizes when buttno is pressed
}
digitalWrite(randomLight, LOW); // turns light off after press
Serial.println(“Your time was”);
realTime = millis() – realTime;
Serial.print(realTime / 1000, 2);
Serial.println(” seconds”);
delay(2000);
*/
}
video of user testing 1 https://drive.google.com/file/d/1VkV5BlQH9FEyJyTbLAc482t-znL9p2Zd/view?usp=share_link
video of final project testing
https://drive.google.com/file/d/1WqDxV7ApMZcw7d5tcpRv3UE9OOj11Roh/view?usp=share_link