In this recitation, I worked with my partner Sid to make a workout device! Using the tilt sensor, we had to wire it correctly and ensure the code was correct. Ultimately, our objective of completing a tiny machine that could detect the number of our bicep curls was a success.
Preparing the Tilt Sensor
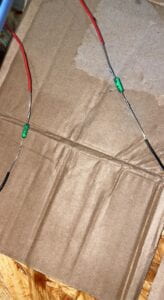
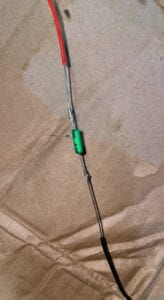
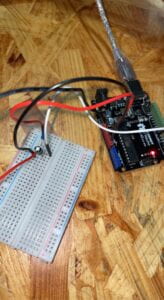
First, we received the tilt sensor and instructions on how to start building the device. Picking two of the different color extended wires on the wall, we began to solder. Since it was only our second time soldering, the craftsmanship still wasn’t perfected. Also, we couldn’t hold our hands steady enough and the wire fell a couple of times. Eventually, with trial and error, we were able to secure a wired-tilt sensor. After this, we also confirmed an input displayed on the Serial Monitor to check whether the tilt sensor worked properly. This was done via using the given Arduino code, and some intricate wiring following the diagram provided.
Code:
int SENSOR_PIN = 2;
int tiltVal;
void setup() {
pinMode(SENSOR_PIN, INPUT); // Set sensor pin as an INP
Serial.begin(9600);
}
void loop() {
// read the state of the sensor
tiltVal = digitalRead(SENSOR_PIN);
Serial.println(tiltVal);
delay(10);
}
Step 2: Refining the Code
At this step, we’ve already successfully made the code operate. Though now, we are looking to change the code so it runs more efficiently. Before, it only generated a row of 0’s to 1’s, and vice versa. However, after changing the source code, it runs like 0, 1, 0, 1, etc. Now, the wiring and coding are nearly complete! The workout machine has taken its first ‘swings’.
Code:
int SENSOR_PIN = 2;
int tiltVal;
int prevTiltVal;
void setup() {
pinMode(SENSOR_PIN, INPUT); // Set sensor pin as an INPUT pin
Serial.begin(9600);
}
void loop() {
// read the state of the sensor
tiltVal = digitalRead(SENSOR_PIN);
// if the tilt sensor value changed, print the new value
if (tiltVal != prevTiltVal) {
Serial.println(tiltVal);
prevTiltVal = tiltVal;
}
delay(10);
}
Note: The video is a little blurry, I tried to render and process it again for 30 minutes, but the quality doesn’t change . . . The first one displays the 000111, the second video shows 0 1 0 1.
Step 3: Wearing the Sensor
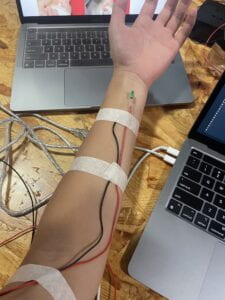
Nothing much here to be explained, my partner Sid taped the tilt sensor onto my arms. Now, I officially look like a workout patient!
Step 4/5: Bicep Curl Workout!
Having attached the tilt sensor to my arm, all there was left to do was to actually work out! By moving my arms back and forth (curling), the serial monitor displayed a number to indicate how many curls I was doing. We modified the code a couple of times, so it would set conditions and allow the machine to be more accurate. My partner Sid helped code himself, as he had prior knowledge of using this language. Therefore, our code seemed smooth and running! In the end, I recorded three videos of me doing 8, 16, & 24 sets of curls. After every set, the code would say the message “Yay, you’ve done one set of curls.” on screen. This activity was very interactive and fun! For step five, we did not have enough recitation time to innovate an idea. Therefore, the professors told us we could imagine what could’ve been made. Personally, I would’ve added a buzzer that correlated with the finished set of exercises. After we complete, say, 8 sets, the buzzer would play a celebratory sound! If we messed up with the code and tweaked it, we could even make the buzzer sound pattern congratulations! If we had more time, I would’ve wanted to try out this step and try to include the Mario sound that occurs when you beat the level. Overall, this was a huge learning moment of coding for me. While it seemed very difficult at first, I slowly got the hang of it!
Code:
int SENSOR_PIN = 2;
int tiltVal;
int prevTiltVal;
int x = 0;
void setup() {
pinMode(SENSOR_PIN, INPUT); // Set sensor pin as an INPUT pin
Serial.begin(9600);
}
void loop() {
// read the state of the sensor
tiltVal = digitalRead(SENSOR_PIN);
// if the tilt sensor value changed, print the new value
if (tiltVal != prevTiltVal && tiltVal == 1) {
Serial.println("A FULL BICEPS CURL");
Serial.println(x);
x = x+1;
}
if (tiltVal != prevTiltVal) {
prevTiltVal = tiltVal;
}
if (x == 8){
Serial.println("Yay, you’ve done one set of curls!");
x = 0;
}
delay(10);
}
(The number 8 would change depending on the number of sets we’re looking to do, e.g. 16 or 24.)
Note: Again, I don’t know why the video is so blurry. I apologize for the inconvenience, on my mobile device the quality is fine. However, once moved into Google Drive, the quality is distorted. The order should follow 8 sets, 16 sets, and 24 sets.
Reflection
For this reflection, I am going to discuss and talk about the workout machine process and some observations I noticed. At first, our tilt sensor did not work. We called over the wonderful learning assistant (Corrina) for help, but even she could not figure the issue out. After investigating further, we realized that one of our wires wasn’t plugged in properly … After Sid taped the wire to my arms, I noticed that it would transition between HIGH and LOW with mere wrist movement. Also, rotating the limb/shaking allowed the machine to register the amount. However, this was ‘cheating’ as no curls were being accomplished. Sorting the code out and the tilt sensor on my arm, this problem was shortly fixed with my partner’s help. Now, I had to try especially hard for the code to count an official curl. Personally, I believe that this workout machine could be used by any user. It serves as a dumbbell without the actual weights. Also, it allows people to work out and know their sets without them having to remember them. If this invention could be stabilized without the tape, it could be multi-purpose strapped-on workout equipment!
Illustration Sketches

Leave a Reply