UFO Fight!
Michelle Hua
Professor Andy Garcia
For our midterm project, Luna Feng and I worked together to create a UFO battle game. From my point of view, the midterm project was a chance to make something more “reusably” interactive. In my group project (Mirror), we had made something that was only really meant to be interacted with once. After one interacted with the mirror and was effectively changed, they didn’t really have the need to re-interact. Our midterm project on the other hand was something one could return to and continue interacting with.
The interactive pieces that I’ve previously researched have all been large scale pieces, so for inspiration, I mostly focused on previous interaction lab pieces. The main three I had in mind were:
- The Race the LED game we built and played in recitation
- The whack-a-mole example that had been previously mentioned in slides
- A Tom and Jerry cardboard game that I remember glimpsing in the slides.
Based on these three examples, I came to the idea that making a game would be the best interactive piece we could make for this project. The definition of “interactive” I came up with in the beginning of this semester is “a state where a subject or party can be changed by or respond to the actions of another.” A game would clearly fit this definition, as it would require people to respond to the piece, and the piece to respond again to have the player win. Given that the people who would test our piece were going to be fellow Interaction Lab students, we designed it more with college students in mind. I think the two player game system and overall aesthetic of the piece was influenced by this. As it wasn’t something that had to be formal, we had more freedom to make it more fun looking and goofy. I feel the two-player aspect of this game was also influenced by this — making it competitive was an easy way to make the game more entertaining, one of our overall goals.
Our circuit was built mostly from Arduino kit and toolkit elements, with a few cables cut from the communal IMA collection and tilt sensors reused from recitation. Aside from Arduino kit materials, we mainly used cardboard to build our UFO. Cardboard was the most obvious material of choice, given that 1) we are already familiar with it from the Group Project, 2) it’s an abundant material, and 3) it’s lightweight and easy to manipulate while still being solid. I don’t think we ever really thought beyond using this material, since it was such an obvious choice. If I were to think beyond cardboard, I would possibly say we could’ve used thin wood, but this would require much more tools, materials, and experience to properly form. As such, we stuck with the cardboard.
Throughout this midterm project, Luna and I stuck to a process that cycled roughly through the steps of plan, create, and feedback:
Plan: We started our process off with brainstorming. The original plan we proposed for this project was called “Musical Fighters”, which was a similar-ish game. “Musical Fighters” would’ve also had a battling component, but was ultimately a audio memory game.
Create: We each made and turned in our individual proposals.
Feedback: After submitting our proposal, Professor Andy Garcia suggested we change the game slightly to better fit what we knew how to code. We edited the game concept into a speed game to fit this concept (which became the basis of our final game), then later met up with the professor to further discuss. Here he then suggested using multiple sensors and creating an overarching theme for the project.
Plan: We took the multiple sensors advice, and began brainstorming themes. Eventually we settled on a space-fight design. Then, as we were in a frenzied brainstorming-sketch stage, we landed on the UFO idea. From there, we combed out the details of the plan. We originally had 5 sensors in mind for each side: a button, a tilt sensor, a knock sensor, a pressure sensor, and a flex sensor. However, after we realized we didn’t know how to attach the button without connecting it directly to the breadboard, we axed the button idea. With this plan in hand, we agreed to meet up in the IMA studios the next day to begin building.
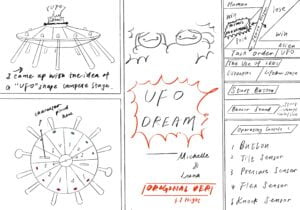
^Luna-made brainstorming notes + additional documentation (doodle in middle courtesy of Michelle)
Create: The Wednesday before the user test, we began our work. I sketched out a basic Arduino board circuit to figure out which sensors should be attached to which pins.
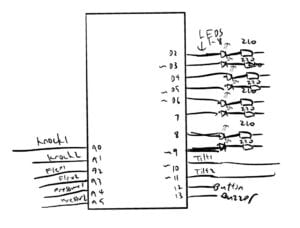
^Original Sketch
At this point, we realized the Arduino board didn’t have enough space to fit eight sensors, eight LEDs, three servos, a button, and a buzzer, so we decided we had to choose a sensor to ax. After a brief conversation, we eliminated the flex sensor for being too similar and less connectable than the pressure sensor. At this point, we had our overall game planned out: 3 sensors on each side, two sides competing in sensor minirounds, winning 3 minirounds to win a full round, and winning three full rounds to win the game.
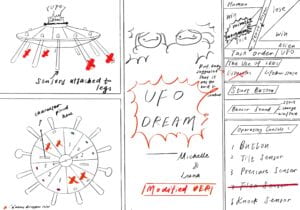
^Luna-made notes again, modified
We then decided to split the work into the coding portion and the building portion. I took the coding portion, wrote down the coding plan, then took it to Professor Garcia to look at an English-version of the code. Our original coding plan was more complex, using the LEDS to double both as a lifebar and as a game-signal mechanic:
Code Plan:
OK SO
- Press button to start game
- Lifebar turns on?
- QUESTION: Can it be like a lifebar state? State 1 is life bar, state 2 is game mode
- Lifebar mode ends after a certain number of millis in lifebar mode, transition to gamemode
- Buzzer plays
- Lifebar turns to Gamemode
- Servo spins
- LEDs lights up in corresponding sections
- Conditional? If servo angle == this range of angles, this LED lights up, this sensor must be activated?
- And then a conditional in a conditional? To determine the winner? If win, LED flashes, if lose, LED off
- Also plays buzzer?
- Plays for a few seconds then step 8
- Conditional? If servo angle == this range of angles, this LED lights up, this sensor must be activated?
- Sensor speed game
- Tilt sensor
- Pressure sensor
- Knock sensor
- Also the same conditional? When this angle, this LED turns on and this sensor must have an action done to it?
- Servo spins and corresponding actions x2
- Who first has 3 wins, wins
- LEDS go to lifebar mode
- winner’s side plays win code
- Servo goes back forth
- LEDS stay on
- Loser’s side plays lose code
- Servo goes whomp to the side
- An LED turns off
- QUESTION: how to ensure that the LED that has been turned off before stays off?
- After certain time in lifebar mode, game returns to gamemode
- Repeats gamemode actions
- Repeats Lifebar state actions
- QUESTION: How to track lifebar state?? Is it possible to set a code in the beginning, player = 5 points or something, then in each lifebar mode round, when the lose code is activated, it subtracts a point, sets new value to the player
- FOLLOWUP Q: should we then tie the LEDs to this state? In lifebar state, if player point # is 5, these digitalwrite(?) these LEDS, if player point == 4, display these LEDS, if 3, display these, so on so forth? Is this possible?
- Ending conditional: if lifebar state player value == 0, then activate ending code? Play buzzer, winner does dance, winner LED flashes?
Professor Garcia suggested we use the LEDs as a lifebar only, as we had other signaling mechanics. I also received advice on how to separate the modes. Based on this feedback, I wrote a simplified version of the code, then began.
Simplified Code Plan:
- Press button to start game
- LEDS/Lifebar turns on
- If miniwin, then led conditionals?
- If
- If miniwin, then led conditionals?
- Servo spins
- Sensor speed game in corresponding section
- Each has own state > when sensor speed turns on, the corresponding sensor state activates
- Tilt sensor
- 3 times
- Pressure sensor
- 5 times
- Knock sensor
- 7 times
- Servo spins and corresponding actions x2
- Who first has 3 wins, wins
- Buzzer plays?
- winner’s side plays win code
- Servo goes back forth
- LEDS stay on
- Loser’s side plays lose code
- Servo goes whomp to the side
- An LED turns off
- After doing this for a certain amount of time buzzer plays
- Servo spins again, Game repeats
- Ending conditional: if lifebar player value == 0, then end game.
- Play buzzer, winner does dance, winner LED flashes
I first created the variables, which Luna used to start building the circuit. She first cut out the cardboard pieces for the UFO shell as reference for circuit size, then assembled the circuits based on various circuit examples in recitation documents.
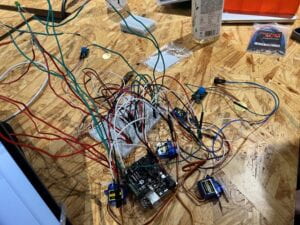
On my end, I realized I didn’t really know how to code beyond the variables, so I started looking into all the relevant examples of code provided. The main three I referenced were state codes (provided in the Time & State class slides), servo codes (from the Actuators and Mechanisms class slide as well as the Servo – Sweep example code), and the Race the LED codes. At the end of the day, I had two states and the main servo spin code done, then I finished up the code the next day. Luna had finished the circuit as well, so we tested it. We immediately ran into a few problems, one being that the code ran through extremely quickly and was mostly just looping the servo code. After some editing, we tried again. This time, it worked better, but not well. I made note of these issues:
Code Issue Notes V1:
- Endmode doesn’t trigger?
- So right now I actually have endmode tied to LED state > should probably change that
- Presscount doesn’t work
- WHY??? WHY????? Crying tears as we speak
- LED lifebar doesn’t work
- ¯\_(ツ)_/¯
- Tilt sensor runs like the wind
- Also confused
- Big servo angles need fixing
- Uhhhhh needs math
- I’m going to math so hard
- This shouldn’t be a big issue
- Code buzzer
- Gotta delay the main servo and also speed up activating sensors
Notably, a big problem here was the nonfunctional pressmode (pressure sensor). However, the sequence that the game was currently running in was flick (knock sensor), tilt (tilt sensor), tilt, press, which the pressmode appeared late enough for at least one round to be played. Since at least part of the game was functional and it was getting very late, we decided to just use this version for the user test.
Feedback: We arrived at the user test, and I attempted to fix the code slightly beforehand. This was a mistake. When I ran the code again, the sequence of the sensor minirounds had changed to begin with pressmode, rendering the entire game essentially nonfunctional. In a panic, I quickly made a duplicate code with only flickmode and tiltmode. This code worked to let people play through the minirounds successfully. Thankfully, no one played long enough for the nonfunctional endmode (game ending setting) to be noticed, and we were able to compensate for the lack of game-signaling by reading our serial monitor aloud. From the user test we gained these notes:
- Reinforce the knock sensor
- (Note from documentation Michelle: This was a very important piece of advice. Four knock sensors were broken in the making of this midterm. Fortunately, they are all currently revived.)
- Potentially use a pedestal display
- Fix the project up aesthetically > hide the wires
- Fix the code where needed
- Fix the game signaling
Plan: The last three notes were already on our to-do list, so we mainly focused on those aspects. I asked Fellow Kevin for help on our issues, on which he pointed out that I had used my LEDs as an input and output, which led to the code not working.
Code Issue Notes V2:
- OK SO
- Endmode: once roundCount reaches three, it triggers another miniround before playing endmode?
- Presscount: works, but VERY BADLY
- Also the second presscount triggers even if no one presses it?
- Is there something wrong with my prevVal codes?…
Create: I smoothed out the LED and endmode codes, and also added the buzzer code. I based the buzzer code off the toneMelody code, which included a “pitches.h” package code. This I copied from the Arduino toneMelody website. I had also edited the pressmode code slightly, which led to the mode working occasionally (although by the next day, it had stopped working again). Since we had confirmed the circuit worked, we also decided to attached the pieces together permenantly, soldering the leds, resistors, and cables in place on the UFO shell.
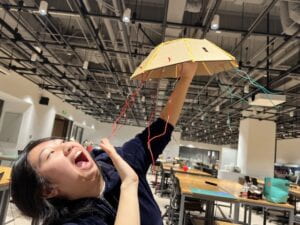
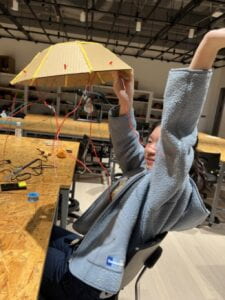
UFO Top Shell + Soldered on elements:
Circuit Inside UFO:
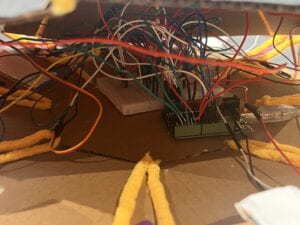
Code Issues V3:
- Pressmode >> doesn’t work
- LEDs >> led1 doesn’t turn off when it’s supposed to, but then turns with led2
- Tiltmode >> runs like the wind
- Solution: delay?
- Flickmode >> I can’t tell if it has the same problem or not
With these notes issues left to resolve, I decided to ask for further help on the next day.
Feedback: I asked Professor Gottfried for help on the existing code issues. He helped to debug the section and get the code running (Thanks, Professor!). The LEDS also mysteriously began working. Why, I’m not sure, but I’m glad the problem resolved itself. The tiltmode and flickmode, while not as precise as we had hoped, were also functioning. (The code says that each sensor needs to be activated a certain number of times. However, it was so imprecise throughout the whole process that at this stage, we had already accepted the mechanic as a “do the activity until the servo spins”) We decided that our code and circuit were a success!
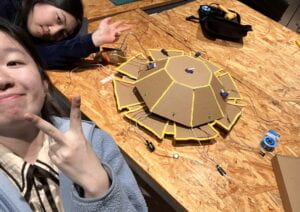
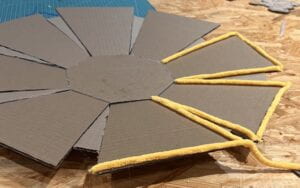
Plan: From thereon out, we only had to work on the design’s aesthetics. We had already cut out and glued together the main UFO shell before the user test. Because the slope of the UFO was a bit too high, we glued the yarn pieces in between the panels to allow for more flexibility. Luna also cut out smaller triangular pieces to insert between the panels for the bottom half of the shell, which flattened it out considerably.
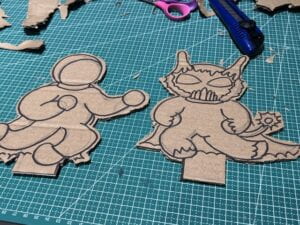
Throughout the process, we had played the design of the player 1 and player 2 avatars, an alien and an astronaut. We designed the alien around the idea of an “inverse Qilin”, and thus named it “Niliq” (Qilin backwards), as it was a not-Qilin. We then named the astronaut “Neila”, for being a not-alien.
Luna had also designed the “legs” of the UFO, which we planned on using to hide the wires of the sensors. For further game clarity, we also planned to draw instructions on the windows of the UFO.
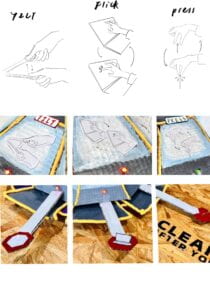
^Collage of notes (designed by Luna)
Create: This final part was fairly straightforward; we simply followed the plan and:
- designed the instructions
- painted the UFO shell
- drew, cut out, and painted the characters
- attached the characters to straws, which we hot glued onto the servo arms
- hot glued a long arm to the main servo
- taped the sensors to the UFO legs, and the legs to the UFO
- printed the instructions and taped them to the UFO window
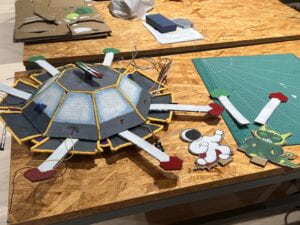
Feedback: Presentation! We got feedback that we potentially could’ve added something to hide the exposed servo, reinforced the entire UFO, and to used the LEDs as a game signal (Note: actually a previously axed concept!). In general though, I think everything went very well!
Day of Presentation:
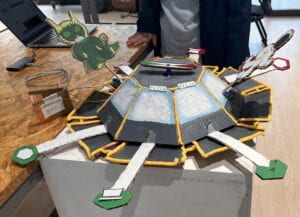
Game with Explanation (Featuring Maelyn Lu):
Game in Full (Featuring Maelyn Lu):
While we spent a lot of long hours and late nights on the project, I don’t think we actually struggled at any point (except emotionally, but I think that’s really just par for the course). By planning everything extensively beforehand and asking for a lot of feedback, there was never a point where we had to redo an entire portion or cut something we put a lot of work into. All in all, I feel that everything worked very smoothly and we accomplished our plan. A big thanks to all the Professors, Fellows, LAs, and others who helped us throughout the process!
Annex:
Figure 1: The death of the UFO (Music: Amazing Grace, sung by Darlene Zschech) (Video Filmed by Cindy Chen)