Monthly Archives: April 2024

Assignment 5


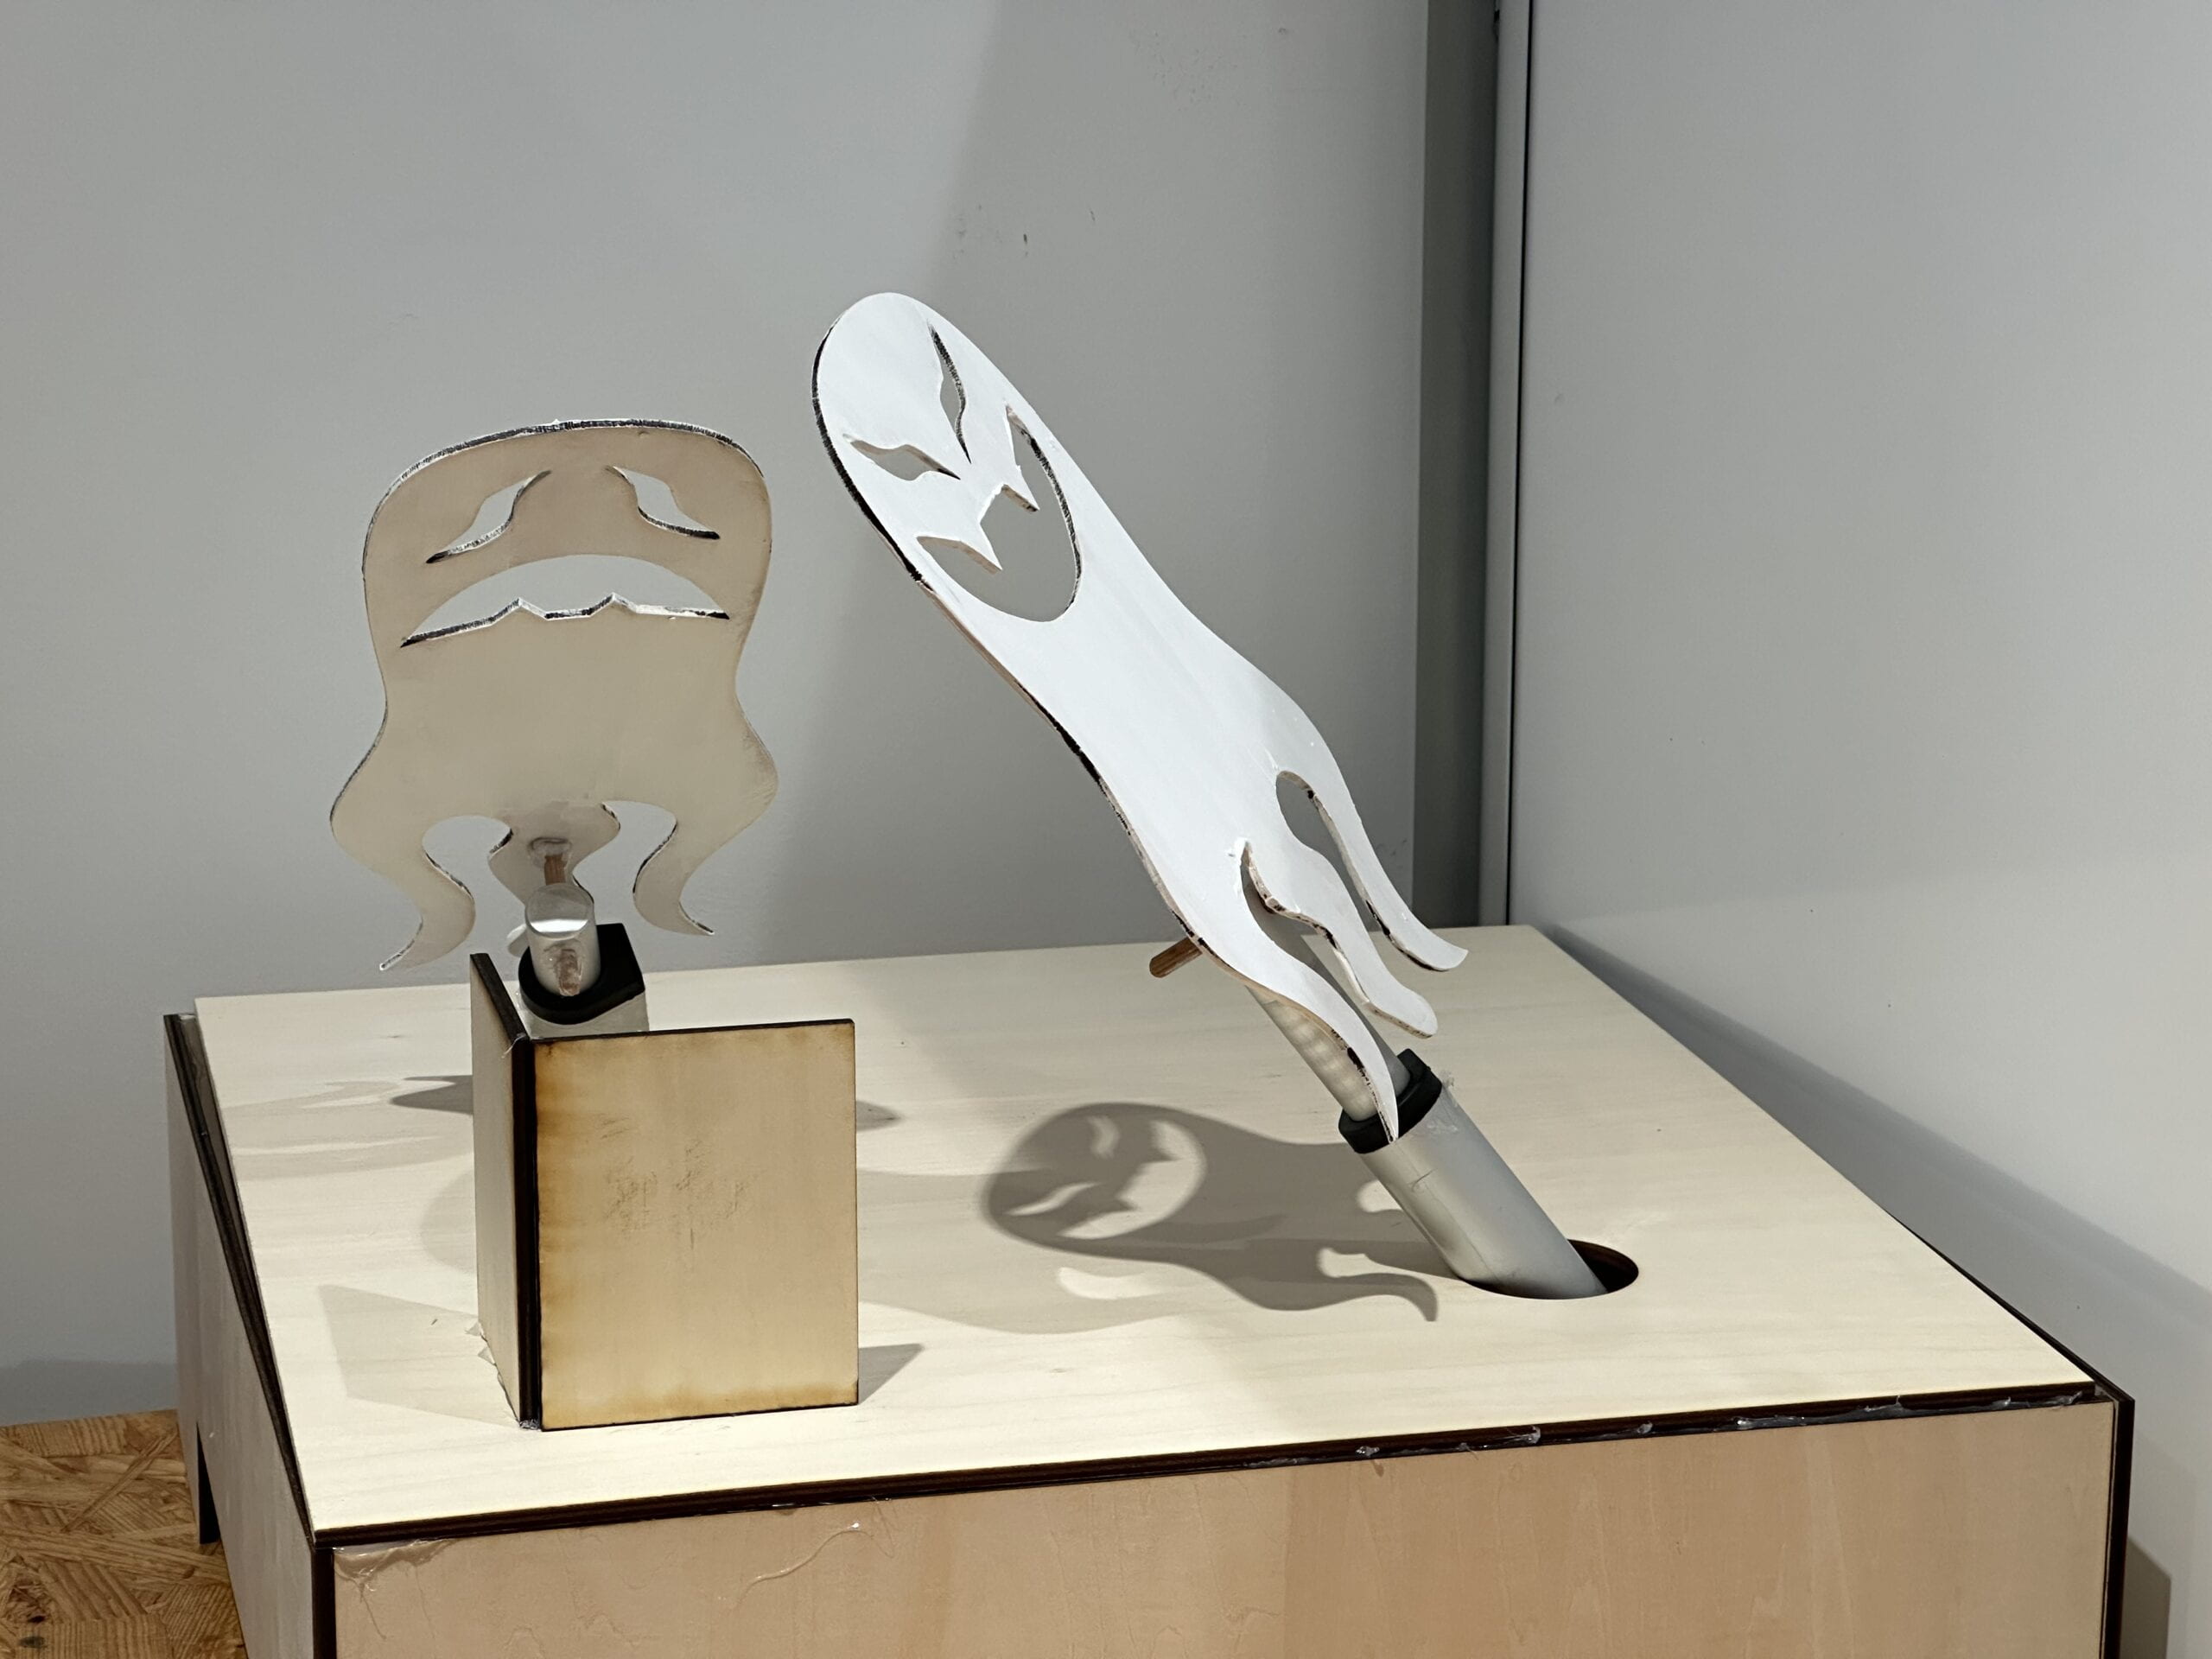
For this project we wanted to use the linear motor to create shadow software the IMA ghost. The idea is to install the ghost-shaped plywood on the motor and put a halogen light between them to cast slightly distorted shadows on the wall to mimic a horror film vibe.

Two of our partners laser cut the ghost, and me and the other member made the base of the motors and the light.  


We struggled with how to best position the motors so they are titled in an angle that cast the shadows the way we wanted. We thought about building two separate slop-like base for each motor but find this method hard to keep motors from slipping off since they are quite heavy, and after dome discussion we decided to build a box that has three holes on top, two for the motors and one for the the light. The good thing about building a box is that we could make the holes slightly wider than the motor and self-adjust the angles when tilting them, and it’s also good for hiding the wires.

But then there’s the problem of the distance between the two holes and the their distance to the light. We first went to the bathroom with rulers, closed all the light, and tested the optimal length. We then calculated the length, width the box, and the depth and the diameter of the holes based on the measurement of the motor, and cut out the box with two holes. We then installed the ghosts on the motor and tested them with the box and the light. It’s easy to think that the light should be situated on the intersection of the diagonal lines of the box if the ghosts are on the two opposite corner, but the best spot it’s in fact somewhere more far away form the two motors. After we sized up a good position for the light we put a small hole with a drill.

Here’s a video of us adjusting the position of the light.


It also took us some time to figure out how to present it. We want a corner with two white walls but sadly two sides of our classroom are glass. We thought about moving the black cart in the corner next to the projector screen but it turned out to be too heavy to be moved around, so we decided to but the box on a table and one of the corner in the back of the room, and use a white board to act as the second wall and also to block the light coming in form the glass door.

For the finishing steps, we painted the ghosts white so fits the concept better, and placed two small pieces of plywood behind the halogen light so it doesn’t blind people’s eye when looking at the project. 

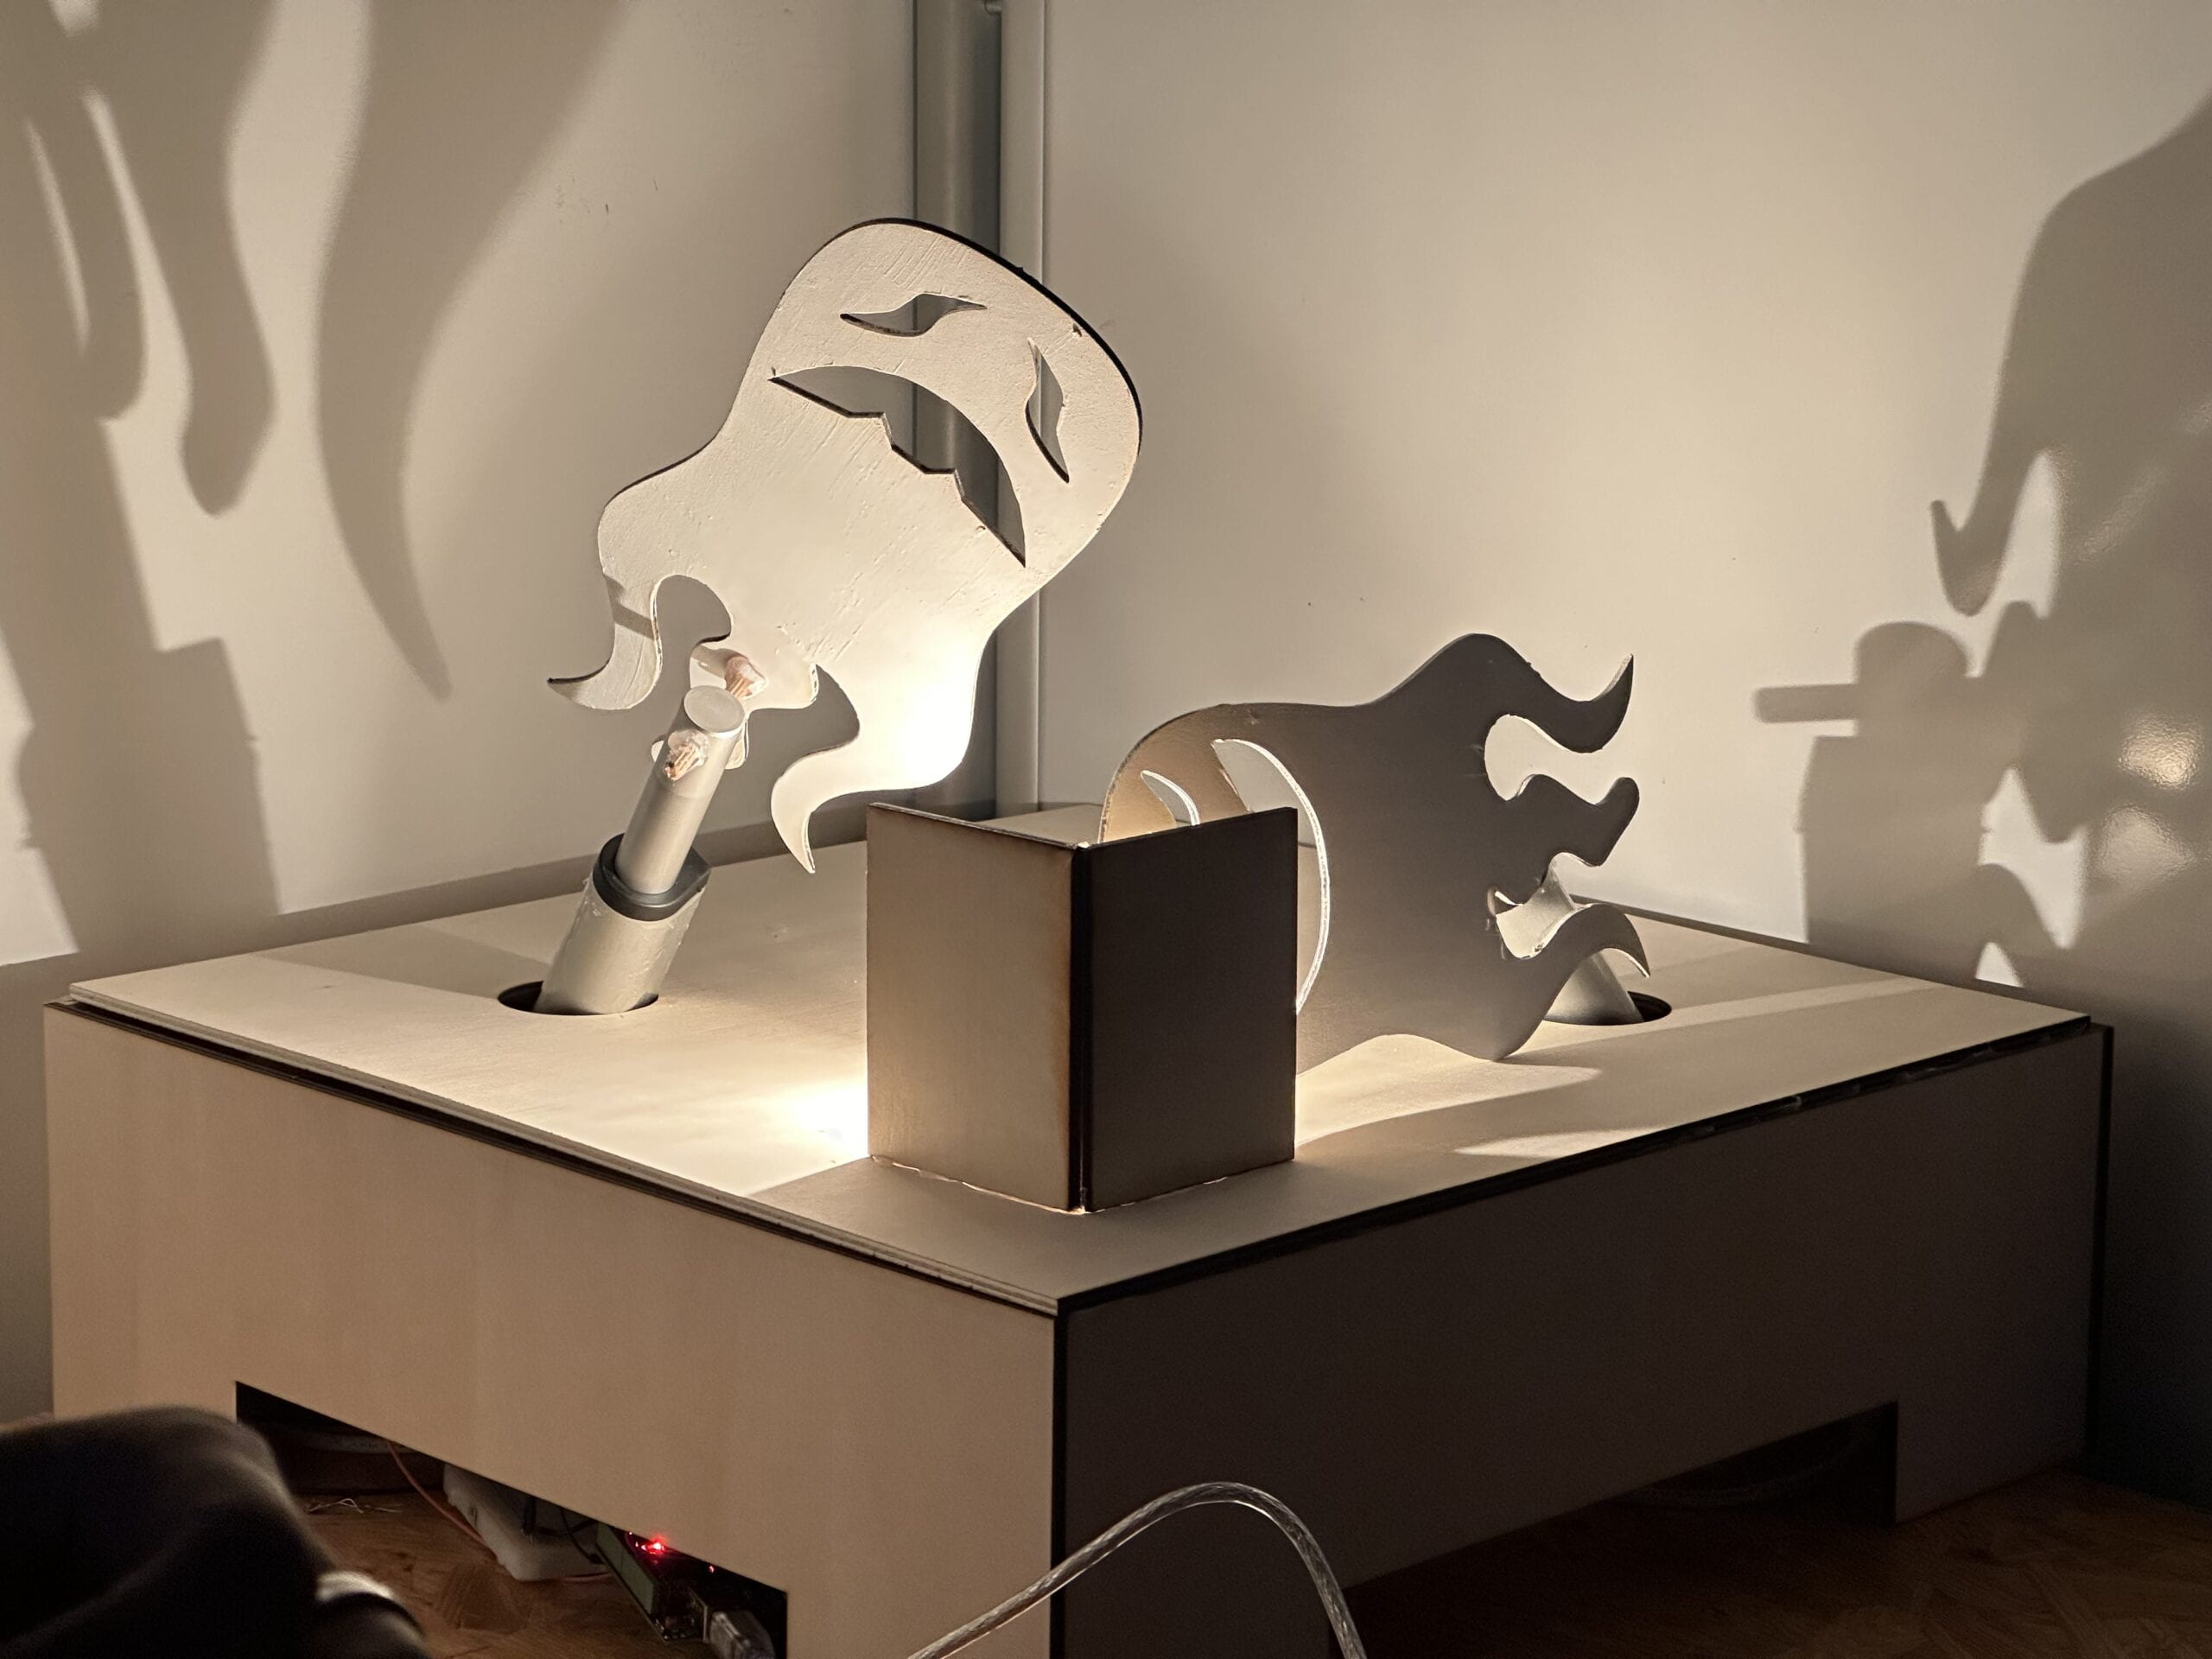
We did not expect the bar of the motor to be rotating as well while moving up and down, so after a while the shadows of the ghost would look a bit lopsided. But the work looks satisfying overall. 

Here is the code:

// modified from: https://lastminuteengineers.com/l298n-dc-stepper-driver-arduino-tutorial/ 

// Motor A connections
int enA = 9;
int in1 = 8;
int in2 = 7;

int enB = 5;
int in3 = 4;
int in4 = 2;

void setup() {
	// Set all the motor control pins to outputs
	pinMode(enA, OUTPUT);
	pinMode(in1, OUTPUT);
	pinMode(in2, OUTPUT);
  pinMode(enB, OUTPUT);
	pinMode(in3, OUTPUT);
	pinMode(in4, OUTPUT);
	
	// Turn off motors - Initial state
	digitalWrite(in1, LOW);
	digitalWrite(in2, LOW);
  digitalWrite(in3, LOW);
	digitalWrite(in4, LOW);
}

void loop() {
	directionControl();
	delay(1000);
	speedControl();
	delay(1000);
}

// This function lets you control spinning direction of motors
void directionControl() {
	// Set motors to maximum speed
	// For PWM maximum possible values are 0 to 255
	analogWrite(enA, 255);
  analogWrite(enB, 255);

	// Turn on motor A & B
	digitalWrite(in1, HIGH);
	digitalWrite(in2, LOW);
  digitalWrite(in3, HIGH);
	digitalWrite(in4, LOW);
	delay(4000);
	
	// Now change motor directions
	digitalWrite(in1, LOW);
	digitalWrite(in2, HIGH);
  digitalWrite(in3, LOW);
	digitalWrite(in4, HIGH);
	delay(4000);
	
	// Turn off motors
	digitalWrite(in1, LOW);
	digitalWrite(in2, LOW);
  digitalWrite(in3, LOW);
	digitalWrite(in4, LOW);
}

// This function lets you control speed of the motors
void speedControl() {
	// Turn on motors
	digitalWrite(in1, LOW);
	digitalWrite(in2, HIGH);
  digitalWrite(in3, LOW);
	digitalWrite(in4, HIGH);
  
	
	// Accelerate from zero to maximum speed
	for (int i = 0; i < 256; i++) { analogWrite(enA, i); analogWrite(enB, i); delay(50); } delay(1000); // Decelerate from maximum speed to zero for (int i = 255; i >= 0; --i) {
		analogWrite(enA, i);
    analogWrite(enB, i);
		delay(50);
	}
  delay(1000);
	
	// Now turn off motors
	digitalWrite(in1, LOW);
	digitalWrite(in2, LOW);
  digitalWrite(in3, LOW);
	digitalWrite(in4, LOW);
} 

W10 – Hide ‘n Weed

For this project I created some sea like creature family, where the mother/father is seeking food (mouse) and the younger babies are forming a line behind her, each following the creature in front of it.

I first combined the wonderer example code with one of my midterm’s code together, so the triangle is replaced with a wiggly purple shape moving towards the mouse. (As in the video below)


I wanted to have more than one moving object, so I added another triangle based on the example codes in class, but the second one’s target would be the first one’s position instead of the mouse. (As in the video below)


Then I wanted to have the triangle to stop upon reaching its target, so I referenced Daniel Shiffman’s Youtube tutorial for Arrive Steering Behavior and had the two both stop gradually instead of constantly moving. (As in the video below)


But then I realized this looks a bit too boring, and the movement of one object following another looks like how a cub would follow the older parent in nature, so I made the arrive steering behavior only apply to the first triangle following the mouse, and the other would be constantly moving and steering. This also fits well with the concept because the younger ones always have more energy and are more dynamic. (As in the video below)

During the making of this sketch I also tried with the avoid each other sketch, but didn’t quite like what I did with it and did not continue to work on it. I wanted to make something like a spinning flower but they look a bit messy when moving. (As in the video below)

Next I added three more wiggly purple creatures, all five of them in there different sizes, and I added small black eyes on them to make the direction they are moving towards more obvious. (As in the video below)


When the mouse is till, it is visible that the biggest one remains in the same position while the rest of the smaller ones are all steering. (As in the video below)


Lastly I added background and GUI. I wanted to make the size of the creatures a parameter as well, but I realized all the size of the five creatures would be the same, and the relationship between the creatures would be less obvious and it would look less interesting overall. (As in the video below) So I eventually did not incorporate the size in the GUI parameters.


Here’s video of the final sketch:


Assignment 5

For this project we created three individual machines: a seesaw, a surfer, and a zoetrope.

Cam C – Seesaw 

This one has a T-shaped support that wiggles back and forth. We at first wanted to attach two dancing figures on each sides of the “T” but realized it doesn’t look quite like the movement s of dancing in effect, but more like two figures rocking back and forth. We also thought about simply using one figure and attack the two feet on each side, but if the material is flexible enough it would not be able to support the body either. So we switched our perspective on its utilization and decided to present the “T” facing forward instead of upward, and it would look like something similar to a seesaw. (We also thought about having the T facing either to the right or left hand side and make it be the movement of a fortune cat’s waving hand, but the range of the movement is a bit too small for a waving hand so did not adapt the idea.) We use these two photos of Tom in the idea to represent the balancing study and rest. To sleep, or not to sleep? That is the question.


Crank B – Surfer 

This one was the easiest to make among the three, because it didn’t took us very long to decide what design to go with it and our idea worked very well. The finishing work moves very smoothly. Only that we did not consider the direction of the wave and the surfer to fit with the crank because one side need to be left out for the handle, so it looks a bit like the surfer is surfing in a wrong side of the wave. 


Geer B – Zoetrope

This one was meant to look through the gaps of the cardboard and will see a moving image of a running horse when spinning. This was the most complicated one to make. I sure it would work a lot better if the beer weren’t made out of paper because the cardboards ended up being too heavy for it so it constantly tips to one side while spinning and prevents it from working smoothly, which makes it hard to create the animation. While making the circular base we accidentally made it slightly smaller and had to cut out a few images when attaching them. So the lesson is to make things bigger in the beginning if not entirely sure with the size (at least in this case). But we both really like the idea of this geer’s design because neither of us want to settle with something like a music box or carousel that is meant to be spinning.


Reading Reflection 2: Machine Art and Kinetic Art

In a more general sense, after doing the readings, the terms “machine art” and “kinetic art” seem to be used as ways to challenge the traditional forms of art and explore expressions beyond that. “Machine Art” seems to, at first, closely related to Tatlin’s work and Tatlinism, but later in the first reading it writes: “Nevertheless, Tatlin himself soon rejected this approach because it preserved art as a practice outside of the overall processes of social production…”, which might indicate that the “machine art” is supposed to be more than pure art but also preserve some of the social production serving properties like general machines.

But considering how Tallin himself is also influenced by artist like Picasso for his creations and the author’s statement in the beginning of the first chapter that there’s no conclusive definition of “machine art” based on its historical usage, I would like to consider it more like an innovative approach for artistic expression compared to traditional painting and sculpture.

As for the term “kinetic art”, the third reading Kineticism: The Unrequited Art seems to have a very clear stand on differentiating simply kinetic mechanisms and kinetic art, saying it is the artists who have embraced the direction of mechanization, while engineers and technicians have often resisted or failed to produce successful kinetic art, as well as that kinematics is concerned with ideal motion and geometric relationships, while kinetics deals with motion resulting from physical forces.

Two artist that was mentioned in Kineticism: The Unrequited Art are Marcel Duchamp are Naum Gabo. From my research, Marcel Duchamp’s famous painting “Nude Descending a Staircase” was rejected by a museum in Paris for cubism exhibition because they say it looks also a bit like futurism. And I then searched for futurism related art works and found this one by Ciacomo Balla called “Dinaismo di un cane al guinzaglio”that has some similar features. Same with another of Naum Gabo’s painting, “Sad young man in a train”, they all tried to show a dynamic motion on a static canvas. 

Naum Gabo’s work are more like sculpture (only in the sense that they are non-paintings). When searching for his art works I wanted to find some videos of his work but there only seem to be pictures, so I wander if some of his pieces are meant to move or just displaying statically. But whichever they should be, from the picture I could tell that have a sense of motion in how they are shaped and designed.

I also did some research on Jean Tinguely’s work, and his fits best to my interpretation of kinetic art. For this music machine called “Méta-Harmonie”, the fact that it is a music machine fits the “Associative” and “Symbolic” aspects of Andreas Broeckmann’s machine aesthetics keys, for it could be interpreted as exploration of the social implications and contexts of the technology, or symbolically describe aspects of human culture. And it is very easy to find videos of it running and working in motion, which also related to the “Formalist”, “Kinetic” and “Automatic” aspects, appreciating the aesthetic qualities of functional forms, exploring the expressive potentials of movement and motion, and has an autonomous and independent operation. The work of the first three artist may be relatable to a few of the aspects but hardly all.

I think the most important role machine machines play within media arts projects is adding a sense of motion to the work. Detection of motion is an innate ability of human, we are more sensitive of moving objects compared with static ones, and incorporating kinetic elements in art is like creating more channels for expression.

NOC W09 – White Peacock

For this project I recreated the movement of the peacock tail when on display. ( And as for why specifically a white peacock is simply that it’s easier to make colorwise.) 

I Started off with the example code of the fracture beaches. I wanted to use arc instead, and created this inconsistent tree of arcs. 


I then adjusted the maximum angle to a natural degree for peacock tails. But the stem of the tree looks way too thin compared to the fan-like shape of the edge, so I moved the starting point of the tree a lot lower so it’s not visable.

I later filled the ellipse with color and added transparency so that the overlapped parts of the ellipses would have a denser color which is similar to slightly see though feathers in real life. After I added the photo to the front of the tail, I realized I need to make the background green to mach the shadow and the tails mostly white to match the body. So to keep the colors, I used lerpColor() to create a gradient, so that the tails starts off white from the body and then gradually colored towards the edge. 


Here I noticed when mouse is on the left most position all the ellipses would overlap precisely on one another and create this unnatural “tail” that looks like they hovering behind the peacock. So I later made the smallest angle PI/60 to look more natural.

When adding gui, besides the rgb values I also included the variable that controls the size and position of the tail (as well as the position of the image). The result was a bit hilarious but it also made it look like the peacock is walking towards you when spreading its tail. 

Here’s a video of the final code.


When drawing the tail I thought about adding lines to the ellipses to make them appear more like connected feathers growing out of a tail, but then I realized the line would not be consistent straight line and would make it look like a tree again. maybe if I make another layer of straight line with array it would look more realistic.