Playdate With Rodrick The Rat is a project where you interact with a rat, in a pet simulator. The biggest difference is that the pet simulator wouldn’t be digital it would be physical and it would have outputs for every motion. You can play with the rat by giving it a ball, you can feed the rat the food in the bowl, and walk it by dragging it from one end to another(only one end can sense a complete walk, this was purposely done). The preparatory research is actually what gave me the idea. During my preparatory research, I saw multiple stages with an object/animal model you can do something with. In these projects I researched they only had one output and one sensor and I decided to improve it by adding more outputs and using more sensors.
The way the user was going to interact with the project made me make sure I had some sort of instructions to show up. I implemented this by adding an output that says play, feed, and walk Rodrick when all the sensors weren’t interacted with in a way that would affect the output, basically when the project was at rest. Another decision it affected was to give my project a base so that users can smoothly walk my rat. During User Testing Session the sensors work but the base didn’t work well since it was made out of cardboard so I allowed users to do the moves the project was meant to encourage, then I let them see how the sensors work separately, as the sensors didn’t detect the movements well inside the box. The user testing process influenced my following decisions by making me change my base from cardboard to plywood. I also colored my 3D rat for better visuals. Another adaptation I did was to connect a man-made plywood handle to the rat to press the button which signifies it completed a walk. The adaptations I made, I think they were effective my 3D rat was able to move without the user having to hold onto the base, the rat looked nicer, and the button was being pressed each time the rat completed a walk reliably.
The most significant steps in my production process were building the base, installing the rat, and installing the circuit in the model. Building the base was a failure at first because the rat wouldn’t move unless you hold down the base which in my opinion negatively affects the interactivity of it. I believe the user should be able to easily use the project. It ended up being a success once I got advice during the User Testing Session and changed my cardboard with a water bottle-made base to plywood, it was so stable I was able to rigorously test the stability of the base by adding things to it. This was a success because I was now able to easily manipulate things on it without worrying about the base breaking and then being able to move the rat easily. Installing the rat was a success with the minor setback of it not accurately marking a walk by pressing the button when it would get to the end of the path. This was easily fixed by changing where the handle attached to it was located. I am very proud of the installment of the rat as I was able to tightly secure it. I justify the production choices I made because they were all motivated by making the project most interactive and physically based as possible. This is the reason I 3D printed a ball for the rat and a food bowl. So that the user can physically do these activities with the rat. This aligns with the reason I made my rat 3D model as it wouldn’t be what I saw if the program is digital. I believe that to obtain the most interactivity the user should do physical stuff and not just click a button or mouse.
The sensors I used were an ultrasonic one and a button. I used an ultrasonic sensor as it could measure distance and what I ended up doing was calculate the distance of how far feeding and playing with the rat is which is about 12, based on this if the value was equal to 12 or below the code knew that someone was either feeding or playing with the rat. I used a button because it was the only way I could think of where the rat itself would be able to mark that it completed a walk. I think they were better suited than others because these sensors were movement based and my project was all about the movement of the rat or the user near the rat. Another option could have been a pointmeter because I know how to use it well and the way it marks values is similar to a button except instead of clicking you twist. I rejected it because I don’t think it had anything to do with the scope of my project and what I wanted for physical interactions I don’t see how it could have been smoothly incorporated. I didn’t want the user to have to twist a sensor in order to get a result/mark an action I don’t think it would have been as a smooth experience as a button, as the only sensor it could have replaced would be the button.
Sketch:
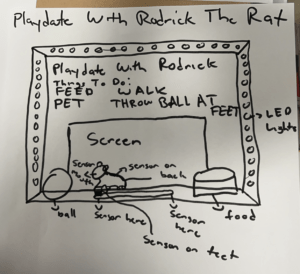
The goal of my project was to make an interactive experience that would simulate having a rat as a pet by being able to feed, walk, and play with the rat. I think my project did achieve that as the users were able to interact with the rat. The audience did not interact well in the final testing as the ultrasonic sensor wasn’t working well. My project aligns with my definition of interaction because it uses physical actions near the rat(on the project) and to the rat in order to receive an output and once that isn’t done it gives a set of instructions. I would improve my project by either getting another sensor or keep testing the ultrasonic sensor. I did test the sensor a lot and it worked after my presentation, it worked based on the angle is what I have come to conclude. As long as you keep it at the right angle it perfectly works. I think my sensor didn’t properly work during class because the sensor worked on and off despite how big I cut the hole for it to work. I thankfully was able to show the professor the working project so he could see how it functioned. From my ultrasonic sensor failure, I learned that I should either change my sensor to a more accurate one or give it a lot of space for error, by this I mean to make a hole two times as big as the sensor so that it could accurately work at all times. I take away design improvement from my accomplishments as I do think the design of my project was very good. The way the rat was installed the walking pathway was made, the button was installed, and the computer hole was made for maximum interaction.
Below is a video of the working project:
Full Material List:
Cardboard
Hot Glue
Arduino Uno
Breadboard
220k ohm resistor
Buzzer
Ultrasonic Sensor
Jumper Cables(M/M wires)
3D Printed Rat/Ball/Food Bowl
3D Food Stickers
Plywood
Tape
Markers
Paint
Box Cutter
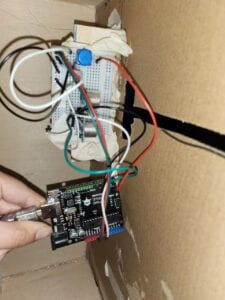
Below is the circuit:
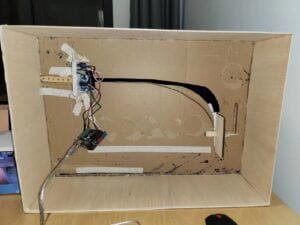
Pictures Of Project:
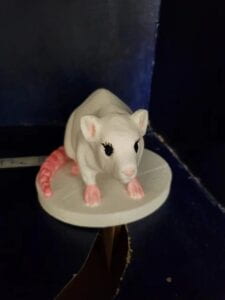
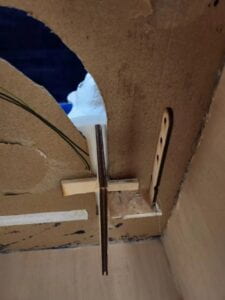
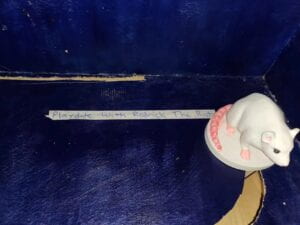
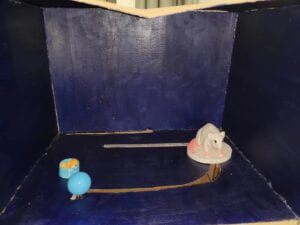
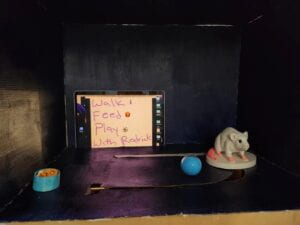
Below is the full code(Arduino and Processing):
Arduino Code(Used Example Button and Ping code on Arduino as baseline):
Processing Code:
import processing.serial.*;
import processing.video.*;
//PImage photo;
Movie myMovie;
Movie myOtherMovie;
Movie startingMovie;
Serial serialPort;

int NUM_VALUES_FROM_ARDUINO = 2;

int arduino_values[] = new int[NUM_VALUES_FROM_ARDUINO];
int old_arduino_values[] = new int[NUM_VALUES_FROM_ARDUINO];
int gameState = 0;

void setup() {
  myMovie = new Movie(this, "happyrat.mp4");
  myOtherMovie = new Movie(this, "ratwhite.mp4");
  startingMovie = new Movie(this, "startingrat.mp4");
  myMovie.loop();
  myOtherMovie.loop();
  size(1200, 900);
  image(myOtherMovie, 0, 0);
  printArray(Serial.list());
  serialPort = new Serial(this, "/dev/cu.usbmodem14301", 9600);
}


void draw() {
  getSerialData();
  if (myMovie.available()) {
    myMovie.read();
  }
  if (myOtherMovie.available()) {
    myOtherMovie.read();
  }
  if (startingMovie.available()) {
    startingMovie.read();
  }
  if (arduino_values[0]<12 && old_arduino_values[0]>=12) {
    //myMovie.read();
    //image(myMovie, 0, 0);
    gameState = 1;

  } else if (arduino_values[0]>=12 && old_arduino_values[0] <12 && arduino_values[1] != 1){
    gameState = 0;
  }
  if (arduino_values[1]==1 && old_arduino_values[1]==0) {
    //myOtherMovie.read();
    //image(myOtherMovie, 0, 0);
    gameState = 2;

  }else if (arduino_values[1] == 0 && old_arduino_values[1] == 1 && arduino_values[0] >=12){
    gameState = 0;
  }

  if (gameState == 0) {
    myMovie.pause();
    myOtherMovie.pause();
    background(0);
    //photo = loadImage("Instructions.jpeg");
    //image(photo, 0, 0);
    startingMovie.play();
    //image(startingMovie, 0, 0);
    image(startingMovie, -360, -10);
  }else if(gameState ==1){

    myOtherMovie.pause();
    startingMovie.pause();
    background(0);
    myMovie.play();
    image(myMovie, 0, 0);
  }else if(gameState ==2){
    myMovie.pause();
    startingMovie.pause();
    background(0);
    myOtherMovie.play();
    image(myOtherMovie, 0, 0);
  }


  for (int i=0; i<NUM_VALUES_FROM_ARDUINO;i++) {
 old_arduino_values[i] = arduino_values[i];
  }
}

void getSerialData() {
  while (serialPort.available()>0) {
    String in = serialPort.readStringUntil(10);
    if (in!= null) {
      print("From Arduino: " + in);
      String[] serialInArray = split(trim(in), ",");
      if (serialInArray.length == NUM_VALUES_FROM_ARDUINO) {
        for (int i=0; i<serialInArray.length; i++) {
          arduino_values[i] = int(serialInArray[i]);
        }
      }
    }
  }
}