CONTEXT AND SIGNIFICANCE
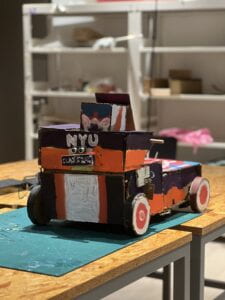
In my previous research, I define interaction as two or more humans, animals or non-living things input, process and output information with each other in a way both of them can sense. And good interactions are those which communicate high-value information in a short period of time. For interactive art products, if they can make people immerse themselves in the interaction while conveying them some food for thought or if they do good to human lives, they are of high quality. (See the analysis in here) The definition of a high-quality interactive art inspired me to build a transformer, which can combine multiple functions in one artifact, thus offering a more immersive experience as if the transformer is really an intelligent creature. I think what is unique about my project is that it provides users with a combined experience with multiple elements. For example, when you turn the rearview mirror of the transformer, it can respond to you with speech. My project does not strengthen one specific element. Instead, it combines multiple elements for a more immersive experience. My project is intended for the masses, hoping to convey the idea that through careful observation and exploration, everyone can find something interesting in daily objects, like a car can be transformed into an autobot.
CONCEPTION AND DESIGN
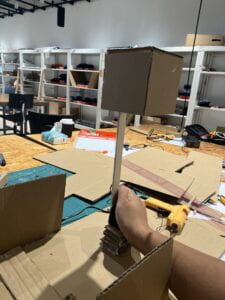
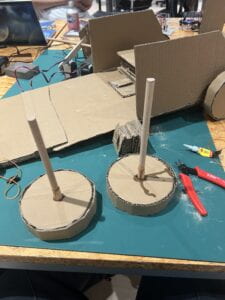
To make the experience of the transformer more immersive, I gave up the idea of adding instructions directly on the transformer and adopted text-to-speech module to make speech instructions. Moreover, I decided to add several different sensors to simulate the process of fixing the transformer, which frees the interaction of the transformer from merely being driven around and transforming. To meet my expectation, I abandoned the nonlinear experience, which was originally designed to make users control the transformer more easily through IR remote, because I found it was not very creative and didn’t help create an immersive experience between the users and the transformer. Instead, I designed it as a linear experience to let users feel that they undergo a complete story —— Thet meet the transformer, fix it, see its astonishing transformation and drive it happily. As to the materials, I used cardboard at first because it was the most convenient material at hand. However, I found that the stepper motor sticked to the cardboard often got too hot and melted the glue. To solve this problem, Professor Andy Garcia taught me that I could 3D-print motor mounts for stepper motors to prevent the heat from transferring to the glue. (See the motor mount here)
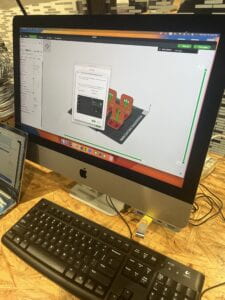
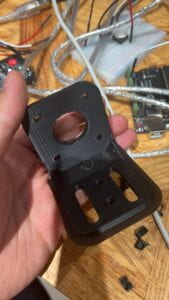
The other parts of the transformer were made up of cardboards to cut down on its weight so that it could be lifted with the force of the stepper motors. The plastic for 3D-printing may be a better choice, since it is light and good at heat insulation, but I hadn’t learned how to model at that time.
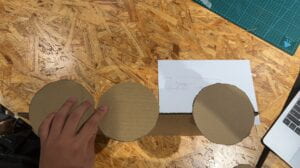
And here are some pictures of our primary design of the transformer:
The design of the structure:

The design of how it is going to transform:

(We gained our inspiration here)
FABRICATION AND PRODUCTION
I think the success in my production process is that I made the transformer able to talk through text-to-speech module. It really improved the interactivity of the transformer (enabling the transformer to respond through speech) and made my project different from others. Here is my code for it:
#define RX_PIN 5
#define TX_PIN 6
// Rx and TX pins should be pin 0 and 1, but it works with 5 //and 6.
EMIC2 emic;
void setup() {
emic.begin(RX_PIN, TX_PIN);
delay(1000);
emic.setVoice(1);
//There are 10 different voices to choose from.
emic.setRate(150);
emic.setVolume(18);
}
void loop() {
emic.speak(“Hi, I am Stepper destroyer created by Eric and Evan. If you see any stepper motor in front of me, you can press the button on my container and help me chase it. Anyway, nice to see you.”);
emic.speak(“Could you do me a favor? I don’t feel well today. Parts of my body maybe needs to be fixed.”);
}
I think the failure of the production process is to try to use 4 stepper motors at the same time. To make one stepper motor move as instructed is already complex enough. The stepper motor needs to be connected to the stepper motor module through a specific wire. (The one from the ER can easily drop off, the one from Interaction Lab is much better) Among the five pins of the stepper motor module, three pins need to be connected to the Arduino and the other two need to be connected to the 5V and GND, all of them are connected through male-to-female wires, which drops off more easily than male-to-male wires. Moreover, the three pins have to be connected with the digital pins, rather than the PMW pins. (In theory the PMW pins should also work, but they didn’t for Arduino MEGA for some reasons I don’t know.) The stepper motor module is also connected to 12V. However, I have to turn off 12V most of the time. Otherwise, the stepper motor will get too hot and stop working. And for the code, it is impossible to make two stepper motors to move at once. So, at first my code was wrong:
stepper1.runToNewPosition(200);
stepper2.runToNewPosition(200);
(It will make one stepper motor turns two rounds and the other not work)
Luckily, Professor Andy Garcia taught us a way to pretend that the two stepper motors are running at once. Here is the code:
for (int i = 0; i < 200; i++){
stepper1.runToNewPosition(-i);
stepper2.runToNewPosition(i);
}
delay(1);
(The two stepper motors actually run one after another. But the speed was too fast that they were like running at the same time.)
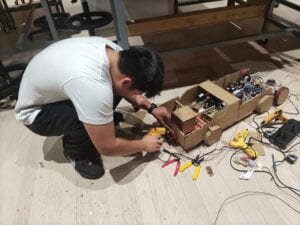
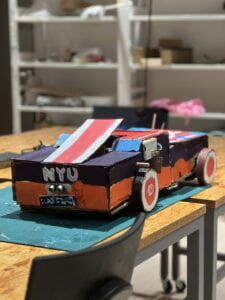
One stepper motor is complex enough, and we had four. So, in the production process, we encountered problems including the wires drop off, the pins are not connected correctly, the power is off, the wires are burnt, the stepper motor gets overheated and stops working, the glue melts, the stepper motor is not firmly stick to the cardboard, which cannot make the wheels move, the battery runs out of power, the stepper motor can only run when the wires are in a specific position due to the poor quality of wires, the power board cannot offer enough power for four stepper motors and etc. And every time one stepper motor doesn't work, we had to check every part of the circuit, which largely drains our time. Therefore, we named our transformer Stepper Destroyer, to show our dislike towards stepper motors. But it was too late to change the motor, since we made our transformer so big that only stepper motors can lift its head up and complete the transformation. (They didn't at last.) In the production process, I wrote most of the codes for Stepper Destroyer, and here are my codes:
(There are two Arduinos in Stepper Destroyer.)
Arduino Uno (or see the codes here)
#include SoftwareSerial.h;
#include SD.h ;
#include EMIC2.h;
#include IRremote.h;
//I don’t know why the blog eats my library every time so I //can’t use the punctuation for the library.
IRsend irsend(3);
#define RX_PIN 5
#define TX_PIN 6
int first = 0;
int count1 = 0;
int count2 = 0;
int count3 = 0;
const int trigPin = 9;
const int echoPin = 10;
long duration;
int distance;
int melody[] = {
139, 165, 175, 196, 208, 233, 247
};
float noteDurations[] = {
4, 4, 4, 16, 8, 8, 16
};
void setup() {
pinMode(trigPin, OUTPUT);
pinMode(echoPin, INPUT);
Serial.begin(9600);
emic.begin(RX_PIN, TX_PIN);
delay(1000);
emic.setVoice(1);
emic.setRate(150);
emic.setVolume(18);
}
void loop() {
digitalWrite(trigPin, LOW);
delayMicroseconds(2);
digitalWrite(trigPin, HIGH);
delayMicroseconds(10);
digitalWrite(trigPin, LOW);
duration = pulseIn(echoPin, HIGH);
distance = duration * 0.034 / 2;
Serial.print(“Distance: “);
Serial.println(distance);
delay(10);
if (distance < 20 && first < 1) {
for (int thisNote = 0; thisNote < 8; thisNote++) {
float noteDuration = 60000 / 183 * 4 / noteDurations[thisNote];
tone(8, melody[thisNote], noteDuration);
int pauseBetweenNotes = noteDuration * 1.05;
delay(pauseBetweenNotes);
noTone(8);
}
emic.speak("Hi, I am Stepper destroyer created by Eric and Evan. If you see any stepper motor in front of me, you can press the button on my container and help me chase it. Anyway, nice to see you.");
emic.speak("Could you do me a favor? I don't feel well today. Parts of my body maybe needs to be fixed.");
first = first + 1;
}
if (first == 1) {
int sensorValue1 = analogRead(A0);
Serial.println(sensorValue1);
int sensorValue2 = analogRead(A1);
Serial.println(sensorValue2);
int sensorValue3 = analogRead(A2);
Serial.println(sensorValue3);
if (sensorValue1 < 300 && count1 == 0) {
emic.speak("Thank you, my rearview mirror was opposite, that is why I can't see the back.");
count1 = 1;
delay(1000);
}
if (sensorValue1 400 && count2 == 0) {
emic.speak("Thank you, there was dirt on my antenna, now I can recieve the signals.");
count2 = 1;
delay(1000);
}
if (sensorValue3 > 300 && sensorValue3 < 700 && count3 == 0) {
emic.speak("Thank you, now my logo is straight and I feel better.");
count3 = 1;
delay(1000);
}
if (count1 == 1 && count2 == 1 && count3 == 1) {
for (int i = 0; i < 3; i++) {
irsend.sendNEC(0xF7C03F, 32);
delay(100);
}
first = 2 ;
emic.speak("Thank you so much, now I can show you my secret. Autobots roll out.");
}
}
}
Arduino Mega (or see the codes here)
#include IRremote.h;
IRrecv IR(7);
#include AccelStepper.h;
int DIR_PIN1 = 22;
int STEP_PIN1 = 24;
// Pin 3 just doesn’t work.
int EN_PIN1 = 26;
int DIR_PIN2 = 28;
int STEP_PIN2 = 2;
int EN_PIN2 = 30;
int DIR_PIN3 = 45;
int STEP_PIN3 = 5;
int EN_PIN3 = 41;
int DIR_PIN4 = 35;
int STEP_PIN4 = 4;
int EN_PIN4 = 33;
int state = 1;
int button;
long startTime;
long presstime;
int first = 0;
AccelStepper stepper1(AccelStepper::DRIVER, STEP_PIN1, DIR_PIN1);
AccelStepper stepper2(AccelStepper::DRIVER, STEP_PIN2, DIR_PIN2);
AccelStepper stepper3(AccelStepper::DRIVER, STEP_PIN3, DIR_PIN3);
AccelStepper stepper4(AccelStepper::DRIVER, STEP_PIN4, DIR_PIN4);
void setup() {
pinMode(EN_PIN1, OUTPUT);
digitalWrite(EN_PIN1, LOW);
pinMode(EN_PIN2, OUTPUT);
digitalWrite(EN_PIN2, LOW);
pinMode(EN_PIN3, OUTPUT);
digitalWrite(EN_PIN3, LOW);
pinMode(EN_PIN4, OUTPUT);
digitalWrite(EN_PIN4, LOW);
stepper1.setMaxSpeed(30000);
stepper1.setAcceleration(10000);
stepper2.setMaxSpeed(30000);
stepper2.setAcceleration(10000);
stepper3.setMaxSpeed(30000);
stepper3.setAcceleration(10000);
stepper4.setMaxSpeed(30000);
stepper4.setAcceleration(10000);
IR.enableIRIn();
Serial.begin(9600);
pinMode(50, INPUT);
pinMode(48,INPUT);
}
void loop() {
if(IR.decode()){
Serial.println(IR.decodedIRData.decodedRawData,HEX);
if(IR.decodedIRData.decodedRawData == 0xE619BF00){
for (int i = 0; i < 50; i++){
stepper3.runToNewPosition(i);
stepper4.runToNewPosition(i);
}
delay(1);
}
IR.resume();
}
if (state == 1) {
if (digitalRead(50) == HIGH) {
state = 2;
startTime = millis();
}
} else if (state == 2) {
button = digitalRead(50);
if (button == LOW) {
presstime = millis()-startTime;
Serial.println(presstime);
state = 1;
for (int i = 0; i < presstime ; i++){
stepper1.runToNewPosition(-i);
stepper2.runToNewPosition(i);
}
delay(1);
}
IR.resume();
}
if (digitalRead(48) == HIGH && first == 1){
for (int i = 0; i < 50; i++){
stepper3.runToNewPosition(-i);
stepper4.runToNewPosition(-i);
}
first = 0;
delay(1);
}
}
(I checked these websites for reference when I wrote the codes:
https://www.youtube.com/watch?v=0DgALFDwouA&t=56s
https://blog.codebender.cc/2014/02/20/emic2/
https://www.bilibili.com/video/BV1XW411H7Ps/?p=3&vd_source=637c310ef910b08826920d2defc0a6f5
https://howtomechatronics.com/tutorials/arduino/ultrasonic-sensor-hc-sr04/
https://docs.google.com/document/d/1MEgxjFO1iaVlIwwEjccmbOkdaQapE4WuOntilAkYfJA/edit#heading=h.15jiiuwqq4uk
)
My group worked together on the building and Coloring of Stepper Destroyer. Bang Xiao is responsible for the mechanism of Stepper Destroyer, and I assisted him during the building process. During the user testing session, our Stepper Destroyer had its wheel drop off and hadn't been fully assembled. So, we just described the functions of the Stepper Destroyer to our testers. However, they still gave us a lot of suggestions, including adding a spiral spring (I later adopted a similar concept, how long the button is pressed, how far the transformer goes.), using ropes to lift the head, shortening the lever, using rubber band and adding something heavy to help lift the head, but we didn't have time to try all of these suggestions, we only conducted some of these. Eventually, we adopted none of these, but we realized that it was so hard to lift the head up, so we could turn the transformation from lifting the head up into an autobot to putting the head down into a truck. In this way, we no longer needed to worry about whether the stepper motors could lift the head or not. We planned to add more functions to the Stepper Destroyer. However, we found the capacity of the Arduino was not enough for so many codes and we had to use multiple Arduino. But we didn’t know how to make multiple Arduinos communicate with each other without IR receivers and emitters, and we considered using multiple IR was too complex and made it too difficult for the physical wiring. So, we gave up our ideas of adding more. Our skills limited us from making the transformer more advanced and next time we should focus more on the creative ideas rather than multiple functions. (But generating really creative idea (like the paper, scissors, stone machine) is so hard and perhaps next time we will still adopt the way of adding more functions. (without stepper motors))
And here is the electronics:
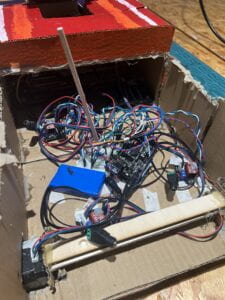
(It looks complex, but it isn’t. The four stepper motors actually have the same wirings. So, I am going to skip the introduction of how we connected the wires.)
CONCLUSIONS
The goal of my project is to convey the idea that through careful observation and exploration, everyone can find something interesting in daily objects. I think my project results is align with my definition of interaction, as it gives the user an immersive experience in a few minutes. (when all the stepper motors are working well) Users are guided to interact with the Stepper Destroyer successfully, which is great. However, the guidance needs to be improved since some users couldn’t grasp what Stepper Destroyer said for the first time. If I had more time, I would improve the accuracy of the words the Stepper Destroyer says and make the pressure sensor (antenna) more conspicuous. I learned from the hard work of building the Stepper Destroyer (three whole nights) that I should consider the workload before launching an ambitious project. I learned from the accomplishment of the Stepper Destroyer that to some extents, hard work pays off. Although our project didn’t meet our expectations, our hard work and ambitious project encouraged other groups to try more difficult and complex codes and electronics and I feel worth it.
Here is a full video of how my project works:
APPENDIX

