Step1
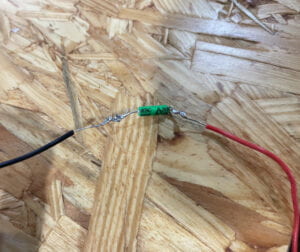
In this recitation class, I paired up with my friend Ragnor! And we started to solder first. The first mistake we made was that we soldered the wrong object because the thing we needed to solder with the wires was the little green sensor, but we thought it was the black tilt switch. But that wasn’t a big deal, knowing how to solder in the first reci class, we easily made two. The picture below shows mine.

Step 2
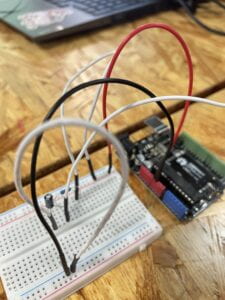
Then we followed the instruction to build the circuit, and after having tried many times in previous classes. This part wasn’t something challenging for us. We finished this part very quickly. The only point I want to mention is that I was not familiar with the schematic, so though the circuit wasn’t complicated, it still took me some time to figure out how to build it by following the schematic.

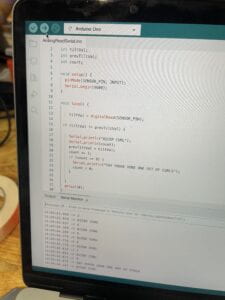
And following the instruction, we input the code below, so when we moved the sensor, the serial monitor would constantly show 010101…
int SENSOR_PIN = 2;
int tiltVal;
int prevTiltVal;

void setup() {
  pinMode(SENSOR_PIN, INPUT); // Set sensor pin as an INPUT pin
  Serial.begin(9600);
}

void loop() {
  // read the state of the sensor
  tiltVal = digitalRead(SENSOR_PIN);
  // if the tilt sensor value changed, print the new value
  if (tiltVal != prevTiltVal) {
    Serial.println(tiltVal);
    prevTiltVal = tiltVal;
  }
  delay(10);
}
Step 3
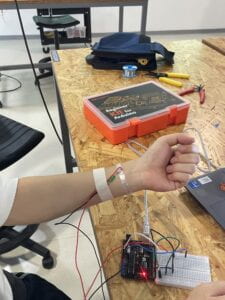
 The next step was to wear the circuit, more specifically, to attach the sensor to our arm. And I used tape to put the sensor on Ragnor’s arm.
And when we did a biceps curl, the value would turn from 0 to 1.
Here’s the video:
Step 4
Then came the most fun, as well as the most difficult step, which was Bicep Curl Workout! Of course I don’t mean that bicep curl itself was difficult for us, though maybe it was, at least for me, lol. But the whole step required much coding knowledge and practice, and I felt like my basic coding knowledge was still very lacking by doing this step. Because I couldn’t understand what each line was for, I always forgot some elements or even didn’t have any ideas. I felt a bit stressed at that moment, but that was also the motivation for me to study coding and devote more time to the interaction lab.
As for task one–“Add a conditional to your sketch so that it shows a message on the Serial Monitor ONLY when a full biceps curl has been completed. ” And we added a condition “if (tiltVal != prevTiltVal && tiltVal == 1) “, and if this condition was satisfied, it would print “A FULL BICEPS CURL.”
| int SENSOR_PIN = 2; int tiltVal;int prevTiltVal;void setup() { // Set sensor pin as an INPUT pin pinMode(ledPin, OUTPUT); Serial.begin(9600); }void loop() { // read the state of the sensor tiltVal = digitalRead(SENSOR_PIN); // if the tilt sensor value changed, print the new value if (tiltVal != prevTiltVal && tiltVal == 1) { Serial.println(“A FULL BICEPS CURL”); } if (tiltVal != prevTiltVal) { prevTiltVal = tiltVal; } delay(10); } |
Here’s the video to show how it worked:
And task two was a bit more difficult because we needed to code something to make the Arduino count the curl, so we added a variable and named it x, so right after the line “A FULL BICEPS CURL” appeared, we input “Serial.println(x); x = x+1;”. So the number would show with the sentence as well.
And the complete code is:
| int SENSOR_PIN = 2; int tiltVal; int prevTiltVal; int x = 0;void setup() { // Set sensor pin as an INPUT pin pinMode(ledPin, OUTPUT); Serial.begin(9600); }void loop() { // read the state of the sensor tiltVal = digitalRead(SENSOR_PIN); // if the tilt sensor value changed, print the new value if (tiltVal != prevTiltVal && tiltVal == 1) { Serial.println(“A FULL BICEPS CURL”); Serial.println(x); x = x+1; } if (tiltVal != prevTiltVal) { prevTiltVal = tiltVal; } delay(10); } |
As for step three, it added a limit to the variable we were using to count the curls. It was quite complex because the number we set confused us. And we tried the way we didn’t add another condition but failed, so the only way we came up with was to add one more condition. And finally, it worked!

| int SENSOR_PIN = 2; int tiltVal; int prevTiltVal; int x = 0;void setup() {// Set sensor pin as an INPUT pin Serial.begin(9600); }void loop() { // read the state of the sensor tiltVal = digitalRead(SENSOR_PIN); // if the tilt sensor value changed, print the new value if (tiltVal != prevTiltVal && tiltVal == 1) { Serial.println(“A FULL BICEPS CURL”); Serial.println(x); x = x+1; } if (tiltVal != prevTiltVal) { prevTiltVal = tiltVal; } if (x == 8){ Serial.println(“Yay, you’ve done one set of curls!”); x = 0; } delay(10); } |
Step 5
And last, my excellent partner added a LED light to the circuit. So when it detected there were 8 full biceps curls, besides the line “Yay, you’ve done one set of curls!“, the LED light on the breadboard would turn on at the same time.
Reflection:
- At what angle of tilt does it transition between HIGH and LOW
while the tilt sensor was horizontal with respect to the surface.
- What else did you notice about its behavior?
I can feel that there is a moveable component in the sensor that can produce sound when I shake it.
- What if you rotate the limb that has the sensor attached to it?
Nothing will change. The value will stay the same.
- What if you shake it?
The output result will quickly alternate between 1 and 0.
- What if you hold the wires several centimeters away and tilt it?
There’ll be no changes to the value.
- Do you think it can be used by any user?
Since it counts for them, it can be used by amateur fitness enthusiasts. In order to motivate them to persist, we may also create a goal and picture the training process.