Recitation 2: Arduino Basics

We had 3 circuits to build in the second recitation class, they were Circuit 1: Fade, Circuit 2: tone melody, and Circuit 3: Speed Game. After getting to know Arduino for the first time in the last recitation, I felt that it wouldn’t be that hard for me this time. And the fact confirms my feeling!
Circuit1: Fade

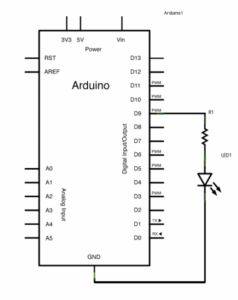
The first circuit is quite easy, I built it very quickly after seeing the schematic. When I open the Fade page of Arduino and click the run button, the LED light started to alternate between dark and light, then between light and dark, and on and on.

But I have a question that didn’t affect the operation but confused me a bit. Because usually, we connect both the GRN and the 5V power on the Arduino board, but by making this circuit, we just connected the GRN and 10, so I wonder what to provide the power.

Here’s the video: reci2

Circuit2: tone melody
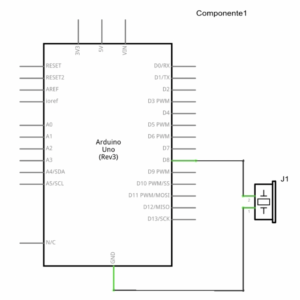
The second circuit was not hard as well, the only things we used were jumper wires and the buzzer. But this time we connected the buzzer to Arduino and used code to let it sound melody. All we needed to do was open the melody page and run the code. And the melody tone was decided by the code; I really want to learn the coding part inside. It’s pretty cool!
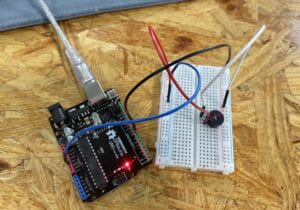
here’s the video:reci22

Circuit 3: Speed Game
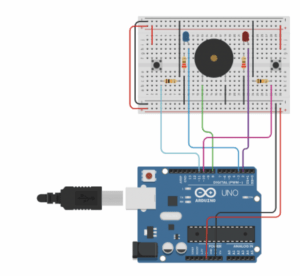
The third circuit was the most complex one, but the most difficult was solely the circuit-building process. Since we already had the schematic, it would be all good if when followed the instruction properly. Because this circuit was finally in the form of a two-player game, it was essentially symmetrical. So I used two 220k resistors, two 10k resistors, two press buttons, 2 LEDs, and a buzzer. It took me some time to build the circuit, but it was pretty smooth. There wasn’t any tricky problem. The only thing was that though I successfully built the circuit, I didn’t truly know exactly what each component was used for, especially the two different resistors.
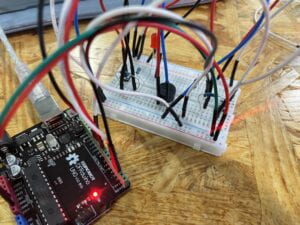
And then my partner and I copied and pasted the code to the Arduino homepage and ran the code. We played the game and I won! When I won, the buzzer went off and the LED on my side came on to show the result. I felt like I was really doing some interactive project. But the press buttons were too small to press, and that gave me some inspiration for the first thinking question. I’ll illustrate it later.

And here’s the final video: reci24

Question 1: Propose another kind of creative button you could use in Circuit 3 to make the game more interactive. Read and use some material from the Physical Computing, Introduction Chapter (p. xvii – p. xxix) to explain why this button would make this game more interactive.

A1: The innovative button that comes to mind and may be attached to circuit 3 is one that, the player can hammer the doll using two hammers and two dolls; if they manage to hit the doll ten times in the first attempt, they have won. This is because the small button on the circuit does not make the player feel particularly intrigued. So I want to use the pressure sensor installed inside the dolls instead of the little press button.

Question 2: Why did we use a 10 kOhm resistor with each push button? (Psssst… Go back to your slides for this answer)

A2: Each push button may effectively prevent floating pins and short circuits by using a 10K resistor. When the switch is open, the 10k resistor can pull the digital input pin down to GND. By doing so, we can guarantee that the push button will function effectively.

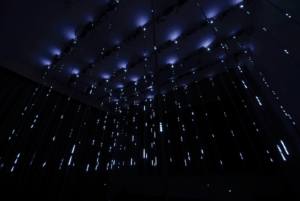
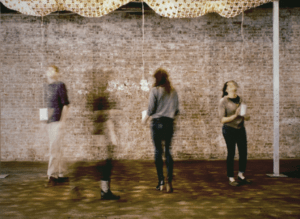
Question 3: In the book Getting Started with Arduino there is a clear description about the “Arduino Way” in chapter 2. Find a project that you find interesting that can be used as an example for these kind of projects. Cite it in adequate manner, include a picture, and explain the reasons that you chose it.

A3: The project I discovered involves moving the ceiling in response to how people move beneath it. I picked it because it demonstrates how an Arduino can get lost while trying to discover a route to C rather than just building roads from A to B. I find it intriguing because of this. The ceiling can move in any direction. Instead, it will sway to the movements of those beneath it.
Reading: Interactive Artifact

The Veldt can be read as a lesson in the perils of technology, particularly when it jeopardizes the bond between parents and their children. In this fiction, George and Lydia Hadley are a married couple that resides in a Happylife Home that is fully automated and can handle all of their household chores for them. Another big part of this story is about the nursery they bought for their children. This nursery can show the conscious activity in people’s own minds in three dimensions, it was originally used to record and study children’s consciousness, but then it was abused by George’s two children and they ended up killing their parents in this place.  I was impressed by some words of this fiction, and it says–One of the original uses of these nurseries was so that we could study the patterns left on the walls by the child’s mind, study at our leisure, and help the child. In this case, however, the room has become a channel toward-destructive thoughts, instead of a release away from them. In order to avoid the tragedy in the ending, I want to design a detector of violent danger awareness.

This interactive device is installed in the nursery, and it will detect the consciousness pattern on the wall because in this room the kids’ consciousness will be projected on the wall. Once the device detects that the wall pattern contains aggressive and violent elements, it will automatically stop the function of the room and report to the parents via mobile phone. And the parents are empowered to decide how long the nursery will be closed. So basically the whole system consists of the person showing emotions and consciousness first, this device detects and then makes interpretation and judgment, and once it detects the awareness of violence, it starts to operate with its stress system so that measures can be taken to prevent the occurrence of violent tragic events.

The Ones Who Walk Away From Omelas depicts an apparently harmonious, beautiful, and happy utopia-like society, but it is not really a utopia; the prosperity and beauty of this society are based on the loneliness and misery of a child. This fiction is an anti-utopian story and also a story related to society and morality. It raises some ethical questions for us to think about–what if the greatest happiness for the majority depended, not merely on a minority being unhappy, but on a minority actively being kept in a perpetual state of misery? What if that were the condition on which everyone else’s happiness and success depended? Would that be morally acceptable, or would it not, rather, strike us as morally repugnant? Although the ending of this fiction is remarkably moving with its subtle acknowledgment that there are some who refuse to give up on the idea that a better world is possible, one of the book’s most moving moments occurs just before the end when the narrator describes the gradual acceptance of the citizens of Omelas to the child’s suffering. People witnessing this child’s suffering are first shocked and outraged. But when they discover that their own happiness is based on his or her very painful experience, they begin to justify evil and start to become insensitive.

In such a circumstance, I hope that something will cause these people to stop being indifferent and once more be able to feel the sorrow and rage over this child’s suffering in order to come up with a better solution. So I want to make a feeling transmission device to correlate this boy’s feelings with people in the whole city. When this boy feels hungry, lonely, or sad, everyone will receive such emotions so that people will feel pain and thus think about how to improve the living conditions and emotions of this child.

The fiction Plague tells the city has a very susceptible virus, infected people will be gradually petrified in a very short period of time. But after they are completely petrified they are still alive, they just become a concept of time and its slow new life form. But most of the uninfected people just burn these petrified people, and this fiction discusses something more than just about the epidemic and the virus, but also about life and ethics.

The interactive device I design for this scenario is a machine which can serve the infected people to let them live in a more comfortable way before they become totally petrified. The petrified people give instructions to the robot with their limbs or eyes, and the robot confirms and helps them complete the instructions.

How do I define Interaction?

Interaction is a process of interconnection, mutual perception, and mutual response. I agree with one concept about interaction in the article What Exactly Is Interactivity, which defines interactivity as a similar process to “listening, thinking and speaking.” One side makes some output, the other side understands and reacts, and the process of this cycle is the interaction. Interaction is an immersive process and an open applied art that is anchored in people’s way of living. Interaction design explains the potential look of objects, which is innately situational and addresses particular issues in a given setting.

  • A good example I wanna share:

This interactive donation machine was created and applied in Europe. I view it as a very successful interactive innovation. When people swipe their credit cards to donate, a piece of bread is sliced off on the screen, and then a hand appeared on the screen to take the bread. This reaction and scene give people who donate with credit cards a real feeling of helping others. They directly know where their money goes and what their money does, so It makes people’s abstract feelings tangible. Its interactivity will make more people feel the meaning of their donation, and more people will be willing to swipe their cards to donate. This machine creates a positive interaction with people. What people do to the machine is swipe their cards to make a donation, and the machine senses this action and then reacts as shown on the screen, where a piece of bread is sliced off, which in turn gives the donors a real sense of helping others.

  • An interactive device that doesn’t meet my definition:

The name of the project is In the rain. I wouldn’t call In The Rain a successful interactive artwork. This gadget may display various rain scenarios with music and light effects so that people can experience various moods and act accordingly. This gadget expresses the designer’s love of rain, it actually shows many sorts of rain over the long run. The project’s and the user’s relationship, however, is fractured and unidirectional. Users are unable to communicate their thoughts to the device, and the device is unable to receive, process, and transmit outside signals. So, in my opinion, this project does not fit my definition. It provides users with an artistic but impractical experience.

Reference:

https://www.creativeapplications.net/member-submissions/in-the-rain-represent-potential-of-rain/


Recitation 1: Electronics & Soldering

During the first week of recitation, I paired with Jason to make a circuit!!

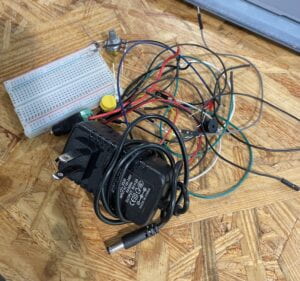
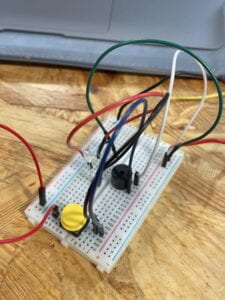
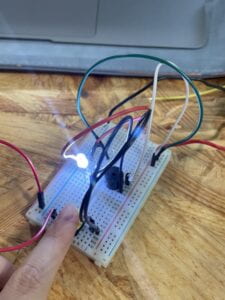
At the beginning of the class, we met some of the fellows and learning assistants, and they gave us the mission to make some circuits with several materials. So basically, what we got is a breadboard, a buzzer, a push-button switch, some resistors, a variable resistor, several jumper cables, a power, and 2 LED lights.

These are what we got:

The first circuit:

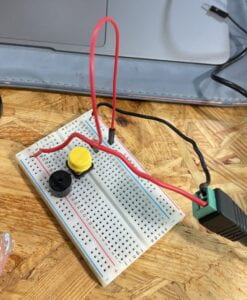
The first thing we did was make a very basic circuit with a switch, a buzzer, a power, and some jump cables. We studied that schematic but failed to operate it. Our main problem was being so confused about the structure of the breadboard. Then we turned to Corina, our learning assistant, and she used a disassembled breadboard to show us its internal structure, and how things worked with the breadboard. After understanding the principles involved, we started our own attempt again.

We connected the red line of the power to the positive side of the breadboard and the black one to the negative. Then install the buzzer and switch. The process wasn’t very complicated, but after we plugged in the power, the buzzer couldn’t be controlled by the switch. So something went wrong, and we found it was about how we connected the switch. Corina showed us a picture of the push-button switch and told us we should connect the A and D poles of the switch, instead of connecting the A and B poles. We then tried to plug the jump cable into the line where the D pole was, and it finally worked.

The Soldering:

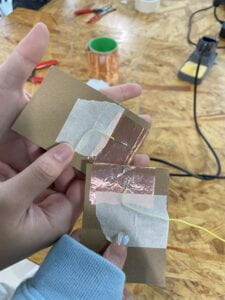
After working out the first circuit, we went to the soldering workshop taught by Professor Minsky. Professor showed us how to use the machine to solder. And taught us how to use cardboard, tape, copper tape, and wire to make a paddle buttom step by step. The professor taught very carefully, other steps are also very simple, the only difficulty is the very step of soldering. It was about controlling and needing practice. My partner Jason tried first, and he did it pretty well, but the soldering wasn’t very strong. Then I started soldering my wire, learning from Jason’s experience, so I melted more material, and it was stronger.

The second circuit:

With the experience of making the first circuit, the second circuit was not a difficult task for us anymore. We changed the position of the switch and buzzer a bit to make there’s a bigger space for other materials. Then we added a resistor and a LED to the circuit, but the first attempt only succeeded half. Because our LED light was not connected to the switch, so it was always on. We adjusted the position of the jump cable, then the light was finally able to be controlled by the switch.

The final circuit:

Only 10 minutes left, and we had one last circuit, which was the most complicated one to do. But we already had a lot of experience and had mastered the principle of this circuit, so we just needed to follow the same pattern. But how to connect the variable resistor to the breadboard was a problem for us, there were 3 outputs of the resistor, and it confused us about which output to connect the cable. Then the fellow Iris told us to use the cables to connect the outputs which were the closest. One was to lead and one was to resist. Also, our classmate Sid provided some assistance with us, so we finished the final circuit very fast and smoothly. He helped me take a video as well. The brightness of the red LED could be adjusted by moving the variable resistor, and the white LED and buzzer could be controlled by the switch. I felt a sense of accomplishment when I saw that the circuit we had built was working successfully. And last, we replaced the push-button switch with the paddle switch we made in the soldering workshop!

Here’s the final videos:

Questions:

Q1: What is the function of the resistor R1?

A1: R1 is mainly used to stabilize the current and voltage in the circuit. Since the battery provides more current and voltage than the LED1 can carry, so a resistor is needed to avoid a short circuit when it’s connected to a LED.

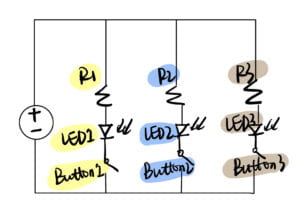
Q2: Looking at the following circuit, draw its diagram by yourself.

A2:

Q3: After reading The Art of Interactive Design, in what way do you think that the circuit you built today includes interactivity? Which degree of interactivity does it possess? Please explain your answer.

A3: I think there’s interactivity between this circuit and us, and also between the different elements in the circuit. Take the first and simplest circuit for example, after we built the circuit, when we press the switch, the circuit started to operate, which means it started the “thinking” step mentioned in the article, then the current passed through the switch and the buzzer, the buzzer sounded, and the whole process of interaction was finished. I feel like the working circuit formed a benign interaction between information and between people and circuits. 

Q4: How can Interaction Design and Physical Computing be used to create Interactive Art? You can reference Zack Lieberman’s video or any other artists that you know.

A4: Physical computing and interaction design produce mediums and platforms where people may relate to the digital environment, giving interactive artists the means to change data about human behavior. It may capture the focus of the line of sight and use the eyes as a brush to write and draw, similar to a human-computer interaction tool called Eyewriter introduced by Zack Lieberman, to allow paralyzed people more effectively express their individual requirements and to foster engagement. the making and improvement of art. Interaction design and physical computing applications broaden usable human tools, enabling people to produce more vibrant art.

Reference

O’Sullivan, Dan, and Tom Igoe. Physical Computing. Course, 2004.