
OCEANIC EXPLORER
Andrew Lu and Wes Firestone
Interaction Lab Spring 2023
Conception and Design
Our project idea is based on the immersive experience of being in a submarine. Our project idea aimed to create an environment where the user could control the descent and acceleration of the submarine. The descent of the submarine is controlled by the wheel while the speed is controlled by a lever. These actions will prompt real-time auditory, tactile and visual feedback to the user.
Having something physical like a wheel and lever would make the feeling of piloting the submarine more realistic and enjoyable.
3D Wheel photo:

3D Lever Photo:
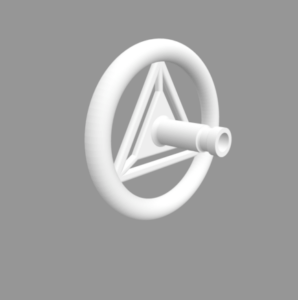
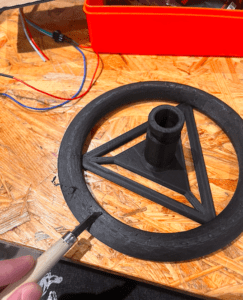
When we got the wheel out of the printer, the edges felt very harsh. This would have been extremely uncomfortable for the user. S0, I smoothed the edges with a blade.
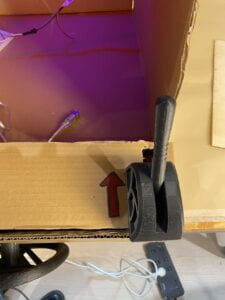
We incorporated these objects into our project by attaching the steering wheel to the potentiometer and the slider to the lever.
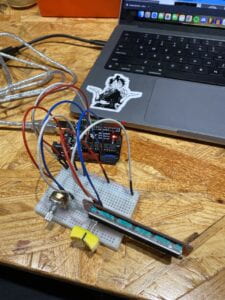
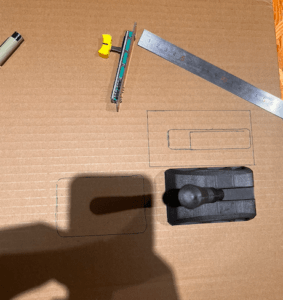
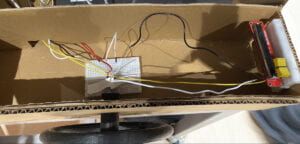
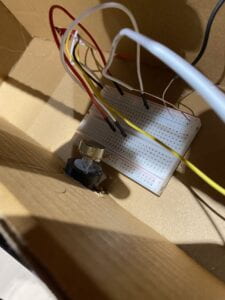
Building our sliding sensor:
Building the potentiometer + attaching it to the wheel.

These were the most accurate sensors we could use that measured the angles and movement of a pilot’s realistic experience navigating a submarine.
The user could get real-time auditory and visual feedback as he/she controlled the level of acceleration and descent of the submarine using these sensors. For user testing, we only had two potentiometers (depth working, speed not), and our display was just an interactive blue screen with the sole working potentiometer. the feedback we received revolved around making the display more visually stimulating with other designs such as fish, radar, etc.
Fabrication and Production
During the production process, Andrew and I believed that starting with the LEDs and sensors in our project would allow us to troubleshoot the most complicated issues in our project. Initially, our project idea was to use free-body movement to control the depths and speed using accelerometers. Luckily during this step, we realized that the accelerometer we were given could not track the user’s movements in 3 dimensions (x,y,z) and gave us unreliable data to the Arduino. Rather, it controlled the velocity in a single dimension. We felt that learning how to use the accelerometer would be extremely difficult as online resources were quite scarce. Thus, we opted with using sliding sensors and potentiometers in replace of the accelerometers because the code was more familiar and provided more accurate data for us to use.
This caused a minor shift in our project idea and backdrop. Instead of an immersive swimming experience that used free-body movement, we tweaked the idea to an underwater submarine experience using a control panel that is found similar in submarines.
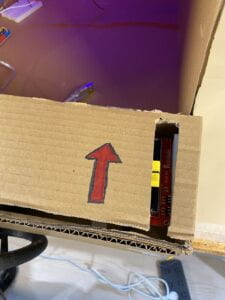
This is what our Slider looked!
We were told because of the flight angle of the lever to include some sort of indication as to how to use it and which direction to slide in. Thus, we created an arrow to indicate this.
Using the sliding sensor, we felt that it would be cool to use these sensors as physical objects (3d printed) that created a control panel which would add to the interaction aspect of the project.
Slider + Wheel
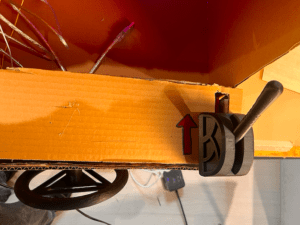
The user could hold on to something and control visual and auditory feedback using the wheel and lever during their immersive driving experience.
The potentiometer was controlled the brightness and color of the LEDs as well as the background display for the sonar.
Whereas the slider controlled the position of the monster displayed on processing as well as the frequency in beeping and other noises.
When we attached the wheel to the potentiometer, the weight was a bit too much for the potentiometer to fully stay in.
This made it partly successful in retrieving and sending data because the wheel kept coming out of the circuits.
As we settled on this idea, we wanted to use red LED lights that would increasingly blink faster as the user descended deeper into the ocean. Andrew and I felt this would make the experience more engaging and realistic because it provokes a cautious effect and indicates to the user that they are descending.
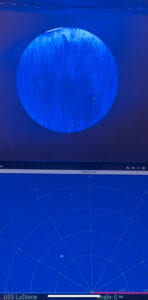
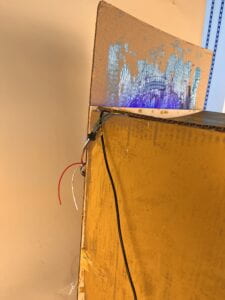
Another aspect we wanted to include in our LED lights was looking at the color of the ocean through a window. We accomplished this look by laser cutting a circle with an 8 inch diameter with a painted blue backdrop with LEDS. Realistically, when one goes deeper into the ocean, the amount of light traveling through the water gets absorbed more. This creates different shades of the ocean and why the ocean gets darker as we go deeper. Changing the shades of blue-LED color is a great indicator of depth by showing how much light is being absorbed.
This painted backdrop had multiple shades of blue to highlight the different tones of blue in the ocean and make the colors more pronounced with the reflection of blue LEDs. When the lights get darker, it creates a darker contrast compared with cardboard. When the lights get lighter, the different tones of light blue are more pronounced. The lights are carefully decorated behind the circle to not block the backdrop connected to a 5v battery because there were more than 60 LEDS attached to it.
Another visual indication we used was a sonar displayed in processing. We figured out how to make the sonar by watching Hani’s Experiments on Youtube (link at the bottom). As the person uses the sliding sensor to increase their speed, a monster would slowly appears in the middle of the sonar
. Integrating this visual with an increase in tone amplitude and frequency had the effect that the user was approaching a monster as they descended into the ocean. When this would happen, the Red LED lights would blink much more aggressively.
However, when we put the code together, the project was very laggy and the LEDs as well as the display and sound were very delayed and didn’t make for a good immersive experience.
Because the flashing LED lights were transferring huge amounts of data, it was either we get rid of the flashing lights, get rid of the visual displays (sonar and monster), or keep the laggy interaction. My partner and I decided that removing the flashing Red LEDs was the best option because it would have allowed the user to endeavor in multiple visual aspects rather than just the LED lights. We felt this was the more immersive route to take. Rather, If we kept the flashing red LEDs the project would overall be less satisfactory for the user.
When we got rid of the red LEDs, we felt something was missing. The red LEDS were such a huge aspect of our submarine that was now gone. However, after brainstorming and troubleshooting, we decided to incorporate the red LEDS with a different visual approach. We did some research and found that submarines use red light for night lighting to help the crew adjust to darker conditions. Instead of flashing LEDs, we found a comprise by adjusting the level of brightness that didn’t strain processing and Arduino so much.
When the user is at low depths and closer to the surface, the red LEDs would be very faint, but when the user wants to descend, the red LED lights would gradually get brighter. This would not only allow us to include such an important aspect of our project but also incorporate this ultra-realistic narrative into the user’s immersive experience.
Conclusions.
We wanted our project to provide the user with an immersive underwater experience. Initially, we hoped to accomplish this using free-body, movement to simulate a person swimming underwater. However, we slightly change how to achieve this “underwater” experience in our project by having it become a submarine and to give the user a different kind of “underwater” experience. We believe that the Oceanic Explorer accomplished this by providing multiple interactive aspects of navigating a submarine and being underwater through visual, tactile, and auditory interaction. Visual because the LEDs represented the color and depth of the ocean, tactile because the user was able to use a steering wheel and lever to control the depth and acceleration, and color of the LEDs, and auditory because the user could control and hear the beeping of the sonar and whale sounds depending on if they increased or decreased their speed.
This level of interactivity provided by the Oceanic Explorer aligns with our definition of interaction. We believe that meaningful interaction is created by two or more intentional actors, that provoke a conversation between the two. Rather than just have a video playing, where the user sits and watches the colors and sounds change on their own, the user has more freedom and takes on the role of a pilot rather than a passenger’s. This is a conversation we aimed to provide to the user and feel that it has been reciprocated successfully by our users. It is not only provocative in curiosity and user input but also one that provides a level of conscious engagement. This can be seen through different ways of driving the submarine that produce a level of brightness and color of the ocean and lights In addition to creating different sounds/visuals from the sonar.
If we had more time to improve the project, I would have loved to make the display a lot more immersive. I would have made a bigger submarine that would encapsulate the user’s body creating a more realistic feeling of being in a submarine. I would also have made reinforcements to the steering wheel and lever to make it more sturdy as well as highlighted and build on the visuals and add more as our main immersive experience and engagement. I would lose the sonar as it could be a little distracting, and add more physical controls to help add onto the color aspect of our project.
I believe that we learned that it is important to be able to improvise and adapt to uncounted problems . Although when the flashing lights didn’t work in the end we were forced to come up with a different solution. Through quick thinking and problem-solving, we improvised our project’s idea as well as achieved a desirable visual thats similar. Also, the feedback from Professor Margaret Minsky brought to light a valuable lesson that a design could be “too distracting” which was very helpful in the realm of interactivity. I think Andrew and I were mistaken about the idea that the more visual stimulation the user got, the more interactive it would have been. However, now after hearing this feedback, we realized that too much could be distracting to the overall experience we wanted to provide to the user.
Moving forward with what I did well, I believe I was able to improvise and troubleshoot which really reflected the knowledge I have retained from this class. Through this project, I was able to build on my skills as a programmer, understand digital fabrication more, utilized what I have learned in class and build on the fastLED knowledge I gained from my midterm project. I was very happy and amazed to see that I was able to apply knowledge from this class to bring an idea to life. Before taking this class, I would have thought that these crazy ideas were unrealistic in accomplishing as they seemed too fantastical. However, this class showed me that it is indeed accomplishable.
Appendix
Final Code:
Arduino:
Processing:
import processing.serial.*;
import processing.sound.*;

Serial serialPort;
SoundFile sound;

int NUM_OF_VALUES_FROM_ARDUINO = 2;  /* CHANGE THIS ACCORDING TO YOUR PROJECT */

/* This array stores values from Arduino */
int arduino_values[] = new int[NUM_OF_VALUES_FROM_ARDUINO];
String feet;


void setup() {
  size(800, 800);
  background(0, 0, 255);
  printArray(Serial.list());
  serialPort = new Serial(this, "/dev/cu.usbmodem14201", 9600);
  //sound = new SoundFile(this, "Submarine.aiff");
  //sound.loop();


}

void draw() {
  getSerialData();
  float depth = map(arduino_values[0], 0, 1023, 0, 500);
 // float speed = map(arduino_values[1], 0, 1023, 0.1, 5);


  background(0, 0, depth);


  textSize(128);
  text(str(int((depth * -1 ) + 500 + ("feet"))),  342,420,100);

}
void getSerialData() {
  while (serialPort.available() > 0) {
    String in = serialPort.readStringUntil( 10 ); // 10 = '\n'  Linefeed in ASCII
    if (in != null) {
      print("From Arduino: " + in);
      String[] serialInArray = split(trim(in), ",");
      if (serialInArray.length == NUM_OF_VALUES_FROM_ARDUINO) {
        for (int i=0; i<serialInArray.length; i++) {
          arduino_values[i] = int(serialInArray[i]);
        }
      }
    }
  }
}
Credit:
https://www.youtube.com/watch?v=xngpwyQKnRw/
3d Wheel:
https://www.thingiverse.com/thing:1066846
3d Lever:
https://www.thingiverse.com/thing:4550772