
LED SHOW by Andrew Lu and Wes Firestone
Professor: Margaret Minsky

Context and Significance
Both Andrew and I come from a musical background where instruments play a huge role in helping us understand the world around us, we wanted to incorporate our interests into our project. By interacting with different sound frequencies whether on the guitar, keyboard or violin, there is an unexplainable joy that we wanted to share with others. We drew other inspiration from previous research such as ‘IRIS’ by Hybe Studio. Iris is an installation we felt spoke to the interactive component that we were looking for artistically and intellectually by challenging the user to come up with different designs by imitation of movement and relaying the information imputed by the user through LED lights. Although we don’t have the knowledge to implement something of this caliber, we thought we could interact with the user through buttons that relay information from the user through LEDs.
An idea we thought would add to the interactivity and creativity of our project was combining color theory and music theory into one interactive model. Our goal was to create different sounds from 6 notes(A,B,C#,D,E,F#) from the A major scale and assign a specific color that spoke to that resembled that musical note.
I would say our intended audience are those who are drawn to devices that challenge them as an artist but also as an intellectual. I would say anybody who has a passion for music and visual aesthetic, or those willing to challenge their inner musician.
Conception and Design.
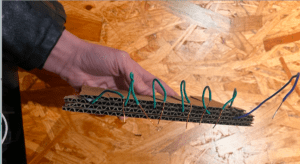
Our project got very useful feedback after user-testing. Although we thought a keyboard was self explanatory to the user, we realized that we needed some clear indication that told the user where to start. We realized that the convoluted look of the wires could intimidate and throw the user off. So, we simplified our look by taping excess wire to the bottom of our keyboard.
Other design decisions targeted our keyboard. Such decisions like making the keys more flexible and providing some indication where to press on the keys.
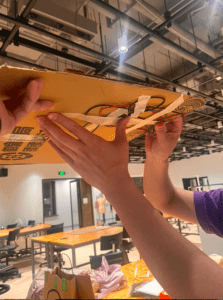
In addition, we designed our project primarily using cardboard. Not only was cardboard the most accessible to us in resources, but it offered malleability to design our keys and its function. Not only did we want our project to resemble a keyboard, but we also wanted it to feel like one. Thus, we opted for individual switch paddles instead of buttons for the keys. We thought that buttons were too immediate of a response and lacked the tactile sensation of slowly or forcefully pressing down that resembled musical dynamics such as pianissimo and forte.
Fabrication and Production
Over the course of designing, producing and finally implementing our ideas onto cardboard and code, there were many failures which most of them we resolved.
At the beginning, we struggled with following through with our initial idea of creating a board where the user could freely light up LEDS, and many others that were all very similar to each other. However, after we figured out what was plausible to create given our resources and time, we started what can be seen as the outcome of our project.
Although we had different production ideas on how to realize and achieve our interactive project, we wanted to prioritize LEDs as a visual indicator, musical pitches as an auditory indicator and the keyboard as our tactile indicator.
Our journey consisted of 3 major tasks that we had to overcome to make our project successful.
Task 1: Designing and Creating the paddle switches.
 =
=
For us to create a functioning keyboard, we needed to design responsive paddle switches + keys that would then later connect to our buzzers. The important part of this task was to be able to position the keys and how they were pressed to make a functioning circuit.
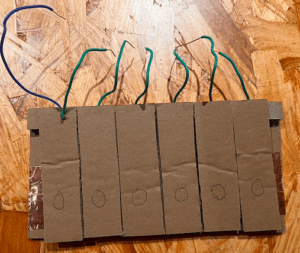
Each key was connected to a pin via a green wire, and the board was connected to ground via a blue wire. That way, when each key was pressed, the copper tape would make contact with the board, completing the circuit. While I was working on most of the paddle switches, Andrew was preparing the breadboard.
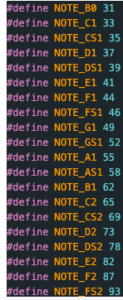
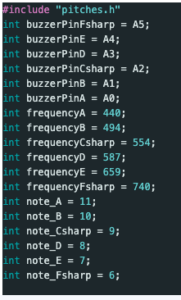
NOTES: A,B,C#,D,E,F#
COLORS: RED,BLUE,YELLOW,GREEN,YELLOW/ORANGE,PURPLE
Task 2: Designing the Buzzers + Code:
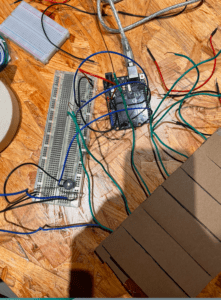
For designing the buzzers, we initially started with one buzzer that connected to each individual key.
Each key was connected to a specific pin to output a specific pitch. However, we were told that we needed multiple buzzers to play different pitches..
Andrew and I both worked in troubleshooting whenever there would be a flaw and designing the infrastructure of code together.. Andrew made huge success when adding the pitches library to our code and designing the code while I worked with the FastLeds.
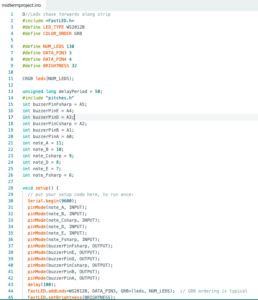
To create the sound, we added a pitch library that included all the necessary pitches and attached each buzzer to their corresponding key which would play a specific pitch.
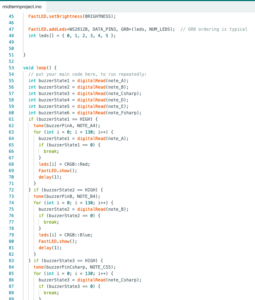
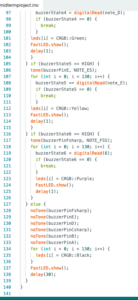
Task 3: Implementing code for LEDs
To implement code for our LEDs, we had to use for loops. Initially, I had to grasp the concept of how each loop iterates and the function of the accumulator variable, i.
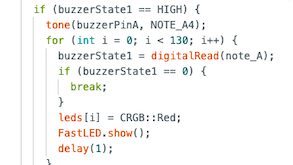
for (int i = 0; i < 130; i++)
This expression is used to iterate i = i + 1 times until i is equal to 130 (the amount of LEDS on the strip). The i++ also gives the effect of it lighting up led by led. Depending on our delay value
we could speed up how fast the LEDS would turn on individually and color.
leds[i] = CRGB::Yellow;
FastLED.show();
delay(1);
However, this solely depended on if (buzzerState3 == HIGH aka if the key is actively being pressed.
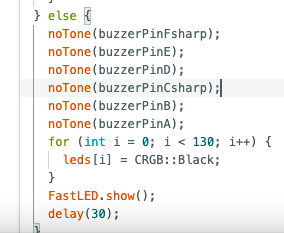
While buzzerState == LOW, aka if the key is not being pressed, the color black would be active which is basically the LED’s off switch.
leds[i] = CRGB::Black;
Conclusion
Our goal for LED Show was to create an immersive experience that transfigured the user’s understanding of sound and color. We also wanted to provide a level of user input via the keyboard that incorporated the duration, type of pitch, and speed the user was pressing
Our understanding of interaction is one where the user can have a fluid conversation-like experience that involves unique inputs generated by the user through tactile indications (keys) and unique auditory and visual outputs (Sound of buzzer(note), LEDS).
I believe our project has accomplished this notion of interactivity because our project takes in the level of duration(how long a key was held) for, what key the user has pressed and its frequency (how many times in a given period was the key pressed). The user has the ability to create a vast range of combinations where each out would be something different entirely depending on the user’s generated input.
However, I believe that our project lacks some diversity that could prohibit the user from further exploring their conversation with LEDShow. For example, I believe that it could feel repetitive for the user, since it lacks the ability to play multiple tones, and combine colors together. In short, I would say that our project fulfills our definition of interactivity but the user could have a more in depth conversation.
If we had more time, I would have liked to add more quality to the sound of our pitches, have the ability to mix colors, add a little more stability to the keyboard. Also, I would have liked to make it more visually appealing by adding paint and more LED strips.
The setbacks included: faulty code for the buzzers, and only being able to light up the entire LED strip. I would say we had a strong idea, however the code was the most difficult task in achieving our project.
Andrew and I have learned information when it comes to coding with FastLeds, buzzers and how libraries work. Not only did we learn a valuable lesson in planning via a roadmap, but also how to implement our visualized ideas into something concrete.