In this tutorial:
- Arduino To Processing
- Processing to Arduino
- Read and Write – Full Duplex (Arduino and Processing are both sending and receiving data)
Download all the code here or review it on Github.
1. Arduino To Processing
1.1. Arduino To Processing: Arduino Example Code:
Start the communication using Serial.begin
void setup() {
  Serial.begin(9600);
}
First, we will create variables for storing the values from each sensor. In the next example we are using three sensors connected to three different analog pins, so we use analogRead, but if we were reading values from a button, we should use digitalRead instead. It will depend on what type of sensor you are using, so change the code accordingly.
void loop() {
  // to send values to Processing assign the values you want to send
  //this is an example
  int sensor1 = analogRead(A0);
  int sensor2 = analogRead(A1);
  int sensor3 = analogRead(A2);
Next, we need to find a way to send multiple values and get Processing know each one of them and when to replace them for updated values. The way we are going to do it is to send them as a String of values separated by a comma. When we finish sending all the sensor values we will finish with a linefeed, so Processing will know that now it’s time to replace the values for the new ones coming.
  // send the values keeping this format
  Serial.print(sensor1);
  Serial.print(",");  // put comma between sensor values
  Serial.print(sensor2);
  Serial.print(",");  // put comma between sensor values
  Serial.print(sensor3);
  Serial.println(); // add linefeed after sending the last sensor value
Finally, we might need to add a delay, but it will depend on the sensors you are using in your project.
  // too fast communication might cause some latency in Processing
  // this delay resolves the issue.
  delay(100);
}
1.2. Arduino To Processing: Processing Example Code:
Start the code by adding the Processing Serial Library
import processing.serial.*;
Define the number of sensor values you will be receiving from Arduino and create an array to store these values. In this example we are receiving three values, so NUM_OF_VALUES = 3.
int NUM_OF_VALUES_FROM_ARDUINO = 3;   /** YOU MUST CHANGE THIS ACCORDING TO YOUR PROJECT **/
int sensorValues[];      /** this array stores values from Arduino **/
We will create a new String to receive the values from Arduino, this String is the one written like:
sensorValueOne, sensorValueTwo, sensorValueThree
At the end of this line there will be a line feed we will identify and replace the previous String with the new one. We will also split the values when we see a comma.
String myString = null;
Create the serial port
Serial myPort;
Start your setup code as you wish. You must include in the setup a function called setupSerial() that will contain the code to start the communication with Arduino. You will need to set the function up by defining the port number your computer gives to your USB port.
void setup() {
  setupSerial();
}
So go down to the setupSerial() function:
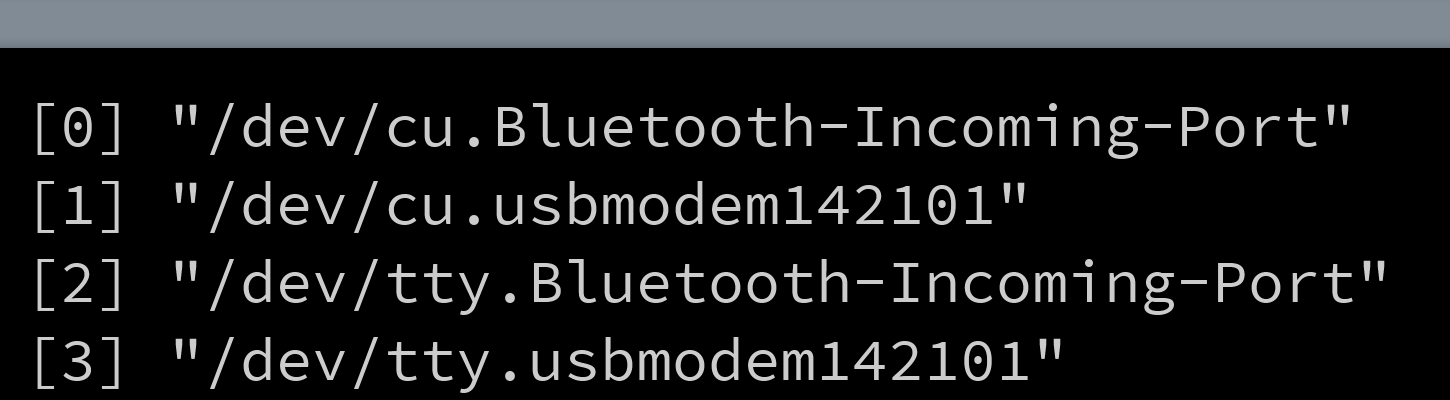
void setupSerial() {
  printArray(Serial.list());
  myPort = new Serial(this, Serial.list()[ PORT_INDEX ], 9600);
  // WARNING!
  // You will definitely get an error here.
  // Change the PORT_INDEX to 0 and try running it again.
  // And then, check the list of the ports,
  // find the port "/dev/cu.usbmodem----" or "/dev/tty.usbmodem----"
  // and replace PORT_INDEX above with the index number of the port.

  myPort.clear();
  // Throw out the first reading,
  // in case we started reading in the middle of a string from the sender.
  myString = myPort.readStringUntil( 10 );  // 10 = '\n'  Linefeed in ASCII
  myString = null;

  sensorValues = new int[NUM_OF_VALUES_FROM_ARDUINO];
}
Now replace “PORT_INDEX” by a number 0, like this:
myPort = new Serial(this, Serial.list()[0], 9600);
Next, run the code and find in the console the list of ports your computer has. Choose the USB port, for example 1 or 3 in this case:
Change the PORT_INDEX accordingly. In this example your line would be:
myPort = new Serial(this, Serial.list()[3], 9600);
But again, this depends on everyone’s computer, so find your own number.
Now your Processing sketch is connected with Arduino.
In the draw loop we will use a function called getSerialData() to update the sensor values as they change.
void draw() {
  getSerialData();
}
Remember that the values from the sensors are stored in an array of variables and these variables will be filled with data according to the information we get from Arduino. In this function, we will split the String containing all the sensor values every time there is a comma and we will stop reading the String when we get a line feed (value 10 in ASCII code). We will also print to the console the values we are receiving from Arduino.
Note: If you want to know why we are using trim, check this out.
void getSerialData() {
  while (myPort.available() > 0) {
    myString = myPort.readStringUntil( 10 ); // 10 = '\n'  Linefeed in ASCII
    if (myString != null) {
      String[] serialInArray = split(trim(myString), ",");
      if (serialInArray.length == NUM_OF_VALUES_FROM_ARDUINO) {
        for (int i=0; i<serialInArray.length; i++) {
          sensorValues[i] = int(serialInArray[i]);
        }
      }
    }
  }
}
Finally, write your code and use the values from the sensors knowing that sensorValues[0] is the value from the first sensor, sensorValues[1] is the value from the second sensor, and sensorValues[2] is the value from the third one.
void draw() {
  getSerialData();
  printArray(sensorValues);

  // use the values like this!
  // sensorValues[0]

  // add your code

  //
}
For example, if you want to draw a circle and change the size of that circle according to the values of the first sensor you are sending from Arduino, your code should look like this:
void draw() {
  getSerialData();
  printArray(sensorValues);

  circle(width/2, height/2, sensorValues[0]);
}
You will probably need to map the values according to what you are doing, for example, if the values you are receiving from the sensor correspond to values from a potentiometer, these values are in a range between 0 and 1023, then the size of the circle will grow outside the canvas. So you might want to map the potentiometer values to the minimum size for the circle to the maximum size you want the circle takes. Then, your code could be something like this:
  float size = map(sensorValues[0], 0, 1023, 0, width);
  circle(width/2, height/2, size);
You can now be creative and write the code for your project as you need.
2. Processing To Arduino
2.1 Processing To Arduino: Processing Code:
After opening a new sketch in Processing, the library is needed to be imported.
import processing.serial.*;
Then we need to define the global variables needed for serial communication. Define the number of values you will be sending to Arduino and create an array to store these values. In this example we are sending three values, so NUM_OF_VALUES_FROM_PROCESSING = 3.
int NUM_OF_VALUES_FROM_PROCESSING = 3;  /** YOU MUST CHANGE THIS ACCORDING TO YOUR PROJECT **/
int processing_values[] = new int[NUM_OF_VALUES_FROM_PROCESSING]; /** this array stores values you might want to send to Arduino **/
You will have to create a serial port, under which you will create a new String, just like in the previous example, but in this case to send the values to Arduino. This String is the one written like:
ValueOne, ValueTwo, ValueThree
Serial myPort;
String myString;
Start your setup code as you wish. Change the size accordingly. You must include in the setup a function called setupSerial() that will contain the code to start the communication with Arduino. Do not forget to change the port number in setupSerial function down below.
void setup() {
  size(500, 500);
  background(0);
  setupSerial();
}
You will find the setupSerial() function below and this is setting up the port of communication, so you have to go down, find it and set up your PORT_INDEX.
void setupSerial() {
  printArray(Serial.list());
  myPort = new Serial(this, Serial.list()[PORT_INDEX], 9600);
  // WARNING!
  // You will definitely get an error here.
  // Change the PORT_INDEX to 0 and try running it again.
  // And then, check the list of the ports,
  // find the port "/dev/cu.usbmodem----" or "/dev/tty.usbmodem----"
  // and replace PORT_INDEX above with the index number of the port.

  myPort.clear();
  // Throw out the first reading,
  // in case we started reading in the middle of a string from the sender.
  myString = myPort.readStringUntil( 10 );  // 10 = '\n'  Linefeed in ASCII
  myString = null;

}
To set up the port, first replace “PORT_INDEX” by a number 0, like this:
myPort = new Serial(this, Serial.list()[0], 9600);
Next, run the code and find in the console the list of ports your computer has. Choose the USB port, for example 1 or 3 in this case:
Change the PORT_INDEX accordingly. In this example your line would be:
myPort = new Serial(this, Serial.list()[3], 9600);
But again, this depends on everyone’s computer, so find your own number.
Now your Processing sketch is connected with Arduino.
Finally, write your own code to send values to Arduino.
void draw() {
  background(0);

  // give values to the variables you want to send here
  //change the code according to your project
You will assign values to the array of values, knowing that processing_values[0] is the first value, processing_values[1] is the second value, and processing_values[2] is the third value. The values in this array will be the NUM_OF_VALUES_FORM_PROCESSING you set up at the beginning. In this example NUM_OF_VALUES_FORM_PROCESSING = 3, so the index number of the array goes from 0 to 2.
Let’s see an example. If you would like to control an output like an LED connected to Arduino by checking whether the mouse is pressed you can send 1 or 0 and then turn the LED on when Arduino receives 1 and off when Arduino receives 0.
    if (mousePressed) {
      processing_values[0] = 1;
    } else {
      processing_values[0] = 0;
    }
Another example, if you would like to control the pitch and duration of a buzzer you can send the values of where the mouse is on the screen. You could use mouseX for controlling the pitch and mouseY to control the duration of the sound. Remember that you will need to map the values either in Processing before you send them, or in Arduino when you get them.
    processing_values[1] = mouseX;
    processing_values[2] = mouseY;
Finally, you need to send the values to Arduino with the function sendSerialData(). Do not delete this line of code from the draw loop!
sendSerialData();
You will find this function below in your code, make sure you use it. This function will send every value of your array to Arduino and will also print to the console the values you are sending.
void sendSerialData() {
  String data = "";
  for (int i=0; i<processing_values.length; i++) {
    data += processing_values[i];
    //if i is less than the index number of the last element in the values array
    if (i < processing_values.length-1) {
      data += ","; // add splitter character "," between each values element
    }
    //if it is the last element in the values array
    else {
      data += "\n"; // add the end of data character linefeed "\n"
    }

  }
  //write to Arduino
  myPort.write(data);
  print(data); // this prints to the console the values going to arduino

}
2.2 Processing To Arduino: Arduino Code:
First you will define the number of values you are receiving from Processing. In the previous example we are sending 3 values, so NUM_OF_VALUES_FROM_PROCESSING is 3. Change the number 3 according to the number of values you are receiving.
#define NUM_OF_VALUES_FROM_PROCESSING 3    /** YOU MUST CHANGE THIS ACCORDING TO YOUR PROJECT **/

/** DO NOT REMOVE THESE **/
int tempValue = 0;
int valueIndex = 0;
We will create an array to store the data from Processing.
int processing_values[NUM_OF_VALUES_FROM_PROCESSING];
Start the communication using Serial.begin.
Add any line of code as your project needs.
void setup() {
  Serial.begin(9600);
}
For example, if you want to control a LED when you press the mouse, you should add the line pinMode in the setup. For example:
void setup() {
  Serial.begin(9600);
  pinMode(13, OUTPUT);
}
In void loop you must include getSerialData. This function will get the values coming from Processing and will place them into the array “values” that we created at the beginning.
void loop() {
  getSerialData();
}
You will find the function getSerialData below in the code. Do not change anything here and make sure you have it in your code!
//receive serial data from Processing
void getSerialData() {
  while (Serial.available()) {
    char c = Serial.read();
    //switch - case checks the value of the variable in the switch function
    //in this case, the char c, then runs one of the cases that fit the value of the variable
    //for more information, visit the reference page: https://www.arduino.cc/en/Reference/SwitchCase
    switch (c) {
      //if the char c from Processing is a number between 0 and 9
      case '0'...'9':
        //save the value of char c to tempValue
        //but simultaneously rearrange the existing values saved in tempValue
        //for the digits received through char c to remain coherent
        //if this does not make sense and would like to know more, send an email to me!
        tempValue = tempValue * 10 + c - '0';
        break;
      //if the char c from Processing is a comma
      //indicating that the following values of char c is for the next element in the values array
      case ',':
        processing_values[valueIndex] = tempValue;
        //reset tempValue value
        tempValue = 0;
        //increment valuesIndex by 1
        valueIndex++;
        break;
      //if the char c from Processing is character 'n'
      //which signals that it is the end of data
      case '\n':
        //save the tempValue
        //this will b the last element in the values array
        processing_values[valueIndex] = tempValue;
        //reset tempValue and valueIndex values
        //to clear out the values array for the next round of readings from Processing
        tempValue = 0;
        valueIndex = 0;
        break;
    }
  }
}
Get creative and write your own code using the elements in the values array. Consider the following example if you would like that when the mouse is clicked, a LED will turn on and a buzzer will play sound. You can control pitch sounds and duration of a buzzer through mouse position. Notice that we are mapping the values here.
if (processing_values[0] == 1) {
  //turn on an LED when the mouse is pressed
  digitalWrite(13, HIGH);
  // map values from mouseX to frequency from (0 - 500 pixels)
  //to the output pitch range (120 - 1500Hz)
  int f = map(processing_values[1], 0, 500, 120, 1500);
  // map values from mouseY to frequency from (0 - 500 pixels)
  //to the output duration range (10 - 2000 milliseconds)
  int d = map(processing_values[2], 0, 500, 10, 2000);
  // play the pitch:
  tone(8, processing_values[1], processing_values[2]);
  delay(1);        // delay in between reads for stability
  } else {
     digitalWrite(13, LOW);
  }
  //end of example
}
3. Read and Write – Full Duplex
(Arduino and Processing are both sending and receiving data)
3.1 Full Duplex Arduino Code:
Start out by specifying the number of values coming from Processing.
#define NUM_OF_VALUES_FROM_PROCESSING 2    /** YOU MUST CHANGE THIS ACCORDING TO YOUR PROJECT **/

/** DO NOT REMOVE THESE **/
int tempValue = 0;
int valueIndex = 0;
We will create an array of values for storing data from Processing.
int values[NUM_OF_VALUES_FROM_PROCESSING];
In setup, start serial communication with Serial.begin. After that you can write whatever you need in your code according to your project.
void setup() {
  Serial.begin(9600);
}
For example, if you had an LED and a DC motor, these would be OUTPUTS and you would use pinMode(pin number, OUTPUT) for each of them. If you would like to have a button, so you can send this information to processing, you should set it up as an INPUT when using pinMode.
void setup() {
  Serial.begin(9600);
  // this block of code is an example of an LED, a DC motor, and a button
    pinMode(13, OUTPUT);
    pinMode(9, OUTPUT);
    pinMode(2, INPUT);
  //end example
}
To receive a value from Processing, you must have the function getSerialData(); in void loop. This function will get the values coming from Processing and will place them into the array “values” that we created at the beginning.
void loop() {
  getSerialData();
}
You will find the function getSerialData below in the code. Do not change anything here and make sure you have it in your code!
//receive serial data from Processing
void getSerialData() {
  while (Serial.available()) {
    char c = Serial.read();
    //switch - case checks the value of the variable in the switch function
    //in this case, the char c, then runs one of the cases that fit the value of the variable
    //for more information, visit the reference page: https://www.arduino.cc/en/Reference/SwitchCase
    switch (c) {
      //if the char c from Processing is a number between 0 and 9
      case '0'...'9':
        //save the value of char c to tempValue
        //but simultaneously rearrange the existing values saved in tempValue
        //for the digits received through char c to remain coherent
        //if this does not make sense and would like to know more, send an email to me!
        tempValue = tempValue * 10 + c - '0';
        break;
      //if the char c from Processing is a comma
      //indicating that the following values of char c is for the next element in the values array
      case ',':
        processing_values[valueIndex] = tempValue;
        //reset tempValue value
        tempValue = 0;
        //increment valuesIndex by 1
        valueIndex++;
        break;
      //if the char c from Processing is character 'n'
      //which signals that it is the end of data
      case '\n':
        //save the tempValue
        //this will b the last element in the values array
        processing_values[valueIndex] = tempValue;
        //reset tempValue and valueIndex values
        //to clear out the values array for the next round of readings from Processing
        tempValue = 0;
        valueIndex = 0;
        break;
    }
  }
}
After that in the next example we will first demonstrate how to use received values from Processing. Doing so by allowing the first element (values[0]) from the values array coming from Processing turn the LED on or off. Values[1] will control the speed of the DC motor. You can find more information on how to use the received values from Processing in section 2.2 Processing to Arduino.
//example of using received values
if (processing_values[0] == 1) {
  digitalWrite(13, HIGH);
} else {
  digitalWrite(13, LOW);
}
analogWrite(9, processing_values[1]);
// too fast communication might cause some latency in Processing
// this delay resolves the issue.
delay(10);
//end of example of using received values
At the same time we will send data back to Processing from two sources: a potentiometer and a button. You can find more information on how to send values from Arduino in section 1.1 Arduino to Processing
//example of sending the values to Processing
int sensor1 = analogRead(A0); // a potentiometer
int sensor2 = digitalRead(2); // the button

// send the values keeping this format
Serial.print(sensor1);
Serial.print(",");  // put comma between sensor values
Serial.print(sensor2);
Serial.println(); // add linefeed after sending the last sensor value
// end of example sending values

// end of example
3.2 Full Duplex Processing Code:
When you open your new Processing sketch, first you need to import the library used for serial communication.
import processing.serial.*;
Then there will be two variables for storing the number of values: first one to store values from Processing that will be sent to Arduino, the second to receive values from Arduino. In this example, we are telling Processing to expect to send two values to Arduino and to wait for receiving two different set of values from Arduino.
int NUM_OF_VALUES_FROM_PROCESSING = 2;  /** YOU MUST CHANGE THIS ACCORDING TO YOUR PROJECT **/
int NUM_OF_VALUES_FROM_ARDUINO = 2;  /** YOU MUST CHANGE THIS ACCORDING TO YOUR PROJECT **/
We will create a serial port, under which we will create a new String where we will store the string of values coming from Arduino.
Serial myPort;
String myString;
In the next part, we will create two arrays, one to store the values we will send from Processing (values) and another one to store the values we will receive from Arduino (sensorValues).
int processing_values[]; /** this array stores values you might want to send to Arduino **/
int sensorValues[];      /** this array stores values from Arduino **/
Start the serial communication by using the function setupSerial.
void setup() {
  setupSerial();
}
You will find the setupSerial() function below and this is setting up the port of communication, so you have to go down, find it and set up your PORT_INDEX.
void setupSerial() {
  printArray(Serial.list());
  myPort = new Serial(this, Serial.list()[PORT_INDEX], 9600);
  // WARNING!
  // You will definitely get an error here.
  // Change the PORT_INDEX to 0 and try running it again.
  // And then, check the list of the ports,
  // find the port "/dev/cu.usbmodem----" or "/dev/tty.usbmodem----"
  // and replace PORT_INDEX above with the index number of the port.

  myPort.clear();
  // Throw out the first reading,
  // in case we started reading in the middle of a string from the sender.
  myString = myPort.readStringUntil( 10 );  // 10 = '\n'  Linefeed in ASCII
  myString = null;

}
To set up the port, first replace “PORT_INDEX” by a number 0, like this:
myPort = new Serial(this, Serial.list()[0], 9600);
Next, run the code and find in the console the list of ports your computer has. Choose the USB port, for example 1 or 3 in this case:
Change the PORT_INDEX accordingly. In this example your line would be:
myPort = new Serial(this, Serial.list()[3], 9600);
But again, this depends on everyone’s computer, so find your own number.
Now your Processing sketch is connected with Arduino.
In the draw loop we will use a function called getSerialData() to update the sensor values as they change.
void draw() {
  getSerialData();
}
Remember that the values from the sensors are stored in an array of variables and these variables will be filled with data according to the information we get from Arduino. In this function, we will split the String containing all the sensor values every time there is a comma and we will stop reading the String when we get a line feed (value 10 in ASCII code). We will also print to the console the values we are receiving from Arduino.
Note: If you want to know why we are using trim, check this out.
void getSerialData() {
  while (myPort.available() > 0) {
    myString = myPort.readStringUntil( 10 ); // 10 = '\n'  Linefeed in ASCII
    if (myString != null) {
      String[] serialInArray = split(trim(myString), ",");
      if (serialInArray.length == NUM_OF_VALUES) {
        for (int i=0; i<serialInArray.length; i++) {
          sensorValues[i] = int(serialInArray[i]);
        }
      }
    }
  }
}
Finally, you must include by the end of the draw loop the function sendSerialData().
void draw() {
  getSerialData();
 //your code here
  sendSerialData();
}
You will find this function below in your code, make sure you use it!
This function will send every value of your array “values” to Arduino and will also print to the console the values you are sending.
void sendSerialData() {
  String data = "";
  for (int i=0; i<processing_values.length; i++) {
    data += processing_valuess[i];
    //if i is less than the index number of the last element in the values array
    if (i < processing_values.length-1) {
      data += ","; // add splitter character "," between each values element
    }
    //if it is the last element in the values array
    else {
      data += "\n"; // add the end of data character "n"
    }
  }
  //write to Arduino
  myPort.write(data);
  print("to arduino: "+ data); // this prints to the console the values going to arduino
}
In the example below, we will first use the values coming from Arduino to change the color and size of a circle. Then the code will change the value of values[1] that will control the LED on the Arduino. Notice that we are mapping the values collected from the mouse’s X position and convert it to be compatible with the DC motor range of speed values (0-255).
void draw() {
  background(0);
  //receive the values from Arduino
  getSerialData();

  //use the values from arduino
  //this is an example

      //sensorValues[1] are the values from the button
       if (sensorValues[1] == 1) {
       fill(random(255), random(255), random(255));
       }
       //sensorValues[0] are the values from the potentiometer
       float r = map(sensorValues[0], 0, 1023, 0, width);
       circle(width/2, height/2, r);

       // give values to the variables you want to send here
       //change the code according to your project

       if (mousePressed) {
       processing_values[0] = 1;
       } else {
       processing_values[0] = 0;
       }
       processing_values[1] = int(map(mouseX, 0, width, 0, 255));

  //end of example

  // send the values to Arduino.
  sendSerialData();
}