For this week’s recitation, you will be also doing some workout! You will use the tilt switch from your kit to build a wearable workout sensor, do a workout exercise, and complete a challenge. You will work in pairs, but each person will need to make your own circuit.
Remeber to document the process for your blog documentation, and futher descriptions about the documentation can be found at the end of the post.
Materials:
From your kit:
-
-
-
- 1 * Arduino Uno
- 1 * USB A to B cable
- 1 * breadboard
- 1 * tilt switch
- 1 * 10k ohm resistor
- A handful of M/F, M/M, and F/F cables
-
-
From course supplies:
-
-
-
- 2 long wires (about 1.8 m)
- 1 capacitor 0.1 uF (confirm size)
-
-
Recitation Exercise:
Step 1: Prepare your tilt sensor
Task #1: Solder the sensor to two long wires. Pay attention to your safety and take care of your workplace. You can optionally cover the soldered parts with electrical tape or a heat-shrink tube for safety and stability.
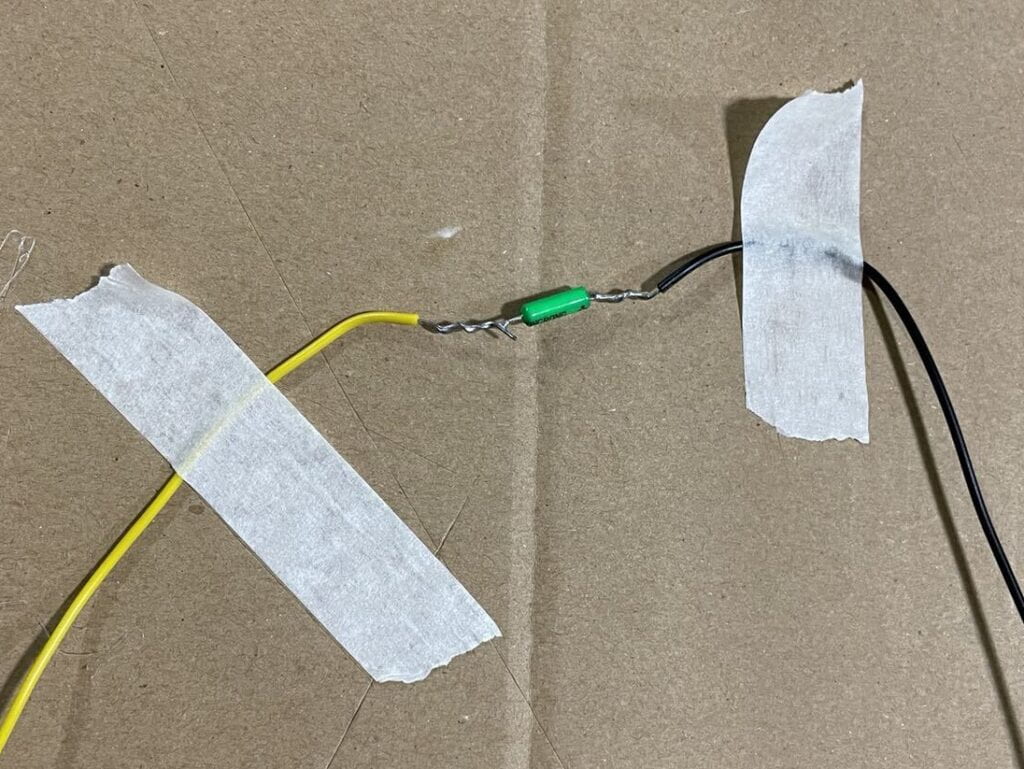
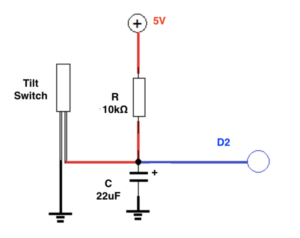
Task #2: Connect the tilt sensor cables to your Arduino using a capacitor as the circuit below:
Task #3: Program your Arduino with the following sketch. Confirm that you get an input from your tilt sensor on the the Serial Monitor to check whether it is working correctly.
int SENSOR_PIN = 2;
int tiltVal;

void setup() {
  pinMode(SENSOR_PIN, INPUT);    // Set sensor pin as an INP
  Serial.begin(9600);
}

void loop() {
  // read the state of the sensor
  tiltVal = digitalRead(SENSOR_PIN);
  Serial.println(tiltVal);
  delay(10);
}
Step 2: Refine the code
Task #1: Upload the following sketch to only print 1 when the tilt sensor changes from 0 to 1, and 0 when from 1 to 0. For example, the code we used before might have printed 0 0 0 0 1 1 1 1 0 0 0 0 1 1 1 as you move the sensor between upright and upside-down, but now your code should print 0 1 0 1.
int SENSOR_PIN = 2;
int tiltVal;
int prevTiltVal;

void setup() {
  pinMode(SENSOR_PIN, INPUT); // Set sensor pin as an INPUT pin
  Serial.begin(9600);
}

void loop() {
  // read the state of the sensor
  tiltVal = digitalRead(SENSOR_PIN);
  // if the tilt sensor value changed, print the new value
  if (tiltVal != prevTiltVal) {
    Serial.println(tiltVal);
    prevTiltVal = tiltVal;
  }
  delay(10);
}
Step 3: Wear your sensor
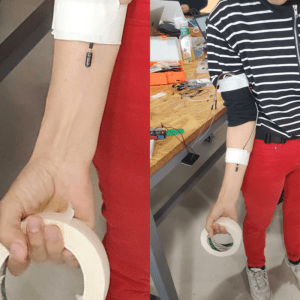
Fix the tilt switch using paper tape to your body, making it a wearable sensor. The sensor should be along your forearm, so that you can use it to detect when your forearm is facing up.
Step 4: Bicep Curl Workout!
/Verywell-34-3498604-BicepCurl01-1576-599462e7b501e800128ff42d.gif)
Task #1: Add a conditional to your sketch so that it shows a message on the Serial Monitor ONLY when a full biceps curl has been completed. Remember to switch from the Serial Plotter to the Serial Monitor. You can comment existing lines of code with //.
You will need to :
-
-
-
-
- Identify the proper section in your code where you can add code when transitions happen.
- Add a conditional that has the criteria so that you only detect transitions LOW to HIGH, showing only when the user has raised their arm completely.
-
-
-
Task #2: Count the curls, adding one to its value every time that the user does a complete bicep curl. You should:
-
-
-
-
- Declare a global variable.
- Add one to its total every time that a LOW to HIGH transition has happened.
- Modify the Serial.print and Serial.println instructions so that the value of this new variable is shown on the Serial Monitor.
-
-
-
Task #3: Set a limit to the variable you are using to count the curls, so that the final code has the following behavior.:
-
-
-
-
- When the total reaches 8, Print “Yay, you’ve done one set of curls”. Hint: you will need another conditional
- Reset the count, so that the behavior repeats at 16 curls, 24, etc.
-
-
-
Step 5: Exercise Challenge
You should design a different physical exercise (not bicep curls). The user will have to wear the sensor according to the physical movement, you should test it with a partner, and receive feedback.
Some ideas that could complement this challenge:
-
-
-
- Add a buzzer and modify the code so that it “celebrates” each completion of each set of exercise.
- Add a vibration motor to your circuit and modify the code so that it gives haptic feedback for each exercise.
- Add a potentiometer to your circuit, so that the user can configure the number of repetitions in a set.
- Add a second tilt sensor to your circuit. Count two people’s exercises on the same Arduino.
- Give the user instructions to follow using the Serial.print. For example, when the sketch starts, it prints “Start your Workout”.
- Make it a time sensitive activity. For example, after 20 seconds, it stops counting and it prints “STOP! Your time is up!”.
- Detect when the user has stopped doing the exercise before the set is done. Prompt them on the Serial Monitor.
-
-
Documentation:
-
-
- Record a short video of yourself doing step 4 (bicep curls) and 5 (challenge) while showing the Serial monitor/plotter in action.
-
2. Embed your code into your blog as shown with the example codes in this recitation, NOT by taking a screenshot of it.
3. Draw your own illustration sketches that showcase how a person would use this interactive training device.
4. Reflect on your experiments, explaining the notes you took, and adding photos, and/or screen shots to document what tests you have tried and what you have learned from them. As a guidance, use the following questions:
-
-
-
-
- At what angle of tilt does it transition between HIGH and LOW?
- What else did you notice about its behavior?
- What if you rotate the limb that has the sensor attached to it?
- What if you shake it?
- What if you hold the wires several centimeters away and tilt it?
- Do you think it can be used by any user?
-
-
-