In class, you have used delay(), but there are cases you would want to use millis() to count time. Although the delay() function is easy to use, it has side effects: the main one of which is that it stops all activity on the Arduino until the delay is finished. Sometimes you need to do two things at once. For example, you might want to blink an LED while reading a button press. In this case, you can’t use delay(), because Arduino pauses your program during the delay(). If the button is pressed while Arduino is paused waiting for the delay() to pass, your program will miss the button press.
What is the millis() function exactly?
Arduino is equipped with a timer/counter, which starts counting from zero once it’s connected to a power supply. the millis() function gives us access to the running tally that the timer/counter has been keeping track of. When you call the millis() function, it returns the current value of the timer/counter in milliseconds (hence the millis() function name).
Important information about millis()!
When you want to use millis() as a variable value, you have to consider the variable type and the amount of data it can hold. Because counting time can go for days with Arduino, regular variable types fill up quickly. We have bytes, integers, float, their storage capacities are far less than the long data type’s storage capacity. A long can hold 32 bits of data, from -2 billion and some change to positive 2 billion and some change! But, since millis() will never return a negative value, we can use an unsigned long instead. What this variable allows us to do is to shift the negative value storage capacity of a long data type to the positive side, effectively doubling the available data.
Let’s look at some examples to show what this means!
I used the example circuits and code provided by TinkerCad.
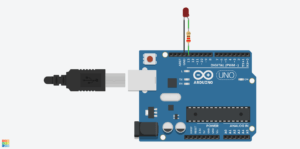
This program blinks pin 13 of the Arduino (the
built-in LED)
*/

void setup()
{
pinMode(13, OUTPUT);
}

void loop()
{
// turn the LED on (HIGH is the voltage level)
digitalWrite(13, HIGH);
delay(1000); // Wait for 1000 millisecond(s)
// turn the LED off by making the voltage LOW
digitalWrite(13, LOW);
delay(1000); // Wait for 1000 millisecond(s)
}
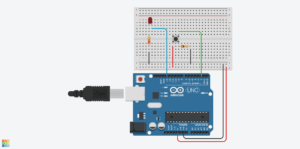
Example2 – Multitasking with a blinking LED and reading button state using delay() function
/*millis example: LED blinks while reading buttonPressed*/

int buttonValue = 0;
void setup(){
Serial.begin(9600);
pinMode(13, OUTPUT);
}

void loop(){
buttonValue = digitalRead(2);
Serial.println(buttonValue);
//read the button value, if the button is pressed or not
// turn the LED on (HIGH is the voltage level)
digitalWrite(13, HIGH);
delay(1000); // Wait for 1000 millisecond(s)
// turn the LED off by making the voltage LOW
digitalWrite(13, LOW);
delay(1000); // Wait for 1000 millisecond(s)
}
I started out in Tinkercad with the above circuit and the code modifying the Blink Example. If you try the code above, although the LED will blink, the button state is not reading accurately all the time. What we wanted was that the button state is read properly while the LED is blinking, not after it blinked. So why is it happening?
This scenario could be explained by what we previously mentioned in the first paragraph, “it stops all activity on the Arduino until the delay is finished”.
Example3 – Using millis() instead

/*millis example: LED blinks while reading buttonPressed*/

unsigned long _time; //declare a variable stores the current millis() value
int buttonValue = 0; //store the button state in this variable
int LED_pin = 13; //store the led pin in this variable
int btn_pin = 2; //store the button pin in this variable
bool led_on = false; //create a boolean variale to store the led state: on->true, off->false
void setup(){
  Serial.begin(9600);
  pinMode(LED_pin, OUTPUT); //LED
  pinMode(btn_pin, INPUT); // Switch
  _time = millis(); // initiate _time variable
}

void loop(){
  //read the button value, if the button is pressed or not
  buttonValue = digitalRead(btn_pin);
  /* we want to turn on the led for 1s and
  turn off the led for 1s
  using millis() function*/

  //here, we use the current time minus the previous time to calculate the period
  if(millis()-_time >= 1000){
    if(led_on == false){
    //if the current led state is off, then turn the light on
      digitalWrite(LED_pin, HIGH);
      led_on = true;
    }else{
    //if the current led state is on, then turn the light off
      digitalWrite(LED_pin, LOW);
      led_on = false;
    }
  //restore the current time in _time variable
    _time = millis();
  }
//print the button state in the serial monitor
  Serial.print("Button State: ");
  Serial.println(buttonValue);
}
We used the same circuit as before but we modified the code with millis() function. We use millis() to keep track of the Arduino running time, and the LED changes state (on->off/off->on) every one second. But at the same time, the activities in Arduino won’t stop, so it keeps reading the value of the button state.
Summary
If you have two, repetitive, timed events and those events overlap then you may find that using the delay() function is not going to be the best solution. However, when we have two timed events and one happens after the other (i.e. they are sequential), then using the delay function is perfect!