Each and one of us as a unique and distinctive voice. Your voice starts down in your lungs where air is exhaled to create an airstream across the larynx which vibrates. The vibrations make sound waves that travel through your throat, nose, and mouth. The size and shape of these structures create the pitch, loudness, and tone of your voice. This voice is your unique gift to the world and it is amazing, believe in its power and express yourself!

Photo by: Jason Rosewell
Inspired by the work from thedotisblack, we will use Fast Fourier Transforms (FFT) to analyze the frequency and amplitude of our voice and create its unique visual interpretation.
The “Fast Fourier Transform” (FFT) is an important measurement method in the science of audio and acoustics measurement. It converts a signal into individual spectral components and thereby provides frequency information about the signal.
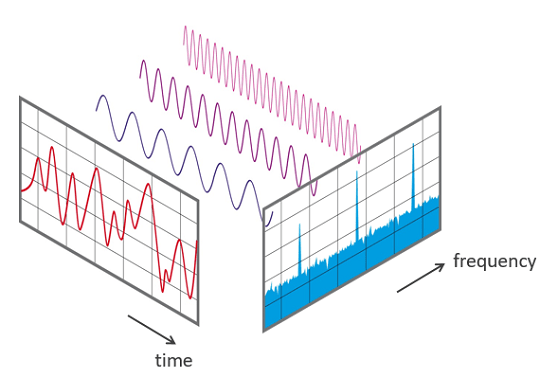
Source: Nti-audio
Sound of EARTH – AURORA BOREALIS 1 | SOUND OF SPACE (Procedural art made with code, FFT Processing)
Step 1.
Begin by opening a new sketch in Processing. We will add the Sound library and declare the necessary functions and variables.
import processing.sound.*;

// Declare the sound source and FFT analyzer variables
FFT fft;
AudioIn mic;

// Define how many FFT bands to use (this needs to be a power of two)
int bands = 1024;
// Define the bands wanted for our visualization.
// Above a certain threshold, high frequencies are rarely attained and stay flat.
int bandsWanted = 128;
// Create an array to store the bands wanted
float[] spectrum = new float[bandsWanted];
Next we will establish the setup to make sure our microphone and FFT function are correctly assigned.
void setup() {
  background(255);
  size(600, 600);

 // Create the AudioIn object and select the mic as the input stream
  mic = new AudioIn(this, 0);
  // Start the input stream without routing it to the audio output.
  mic.start();

// Create the FFT analyzer and connect it to the sound input
  fft = new FFT(this, bands);
  fft.input(mic);
}
Inside the draw() function, we proceed to perform the FFT and draw a simple line representation of the sound from the microphone input.
Note: At the moment, the values for the lines spacing and height are hardcoded to match this sketch. We will modify these later to be responsive no matter the size of our window.
void draw() {
  background(255);
  // Perform the analysis
  fft.analyze(spectrum);
  //Here we are reversing the spectrum array in order to get the higher frequencies on the right edge of canvas.
  spectrum = reverse(spectrum);

  pushMatrix();
  //Translating the position to start drawing in the middle
  translate(width/2, height/2);
  //Drawing a line for every frequency of the spectrum
  for (int i=0; i<bandsWanted; i++) {
    stroke(0);
    line( i*2, 0, i*2, -spectrum[i]*1000 );
  }
  popMatrix();
}
When you run the sketch and if all went well you should see something like this. Give it a try and say something !
Step 2.
We now need to refine the code and find a way to make that linear FFT rotate around the center of the window.
For that we will declare 4 additional variables at the top of our sketch. One for the gap in between each frequency, another 2 for the position and spinning speed, and the last for the duration of the event.
float gap;
float position;
float spinSpeed;
float duration;
Adjusting the gap:
To make the gap in-between lines responsive, we need assign the values according to the half-width of the windows divided by the amount of frequencies we are displaying. We can do so in the setup() like shown below.
gap = (width/2) / (float)bandsWanted;
Now we can adjust the line function inside draw() to make use of this variable.
line( i*gap, 0, i*gap, -spectrum[i]*1000 );
Rotating
Let’s assign in setup() to the variable “duration” the value 10, which in this case represents the number of seconds.
duration = 10;
We want our FFT visualizer to rotate 360 degrees in that period of time. We also know that by default, processing works at 60 frames per second. So, we need to know how many degrees to rotate for each frame knowing that the entire duration is 10 seconds.
In setup() , we assign to “spindSpeed” the following formula:
spinSpeed = radians(360) / (duration*frameRate);
Now that we have determined the amount of degrees to rotate each time, we can add-assign that value to our “position” variable and use a push and pull matrix to make the transformation.
We also need to add an if () statement that will stop the drawing after the 10 seconds have elapsed.
In draw(), replace everything the for loop by the block of code below:
  pushMatrix();
  //Translating the position to start drawing in the middle
  translate(width/2, height/2);

  position += spinSpeed;
  rotate(position);
  if (frameCount <= duration*frameRate) {
    //Drawing a line for every frequency of the spectrum
    for (int i=0; i<bandsWanted; i++) {
      stroke(0);
      line( i*gap, 0, i*gap, -spectrum[i]*1000 );
    }
  } else {
    noStroke();
  }
  popMatrix();
The last step is to comment the background() function in draw() to keep the trail of the FFT.
//background(255);
You should have something like this:
Step 3.
It is now time for you to manipulate the code and customize your voice portrait. You can try to experiment with different shapes such as rectangles or circles, adding color depending on the spectrum frequencies position or amplitude, changing the opacity, changing the amount of frequencies displayed or anything else that comes to your mind.
Note: Pay attention to the value highlighted in orange which multiply the amplitude of each frequency. You might want to decrease this value to 100 for example for a more subtle effect.
line( i*2, 0, i*2, -spectrum[i]*1000);
The final outcome may look something like this:

Other things you can: Album Cover
Using the same technique as with the Voice portrait, create an album cover of one of your favorite songs. For this, you will use a SoundFile.
sample = new SoundFile(this, "song.mp3");
You will also need to change the speed of rotation according to the duration of the song.
Hint: you can use the function sample.duration()
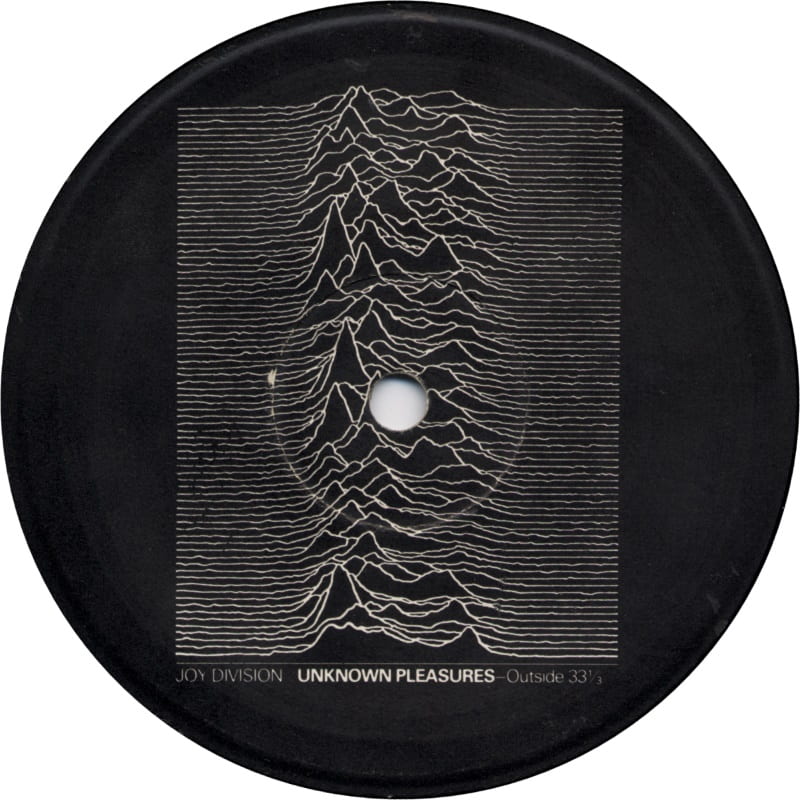
Joy Division – Unknown Pleasures