Overview
After building some foundation for circuit construction and Arduino basics, we learned some concepts of sensors and put into practice during recitation. With my partner Rannan, we practiced two circuits in total, integrating sensor into the circuit and run the code to see amazing things happening.
Materials
From Arduino Kit:
1 * Arduino Uno
1 * USB A to B cable
1 * breadboard
2 * LEDs
2 * 220 ohm resistors
A handful of jumper cables
From cart:
1 * Force Sensitive Resistor
1 * Photoresistor
Circuit 1: Force Sensitive Resistor
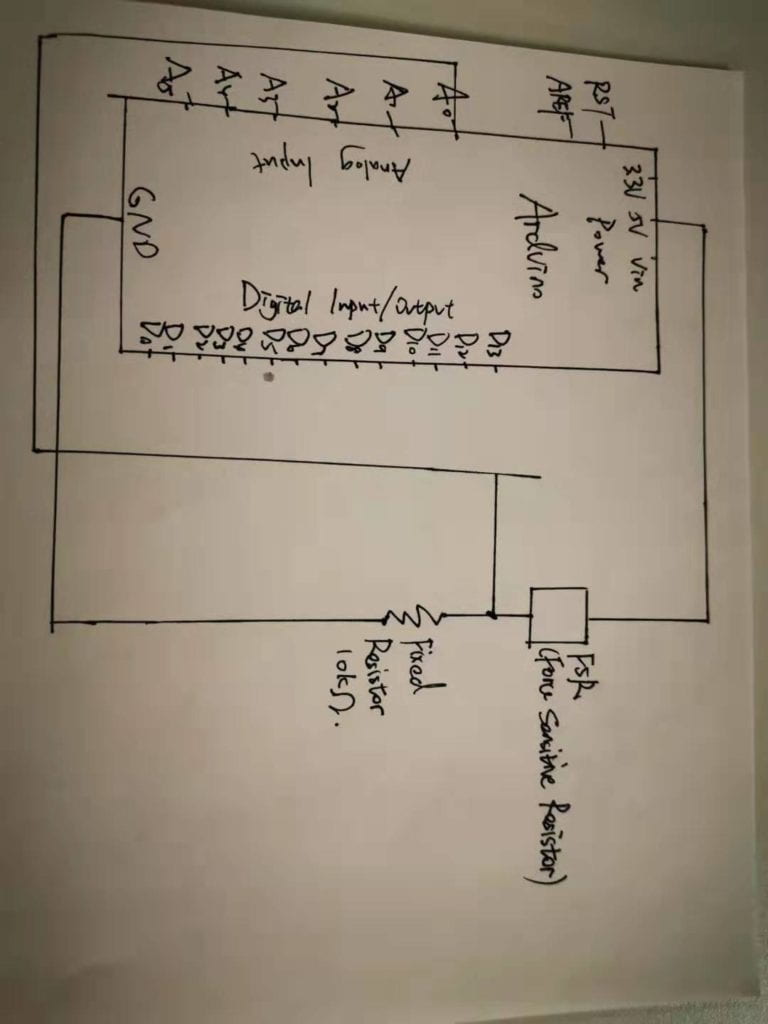
Schematic

Process
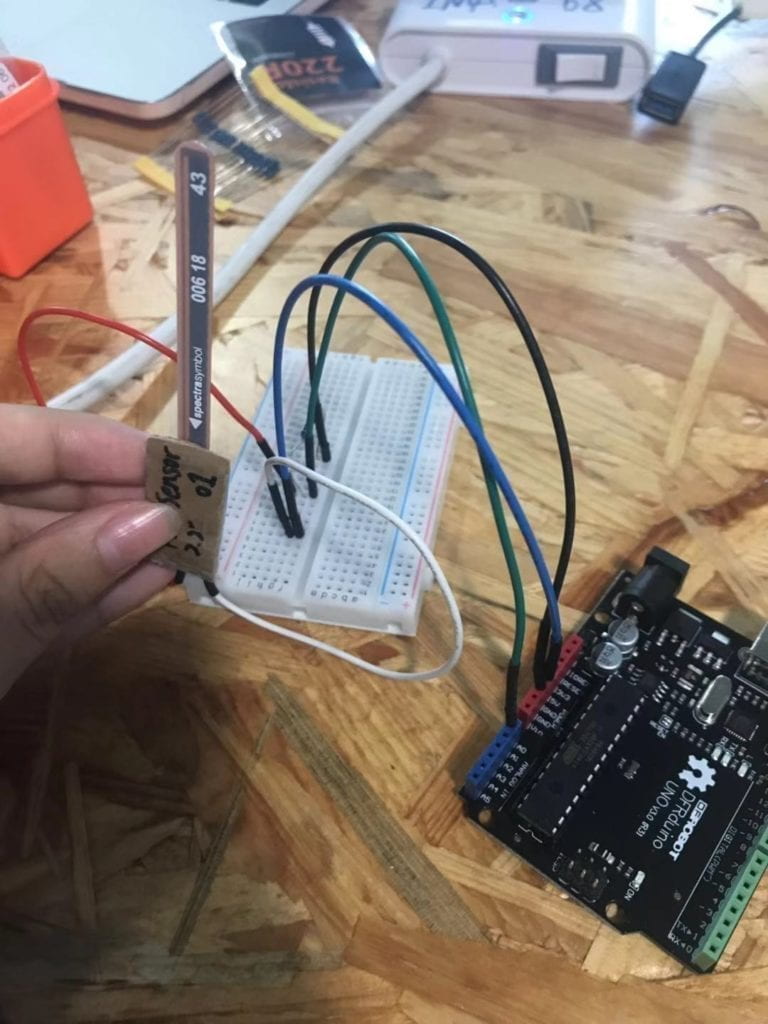
We first attached the two legs of the sensor to the ground and the pin. Since it’s an analog input, we linked it to the A0 analog input. In order to control the flow of current we add a 10K ohm resistor. The circuit building is quite easy.
We used the AnalogInOutSerial example code to run the circuit. In void setup, we entered “Serial begin (9600)” to determine the speed of running. The in the void loop the map function was applied. There were also a list of integrals. To understand the code, I first identified the input and output. The input was the Force Sensitive Resistor, but the computer need to recognize the value of it. And thats when the analogRead() function came in. Since the pin was attached to the sensor, so the computer could recognize by entering the pin number in analogRead() function. Here an int (integral) was introduced to make the code legible. The output was the value represented in the serial. The purpose was to generate output based on changes in input, so the map() function served as the processing part. But the map() function need to set an initial value and that’s when the int sensorValue had its role to play. After the processing, the output value was reported in the serial with corresponding input value generated by the sensor.
However, the circuit didn’t work. We together with one fellow checked the wire connections and the coding and nothing turned out. Then we checked the sensor and found that it was broken. Since we didn’t have much time left, so we were told to swap out this sensor with a different type of sensor. Though it didn’t work out, the learning process is rewarding.

Circuit 2: Photoresistor
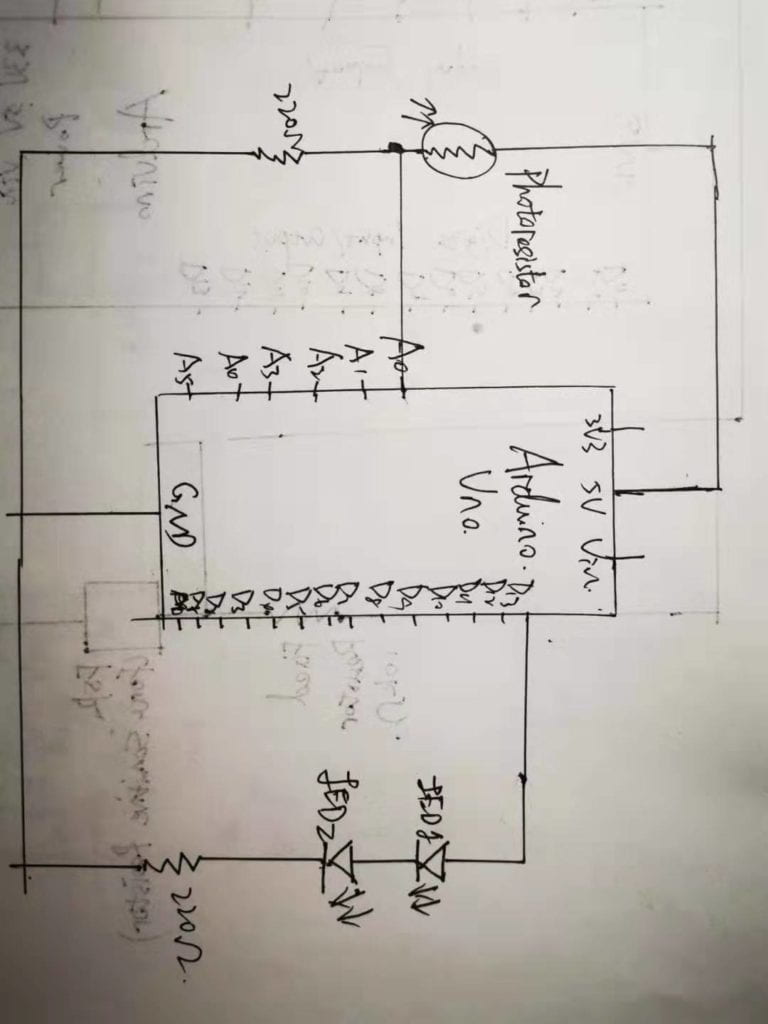
Schematic

Process
We swapped the broken FSR with photoresistor, a light sensor. To add more obvious effects, we added two LEDs by connecting them to the digital pin 13. We also added a 220 ohm resistor to control the flow of the current. The basic structure of schematics and coding was similar to the one above. But we added “if statement” to control the brightness of the light. As shown below, we first used map() function to generate output value of the LEDs. However, the value itself didn’t give rise to anything, which was something we got to know from the learning assistant (thank you Jessica!). So we added the “if statement” to set conditionals. According to what we had learned before, we set the digital output in which the Led lit up when the value reached a level and shut off when below that value. Since it was a light sensor, we used the torch from the phone to increase brightness.
Here’s the result!
Responses to Questions:
- What did you intend to assemble in the recitation exercise? If your sensor/actuator combination were to be used for pragmatic purposes, who would use it, why would they use it, and how could it be used?
I intended to assemble the photoresistor. As a light sensor, it can take brightness as input and can be used widely. For example, in my exercise, the input and output are both brightness. This could be applied to the early evening when everything became darker. The photoresistor inside the house could sense the darkening of outside and correspondingly turned on the light in the house. It could be even better if the digital output could be changed to analog so that the adjustment of brightness would be smoother. It could be used by anyone who were in a building. The people could get rid of the trouble of turning light on and off regularly and complaining about the brightness of the light.
2. Code is often compared to following a recipe or tutorial. Why do you think that is?
The core features of code are specification and clarity, or logic. Every line of code has its own unique and important functions, and they depend on each other and therefore are inseparable. This also applies to a recipe or tutorial, in which every step as well as things needed are clearly stated and arranged in a logical order.
3. In Language of New Media, Manovich describes the influence of computers on new media. In what ways do you believe the computer influences our human behaviors?
Just as Manovich describes, that the computer is turning media into something modular and open to revision and creation and automation arises as a result. In that sense, our human creativity and intention actually have been decreased to some degree. For example, some vector images don’t allow for flexible curves. In this regard, the computer automation actually could shape our behavior just like media has always been shaping our ways of communication. Computer is a modern media that is deeply shaping our lives. Workplace is impossible without computers. Everyone need a phone to live, study and literally do anything. The emergence of computers is also driving the traditional way of reading books to online reading, which in turn intensifies modern trend of fast consumption and less concentration.