Introduction:
Working on combining the power of Processing and Arduino
Objectives:
- Combine Arudunio and Processing to create a program to carry out a desired function
Materials (as listed on the IMA website):
From Arduino Kit:
1 * Arduino Uno
1 * USB A to B cable
1 * breadboard
1 * buzzer
2 * Potentiometer
A handful of jumper cables
Process:
Exercise 1: Create an Etch-A-Sketch
For this first exercise, I created my circuit which consisted of two potentiometers. The main idea of this exercise with the basic code was to get used to having one input that would convert this input to ACIIS. Once I was able to get one synced up appropriately, I worked on getting the second potentiometer to be able to do the same thing. The fun part of this recitation was actually being able to combine the codes from the samples and then creating a device that allowed us to create our own sketches (although mine were rather abstract since I am not too adept at using the device).
The link below has a video attached of the success from connecting one potentiometer to a screen. This first part acted as one of the feet in the soon-to-be Etch A Sketch.
https://drive.google.com/open?id=1tAASJk-ovaka6x8ehbgKtQZ-73zTAIdt
The last video is of the final product and actually being able to draw with the Etch A Sketch. One problem that I had was that my lines were not so stable. I think this was due to loose connections on the part of the potentiometer. In the future, I think that ideally I would like to use a bigger bread board in order to make this the most efficient because then I would have to bump into the wires in order to manipulate the potentiometer.
https://drive.google.com/open?id=1aJ1z28cJ4BcI-ksfdA43ZYKV8FvIOLDh
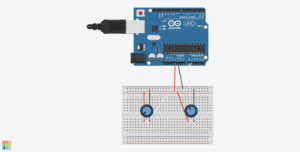
Circuit Schematic:
The circuit below is for part one that was used to create the Etch A Sketch. The circuitry for this lab was simple compared to some of our projects; the main challenge was the code and getting Arduino and Processing to work together.
Final Etch A Sketch
https://drive.google.com/open?id=1tLvEg0kdJSAtoCiQVA-3-TZzHMRSRw6u
Exercise 2: Make a Musical Instrument
Again, the circuitry for this code, as seen below, was extremely simple. The fun part came with creating the code. I think the most fun I had was with figuring out how to get an object to follow my mouse. Ideally, I would have wanted an object with a fade behind it, but I think the process that looked the cleanest and clearest was when I had a shape such as an ellipse follow my mouse. This combined with the processing function of “mousePressed” allowed me to connect the buzzer to create a “music” (if you define that as poorly timed beeps).

Screen record of object following mouse:
https://drive.google.com/open?id=1ivEejIAoaid_UXD05emhxW5A3RQuFdfX
Reflection:
The interaction for Etch A Sketch is pretty clear cut and obvious. Your movements result in the object on the screen consequently moving and creating whatever it is you want to make. This interaction is a high performance-level of interaction because there is not just an input action and then an output action. The device responds with how you respond which creates a more meaningful interaction.
In the same way, creating the instrument does the same thing. Depending on where you move will depend on where you your object goes. In addition, whenever you feel compelled to press your mouse, then the buzzer will make a noise. I do not think that creating this so-to-say is as “interactive” as the Etch A Sketch because you are merely pressing a button which in turn has one action. I think an additional component to make this device more interactive would be if moving your mouse up and down the screen made the subsequent note from the buzzer higher or lower.