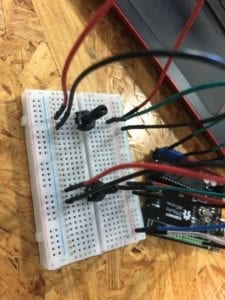
On Excercise 1 we had to do an “Etch a Sketch” on Processing. We had to use two potentiometers in Arduino to control the drawing. One potentiometer would be the “x”, and the potentiometer would be the “y”. We were supposed to link Processing with Arduino so that moving the potentiometer would be shown on the screen using Processing. On Arduino, I used a code that was already given to us in class and modified. I changed the analogRead and I mapped the two sensors. I also used a code from class for Processing. Nevertheless, I changed the number of values, the void setup size, defined x and y, added ” void draw” with line and stroke, etc. I thought it was amazing to be able to replicate an Etch a Sketch using these programs. It made me think of the endless things these programs can be used for. However, I thought interaction would have been more efficient if one used the mouse to draw, or even better, used something like an apple pen. Bellow the code I used.
On Arduino
void setup() {
Serial.begin(9600);
}
void loop() {
int sensor1 = analogRead(A0);
int sensor2 = analogRead(A5);
sensor1= map (sensor1, 0, 1023, 0, 800);
sensor2= map (sensor2, 0, 1023, 0, 800);
// keep this format
Serial.print(sensor1);
Serial.print(“,”); // put comma between sensor values
Serial.print(sensor2);
Serial.println();
// too fast communication might cause some latency in Processing
// this delay resolves the issue.
delay(100);
}
On Processing
import processing.serial.*;
String myString = null;
Serial myPort;
int NUM_OF_VALUES = 2; /** YOU MUST CHANGE THIS ACCORDING TO YOUR PROJECT **/
int[] sensorValues; /** this array stores values from Arduino **/
int prevX;
int prevY;
void setup() {
size(800,800);
background(0);
setupSerial();
}
void draw() {
updateSerial();
printArray(sensorValues);
stroke(250,250,250);
line(prevX, prevY,sensorValues[0],sensorValues[1]);
prevY = sensorValues[1];
prevX = sensorValues[0];
}
void setupSerial() {
printArray(Serial.list());
myPort = new Serial(this, Serial.list()[ 2 ], 9600);
// WARNING!
// You will definitely get an error here.
// Change the PORT_INDEX to 0 and try running it again.
// And then, check the list of the ports,
// find the port “/dev/cu.usbmodem—-” or “/dev/tty.usbmodem—-”
// and replace PORT_INDEX above with the index number of the port.
myPort.clear();
// Throw out the first reading,
// in case we started reading in the middle of a string from the sender.
myString = myPort.readStringUntil( 10 ); // 10 = ‘\n’ Linefeed in ASCII
myString = null;
sensorValues = new int[NUM_OF_VALUES];
}
void updateSerial() {
while (myPort.available() > 0) {
myString = myPort.readStringUntil( 10 ); // 10 = ‘\n’ Linefeed in ASCII
if (myString != null) {
String[] serialInArray = split(trim(myString), “,”);
if (serialInArray.length == NUM_OF_VALUES) {
for (int i=0; i<serialInArray.length; i++) {
sensorValues[i] = int(serialInArray[i]);
}
}
}
}
}
On Excercise number 2 we had to make a musical instruement that was going to be controled with the mouse. We would incorporate the arduino by linking arduino with a buzzer to what we came up with in Processing. Likewise, I used a based code for both Arduino and Processing from the files that were given to us in class. I did not really change anything on Arduino for this excercise, but I did add things on Processing. I added a conditional (Bollean) so that everytime my mouse is more than 100 (or half of the screen) there was going to be sound coming out of the buzzer. Although I was not able to fully turn my mouse into an instrument every time I clicked the mouse on a different area, I created sound using the mouse, and the buzzer. I think this excerice is very interactive. You click on the mouse and there are melodies that come after as a response are created depending on the position of the mouse. I think this creates a dialogue between you and the computer. Bellow the code I used.
On Arduino
char valueFromProcessing;
int ledPin = 13;
void setup() {
Serial.begin(9600);
pinMode(ledPin, OUTPUT);
}
void loop() {
// to receive a value from Processing
while (Serial.available()) {
valueFromProcessing = Serial.read();
}
if (valueFromProcessing == ‘H’) {
digitalWrite(ledPin, HIGH);
} else if (valueFromProcessing == ‘L’) {
digitalWrite(ledPin, LOW);
} else {
// something esle
}
// too fast communication might cause some latency in Processing
// this delay resolves the issue.
delay(10);
}
On Processing
import processing.serial.*;
Serial myPort;
int valueFromArduino;
void setup() {
size(500, 500);
background(0);
printArray(Serial.list());
// this prints out the list of all available serial ports on your computer.
myPort = new Serial(this, Serial.list()[ 2 ], 9600);
// WARNING!
// You will definitely get an error here.
// Change the PORT_INDEX to 0 and try running it again.
// And then, check the list of the ports,
// find the port “/dev/cu.usbmodem—-” or “/dev/tty.usbmodem—-”
// and replace PORT_INDEX above with the index number of the port.
}
void draw() {
// to send a value to the Arduino
if (mouseX>100) {
myPort.write(‘H’);
} else {
myPort.write(‘L’);
}
}
