Circuit 1: Door Bell
- Components: 1) a 12 volt power supply: provide power for the whole circuit
2) a LM7805 Voltage Regulator: a transformer that expands the number of components a single power can connect
3) a 100 nF Capacitor: to stabilize and smooth the flow of electricity in this circuit
4) a Speaker: make noise to see if the circuit is connected correctly
5) a Push-Button Switch: determine the connecting status of this circuit, creating interactivity
6) a Breadboard: a basic stage for building the circuit
2. Diagram:
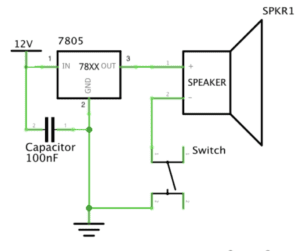
3. Pictures and video of the completed circuit:
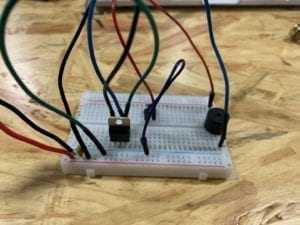
4. The process of building: We insert the Voltage Regulator first between the positive and negative of the Breadboard. Then we put the Push-Button Switch into this breadboard with its different wires in two different rows. Then we connect the Speaker with one side to the switch and other side to the negative. The circuit worked perfectly as you can see in the video.
Circuit 2: Lamp
- Components: 1) a 12 volt power supply: provide power for the whole circuit
2) a LM7805 Voltage Regulator: a transformer that expands the number of components a single power can connect
3) a 100 nF Capacitor: to stabilize and smooth the flow of electricity in this circuit
4) a LED: if connects with power, it can light
5) a 220 ohm Resistor: control the voltage so that the voltage for the LED will not be too much
6) a Push-Button Switch: determine the connecting status of this circuit, creating interactivity
7) a Breadboard: a basic stage for building the circuit
2. Diagram:
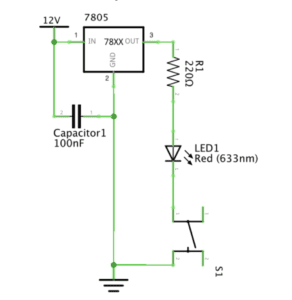
3. Picture and video of the completed circuit
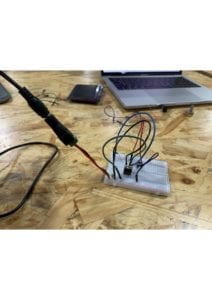
4. The process of building: Based on the foundation of the previous circuit of the speaker, it become slightly easier for us to build this circuit. We just change the speaker to the LED and insert a 220 ohm Resistor between the Voltage Regulator and the LED. We didn’t encounter any issues along the way, which is quite fortunate.
Circuit 3: Dimmable Lamp
- Components: 1) a 12 volt power supply: provide power for the whole circuit
2) a LM7805 Voltage Regulator: a transformer that expands the number of components a single power can connect
3) a 100 nF Capacitor: to stabilize and smooth the flow of electricity in this circuit
4) a LED: if connects with power, it can light
5) a 220 ohm Resistor: control the voltage so that the voltage for the LED will not be too much
6) a Push-Button Switch: determine the connecting status of this circuit, creating interactivity
7) a Breadboard: a basic stage for building the circuit
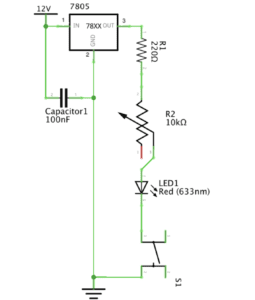
8) a 10K ohm Variable Resistor: to make the lamp dimmable
2. Diagram
3. Picture and video of the completed circuit:
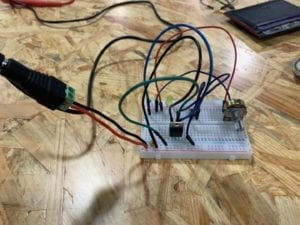
4. The process of building: Built on the foundation of the previous circuit 2, we just insert the variable resistor between the 220 ohm resistor and the LED. However, the circuit didn’t work first time we tried and the LED can’t be lighted. We then figured out the connection of the circuit was wrong since we connected the positive of the LED to the negative of the 220 ohm Resistor, and the variable resistor’s positive and negative were connected, making the circuit an open circuit. Then we corrected it and the circuit worked good as shown in the video.
Circuit 4: Switch the switches
1. Components: 1) a 12 volt power supply: provide power for the whole circuit
2) a LM7805 Voltage Regulator: a transformer that expands the number of components a single power can connect
3) a 100 nF Capacitor: to stabilize and smooth the flow of electricity in this circuit
4) a LED: if connects with power, it can light
5) a 220 ohm Resistor: control the voltage so that the voltage for the LED will not be too much
6) a soldered arcade button: determine the connecting status of this circuit, creating interactivity
7) a Breadboard: a basic stage for building the circuit
8) a 10K ohm Variable Resistor: to make the lamp dimmable
2. Diagram

3. Picture and video of the completed circuit:
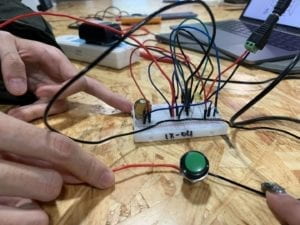
4. The process of building: Based on the foundation of the third circuit, we just switched the push-button switch to the soldered arcade switch. Circuits worked great as shown in the video.
Questions:
1. From my perspective, the switch in the circuit is the core part of interactivity. Interactivity is defined as “a cyclic process in which two actors alternately listen, think and speak”. The definition shows that interactivity emphasizing on conversations between two entities. In the circuit that we build, the two entities should be people and the reacting item (either the speaker or the lamp). Human like us give out commend by clicking the switch, and the switch turns the open circuit to a closed circuit. Then the speaker start sounding and the lamp start lighting, delivering information we can perceive. Thus, the two entities have conversations and the key part of this conversation to exist is the switch.
2. Just as Zack Lieberman shown in the video. The interaction design and physical computing can be used in many ways. The interactive painting Lieberman designed that allowed people to play with the whatever drawn in the screen suggests that interaction design can be used to stimulate inspiration in the artistic field. I also see the potential from this case that we can create lots of innovative and funny computer games for enriching our options for entertainment. The second case Lieberman showed in the video is the “Eye Tracker” to help those disabled artists to paint with their eyes. This innovation is really inspiring and significant since it brings up the idea of social responsibility. Trough interaction design and physical computing, we can make complex operations accessible to the disabled, leading to a brighter future for them.