Introduction
The goal for my midterm project was to derive real time emotion and use a style transfer model to map a painting associated with that emotion to the video input from a webcam. This goal was broken down into three distinct steps: 1. Emotion based feature extraction with mobilenet 2. Selecting an image associated with the detected emotion 3. Style transfer projection onto user portrait. I imagine that something like this could be displayed in a museum / exhibit, or potentially as a tool that children could use to understand emotion. Below is a demonstration of the project:
Code: https://github.com/Jarredvdv/ML5/tree/master/SentiNetVideo
Demo
I. Adding training samples to model
II. Style Transfer using detected emotion
III. Using pretrained model
Process
The project was inspired by some of the neural style transfer projects that we had seen previously during class. I wanted to extend the basic implementation in the documentation of ML5.js into something that was interesting and interactive. Naturally, using video via the webcam supported by p5 is a simple and fun, albeit computationally expensive, way to incorporate the user and enhance the interactivity of the project.
The first step required a method to determine the emotion of the user. The mobilenet feature extractor is a solid candidate and can be trained to bolster the performance of our emotion detection model. My initial approach started without a pretrained model. In order to train the model I assembled a web interface that displays the webcam video of the user, as well as some buttons that could add training samples for each emotion (happy, sad surprised, and angry) to the feature extractor. Clicking on a button while demonstrating the associated emotion creates one sample, which means that at least 4 clicks were needed to train the model naively. As you might imagine, fewer samples leads to more overfitting and likewise lower performance, so it’s a good idea to add at least 10 samples for each emotion, in which each sample includes some kind of variance whether it’s facial position, distance from camera, muscles used for the expression, which helps the model generalize better. Once there were enough samples, we can then properly train our model and test the performance. I used another set of progress bars to showcase training progress. Initial results proved that this method could work quite well in an isolated setting, of course even with 40 samples, the model might overfit, but it provided a baseline that responded well to user input. In order to demonstrate the detected emotion, I unpacked the results of the model and used a progress bar to demonstrate the statistical likelihood that an emotion was detected. This provided a good level of feedback in which the user could try the different emotions to see how well the model performed.
Now that we had a working model for emotion detection, the next step is to select some paintings / art styles and associate them with each of the emotions. In the interest of time, I narrowed my choices down to the art styles from some of the pretrained models available through ML5js, such as the famous wave painting (which was used for sadness). One of the questions raised during the concept proposal was how I would determine which art style would be used with each emotion. It’s difficult to do this programmatically and is highly subjective, however, I deferred to using colors and stroke styles to match them to an emotion. To help make this process more intuitive, I included a small thumbnail of the style transfer source image under the video display. This helps bridge the gap between the detected emotion and the resulting style transfer projected on the portrait of the user.
Finally, using our pretrained models for each style transfer, we can click the transfer button to map the determined style to the video displayed on the web interface. This helps us switch context between live video and style transfer, and gives our CPU a chance to breathe. We now have an end to end pipeline for deriving emotion and applying a style transfer with a suitable frame rate. In the days leading up to the presentation, I also included functionality that integrated a pretrained model found online as the default for emotion detection. This helped streamlines the user experience by preempting the need for adding training samples. The option to add training samples is still available to help bolster the predictive ability of our feature extractor.
Challenges
With a concept in mind, the biggest challenge was how to make the user experience intuitive yet accurate. The layout of the interface, with buttons for training as well as enabling the style transfer helped give clues as to how the project worked. Small cues such as adding the number of samples next to the button text of each emotion provided feedback as to the training progress. Another step taken to streamline user experience was to default to a pretrained model, which was very difficult to find, and even upon discovery required several hoops to jump through before it could be prepared in a format that worked with our model.
The pretrained model also helped solve issues with overfitting due to the sample number of samples provided during training. For example if we move our head closer when we’re adding samples of being angry, the feature extractor will associate head position with anger which isn’t indicative of emotion. I also noticed that the feature extractor performed worse on people that had less expressive facial emotions, or had objects that would obscure facial expressions, such as glasses or long hair.
Conclusion
All in all, I’m very happy with the overall outcome of the project. I was able to demonstrate that it’s possible to use two separate models and architectures together to achieve something much larger than the sum of its parts. The feature extractor / style transfer pipeline was highly responsive and was able to swap between different emotions in real time, something that would traditionally be very difficult and resource intensive to do. My hope would be to extend this further by tweaking the user experience and potentially mapping emotion to pre-existing works of art instead of a user portrait, which is much more interesting and scalable.
Midterm Proposal
Concept
My goal for the midterm is to be able to style images based on a detected emotion. The pipeline for doing so would be broken down into three different steps. 1. Detect emotion using KNN or mobilenet 2. Select style transfer model 3. Project style transfer onto image or video. I imagine that this kind of thing could be used as an interactive art exhibit to demonstrate the power of DL, or potentially a tool that could be used to teach emotions to young children.
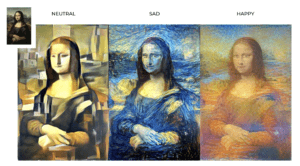
As an example, if we have a webcam video of a user, and the sad emotion is detected, then we can use style transfer to paint a “sad style” on top of the portrait. Examples of emotions are sadness, happiness, anger, and surprise, which provide enough variance to be able to reliably detect.
Challenges
Feature extracting for emotions can be difficult, so it’s definitely worth exploring pretrained models or developing functionality for being able to train using local samples. Another consideration is the interactivity of this, how can I make this easier to user or more engaging. Perhaps I could default to a pretrained model and provide the option to add more samples.
As far as determining what styles are mapped to what emotions, my plan is to use pre-existing models that closely associate with emotions based on things like stroke style, color, mood, etc.
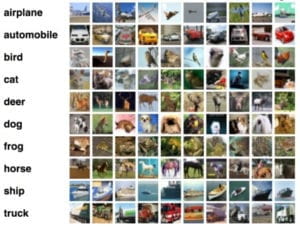
Train Cifar10
I was able to successfully train and test the performance of our model on the cifar10 dataset, and tested out different batch sizes during training as well as different activation functions, such as the sigmoid activation function
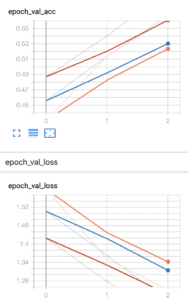
Testing batch size
Batch size: 16
With a smaller batch size (which can be more convenient when training locally), our loss function converges quite quickly but levels out at around the same level during each epoch.
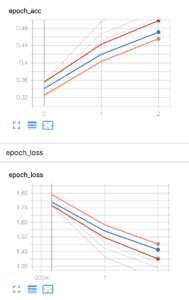
Batch size: 32
With a larger batch size, we have higher performance given by higher accuracy and less loss. Here you can see that on the 3rd epoch, our accuracy is improved quite drastically. In the grand scheme of things this is a small percentage, still worth noting.