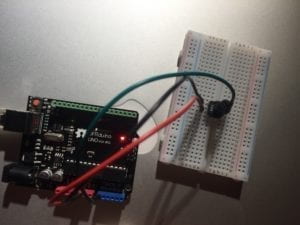
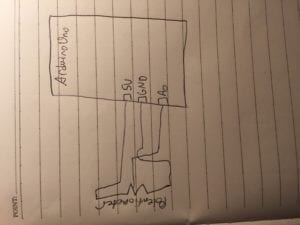
For this week’s recitation, we were tasked with selecting an image or video and altering it using processing and arduino. I decided to select this picture of a roller coaster on the beach as my canvas. I decided that I was going to set up a circuit where I would have a potentiometer that would adjust the brightness of the photo with a turn of the knob. In order to code this interaction, I had to use an arduino-to-processing template. I used one matrix with one set of values, which resembled the potentiometer and began from there. I then had to input the code I wanted in void draw. Originally, I was going to use a “For” loop that would change a set of RGB values, but then I was made aware that since I am changing the brightness, I should use HSB values. Once I finished with this, I uploaded the image into my processing code and ran it… but nothing came up. I checked my circuit and arduino code and everything was working fine, but for some reason the photo wouldn’t show. I was able to get help from the recitation helpers and professors, but whenever the code ran, a grey screen would pop up. In order to try and solve this, I changed the color values in my code back to RGB and worked on just changing each individual pixel’s color to a darker or lighter shade with each turn of the potentiometer. I ran the code again but to no avail. For some reason, things were not processing in processing.

Picture of circuit

Circuit schematic

Before I relate this reading to my project, I want to emphasize the importance of open source code and opportunities of learning how to code and use new technology that are open to the public. I think it’s a great idea that computer vision is reaching out to novice programmers and I think more initiatives should do the same. I think today, computer vision has become extremely popular and I think many of our interaction lab projects will contain some aspect of it. My project for this recitation uses a very basic aspect of computer vision by changing the brightness of an image with the turn of a knob. I enjoy how the article goes through a list of elementary techniques that one can use with computer vision. I believe the fact that my circuit allows for the user to manually change the how an image looks makes it a “computer visioned” technique or process, but I hope that as I become more comfortable with processing, I can do more with computer vision by creating more visual effects.
Processing Code
// IMA NYU Shanghai
// Interaction Lab
// For receiving multiple values from Arduino to Processing
/*
* Based on the readStringUntil() example by Tom Igoe
* https://processing.org/reference/libraries/serial/Serial_readStringUntil_.html
*/
import processing.serial.*;
PImage photo;
String myString;
Serial myPort;
float c;
int NUM_OF_VALUES = 1; /** YOU MUST CHANGE THIS ACCORDING TO YOUR PROJECT **/
int[] sensorValues; /** this array stores values from Arduino **/
void setup() {
size(600, 600);
//background(0);
photo = loadImage(“RCP.jpg”);
setupSerial();
colorMode(HSB);
}
void draw() {
updateSerial();
printArray(sensorValues);
//set(x,y,color(random(255), random(255), random(255))));
// use the values like this!
//c=map(sensorValues[0], 0, 1023, 0, 255);
//image(photo, 0, 0, width/2, height/2);
for (int x=0; x<photo.width; x++) {
for (int y=0; y<photo.height; y++) {
color col = photo.get(x, y);
color newCol = color(col, col, map(c,0,1023,0,255));
photo.set(x, y, newCol);
}
}
// add your code
//
}
void setupSerial() {
printArray(Serial.list());
myPort = new Serial(this, Serial.list()[13], 9600);
// WARNING!
// You will definitely get an error here.
// Change the PORT_INDEX to 0 and try running it again.
// And then, check the list of the ports,
// find the port “/dev/cu.usbmodem—-” or “/dev/tty.usbmodem—-”
// and replace PORT_INDEX above with the index number of the port.
myPort.clear();
// Throw out the first reading,
// in case we started reading in the middle of a string from the sender.
myString = myPort.readStringUntil( 10 ); // 10 = ‘\n’ Linefeed in ASCII
myString = null;
sensorValues = new int[NUM_OF_VALUES];
}
void updateSerial() {
while (myPort.available() > 0) {
myString = myPort.readStringUntil( 10 ); // 10 = ‘\n’ Linefeed in ASCII
if (myString != null) {
String[] serialInArray = split(trim(myString), “,”);
if (serialInArray.length == NUM_OF_VALUES) {
for (int i=0; i<serialInArray.length; i++) {
sensorValues[i] = int(serialInArray[i]);
}
}
}
}
}
Arduino Code
void setup() {
// put your setup code here, to run once:
Serial.begin(9600);
}
void loop() {
int sensor1= analogRead(A0);
Serial.println(sensor1);
delay(100);
}