Train and Inference Style Transfer

I had a lot of trouble with this assignment and ran into a few difficulties. In the end, I wasn’t able to train the Style Transfer despite overcoming most of the challenges I faced. However, I do feel like I learned much more about the files and the process in terminal after spending hours problem solving and researching the challenges I faced.

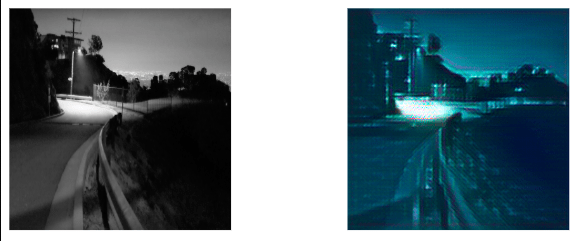
To start training, I cloned the repo, created the environment and checked the installation, but had to use a different command from the slides because I realized that the folder was named styleTransfer instead of styletransferml5, something which threw me off on several steps of the training. After successfully downloading the setup, I renamed my image, shapes.png, an interesting 3D shapes image I thought would produce interesting results, and loaded it into the images folder on my devCloud.

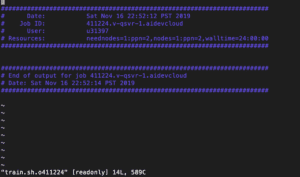
After completing these steps, I attempted to run the qsub -l walltime=24:00:00 -k oe train.sh code, but didn’t receive the “successfully training” message. Instead, I discovered that every time I ran the code, the program created a new “training” file, such as train.sh.o411228, and an error file, train.sh.e411228.

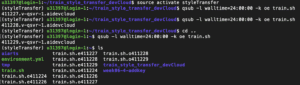
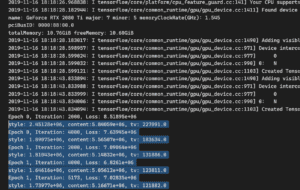
Initially I didn’t realize that train.sh.e411228 was an error file, so I kept checking the other version to find confusing outputs such as this:

Checking the error file showed this error, saying that style.py didn’t exist, so I reuploaded the style.py into the train_style_transfer_devCloud folder on devCloud and kept trying again.

At this point I reviewed all my steps on the slides and realized that I needed to edit the train.sh file, as I had not realized that before. I went back into the downloaded folder from Github and changed the username and file name, but after a few more error messages I realized that the original train.sh indicated the folder was styletransferml5, which is why the program couldn’t find the style.py file, as it was under activate styleTransfer in the train_style_transfer_devCloud folder. Here is my edited train.sh file:

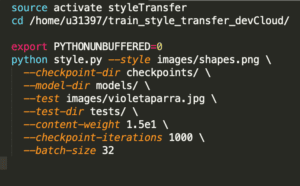
After correcting my mistake, I reuploaded the train.sh file again and submitted the qsub -l walltime=24:00:00 -k oe train.sh command, and was very excited to see the message, ml5.js Style Transfer training!

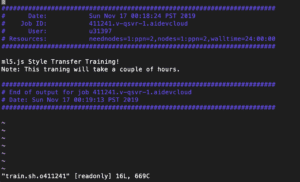
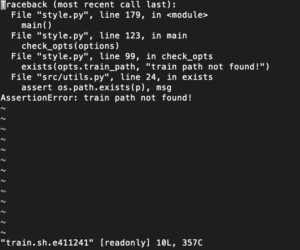
However, after a day and a half went by, the message was still the same with no successful models trained. At this point you directed me to check the error file, which showed this new error, train path not found.

The final hurdle was realizing that when cloning the repo the unzip train2014.zip had failed to work, which meant that despite problem solving earlier the file was still zipped and therefore couldn’t be used to train. I redownloaded the file again and attempted the use the unzip command in Colfax, but got these error messages after several attempts.

In the end, I kept getting the “broken pipe” message, so I had to give up my attempts. While I feel like I got very close and got to know all the parts that go into style transfer training, experiencing all the complications was very frustrating especially after spending hours problem solving, getting help from friends and fellows, and feeling so close to the finish line after the success messages.

Week10- StyleTransfer Training

Traning

The training script for StyleTransfer depends on a quite old TensorFlow version which imports extra difficulties for building the environment. Moreover, the training process uses the CoCo dataset which contains 14 GB of images. It also introduces a lot of training time. 

In my case, I used RTX2080Ti to do the training process. For two epochs and 8 batch, it takes about 3 hours to finish the training phase. In general, it is super fast considering how many images CoCo could have.

Convert

Since this is an old script, I can not directly transform it into a browser compatible model. In this case,  I used the ml5 script to do the work. 

Testing

Below aresome images I converted:

Week 10: EB’s work

For this week’s assignment, I trained a style transfer model using a cyberpunk style image as my base. I personally fell in love with this genre thanks to movies such as Tron, Beyond the Aquila Rift and others. I wanted to create a model that would translate normal landscapes into something out of one of these movies.

Beginning the project, I didn’t realize that it would take me such a long time to complete. Being on a Windows computer didn’t help as well. I followed along with the slides provided to us however some of the lines of code would not transfer well in the command terminal of the windows system. Therefore, I resorted to transferring my work onto a mac.

From there, I downloaded the finished model and uploaded into the folder that was provided to us. Running the localhost server, I then proceeded to test the finished work out. 

Here are some of my finished work:

Personally, I’m very satisfied with the results. It manages to change normal everyday landscapes into actual Tron images. However, I think that the result created a very digitized version of the landscapes. Understandably, there is a lot of loss and the accuracy might not be quite high, but it is safe to say that the model was able to perform better than expected.

The effect doesn’t really work with portraits as seen in this example. If given pictures of landscapes it works very well. I think that this model has potential and if given enough time to develop, it can potentially create even better examples of said images. 

Overall, I think that I was able to recreate the cyberpunk aesthetic with the model. It went really well however there is a lot of room to improve. A larger sample size would give me a better result and translate the landscapes into a more accurate depiction of cyberpunk/Tron-esque landscapes. This idea can become a reality and is a very feasible idea in my opinion. This is definitely a good idea to look into.  

Week 10: Training StyleTransfer – Jinzhong

TRAINING

In this week’s assignment, I am going to train a styleTransfer model for ml5 on devCloud. I select an image from the Insider. Using Skittles to draw the portraits of people. This work of art binds people’s mentality with materials and soul, which creates huge visual and social impact.

In this training assignment, I am going to train a style transfer network using one of the portraits to let it transfer camera rolls to the art expression. So I follow the instructions in the slides and set up the environment on the devCloud:


$ # Create SSH connection with devCloud
$ ssh devCloud

$ # Clone the training code from GitHub
$ git clone https://github.com/aaaven/train_style_transfer_devCloud.git
$ cd train_style_transfer_devCloud

$ # Set up virtual environment and training image
$ conda env create -f environment.yml
$ sed -i 's/u24235/u31325/g' train.sh
$ sed -i 's/styletransferml5/styleTransfer/g' train.sh
$ sed -i 's/zaha_hadid.jpg/train.jpeg/g' train.sh
$ curl -L https://image.insider.com/5cb7888866ae8f04915dccc8?width=2500&format=jpeg&auto=webp -o images/train.jpeg

$ # Start training
$ qsub -l walltime=24:00:00 -k oe train.sh

The instructions above are the essential ones that extracted from the original slides to simplify the set-up process. After submitting the job, we can run qstat to check out the training process. It usually shows like that:


Job ID Name User Time Use S Queue
------------------------- ---------------- --------------- -------- - -----
410873.v-qsvr-1 train.sh u31325 07:16:30 R batch

Indicating the training is still on the go. If the result of the command shows nothing after hours of wait, the training process is done, and the model can be extracted from devCloud:


$ # On my own laptop
$ scp -r devcloud:/home/u31325/train_style_transfer_devCloud/models myModels

And the model is saved to the local path under myModels folder.

TESTING

The next step is to load the model in ml5js and let if transfer the style of images. I followed the instruction here

Indicating the training is still on the go. If the result of the command shows nothing after hours of wait, the training process is done, and the model can be extracted from devCloud:


const style = ml5.styleTransfer("myModels/", modelLoaded);
function modelLoaded() {
  style.transfer(document.getElementById("img"), function(err, resultImg) {
    img.src = resultImg.src;
  });
}

The JavaScript code will load models from the previously copied folder and run styleTransfer after the model is completely loaded.

RESULTS

I transferred some pictures and get the following results: