Electric Circuits, Electrical Components and Interaction – Monika Yosifova Response

My experience in my first ever Interaction Lab Recitation was not what I expected. I didn’t know that there were so many people taking that class and it was truly exciting to actually get to meet new people. The girl that I was working with on the electric circuits project is called Tiana, and we both worked really hard to understand how both soldering and building circuits operated!

Circuit 1:

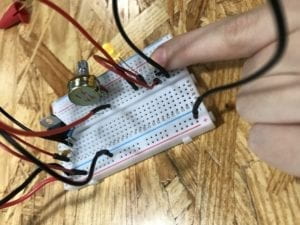
For the first circuit we used a Breadboard to help us organise our electric circuit. We connected this breadboard to a 12 V power cable which was the source of electricity for this circuit. We connected the red cable from that 12 V Power supply to the positive charged slots on the breadboard and the black cable we connected to the Negatively marked slots on the breadboard. This made everything that was connected to the Negatively charged slots ground. Then Tiana and I plugged in the Voltage regulator in the breadboard, it controlled the amount of power output throughout the breadboard. We connected sections 1 and 2 of the Voltage regulator together with a 100 nF Capacitor which condensed and stored some of the energy throughout the circuit. I then used a black cable to connect section 2 of the voltage generator to ground. Managing to get the Switch Button to work was more difficult as we had to watch the placement for it more carefully. We made a few mistakes with it’s placement and needed help figuring it out. Lastly, we put in the Speaker, plugging it in with energy from the 3rd slot of the Voltage Regulator. When we pressed the Switch Button after we plugged the circuit into the power, we heard a rather loud “WOOOM” sound and we celebrated.
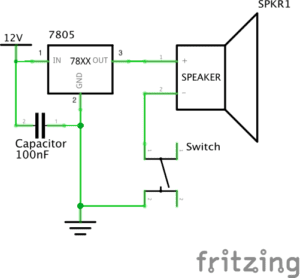
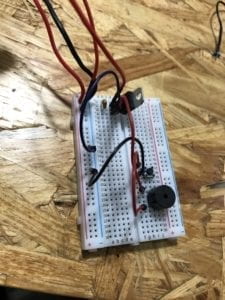
Note: We originally hadn’t plugged the Voltage Regulator in and were wondering why it wasn’t working. We were being too careful with it cause we though we’d break it.

Circuit 2:

Circuit 2 personally gave me the most satisfaction to make. I love lights and as someone who never studied physics before, it was always amazing for me to see how people made a light turn on. When Tiana and I managed to get Circuit two done correctly, with no help, I felt like a Air-bender or a wizard (only for electricity). 

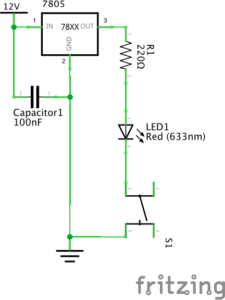
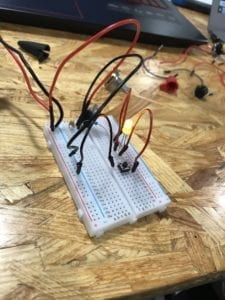
Similarly to circuit 1, our group utilized the Breadboard, the 12V power source, the Voltage Regulator and the capacitor  in a  way similiar to before. Section two of the Regulator was plugged into ground while section one was plugged into  power. The Capacitator was again used to connect Sections 1 and 2.  It got more interesting once Tiana and I had to figure out which resistor to use. We had been provided with two and had a difficult time finding out which one was the best. Professor Cossovich came over and explained the color-coding on the little resistor to us and we were good to go. This 220 Ω  resistor reduced the flow of electricity along the circuit and we connected it to one end of the little yellow LED light bulb that we were supposed to turn on.  Tiana then put in the Switch button, connecting one of the ends of it to ground while the other one was connected to the LED. Once we pressed the Switch, the little light turned on.
Circuit 3: 

Circuit three was by far the most complicated, but after being able to successfully make the previous two circuits, Tiana and I were really excited and just got on with the job. Class had already ended, but we were so curious about what the next little challenge was that we just wanted to construct it.

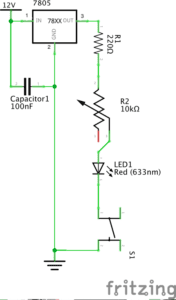
Similarly to the last two circuits, we utilized the Breadboard, the 12V power input, the Voltage regulator and the Capacitor, connecting Section two with the Capacitor to ground. Section 1 of the Voltage Regulator was connected to Power. Section three we connected to the 220 Ω Resistor again, with red cables, and then we connected it to section two of the Potentiometer. The potentiometer allowed for more control around the circuit as we connected its third section to the Led light. The LED light we then connected to the Switch Button again. There was a black cable that connected ground to the Switch on the other end. When we connected the circuit to the power, the LED automatically switched on, which was a mistake. Professor Cossovich then told us that we had, again, plugged in the Switch Button wrong.  After fixing that, the circuit worked!
Responding to Question 1:

I really had a laugh with some of my friends after reading “The Art of Interactive Design” article.  I though it was an engaging read. 

The circuits that we build in the Friday Recitation class were highly interactive as they created a level of concentration among the pairs that were building them. I had never worked with Tiana before, but the two of us were listening to each other, thinking about how to make the circuits work and communicating what we though was the correct way. It was a good project that brought me closer to someone I never honestly thought I’d work with, and I enjoyed it a lot! 

Responding to Question 2:

Interaction Design and Physical Computing be used to create Interactive Art in many ways. People get shocked and impressed by little things, an example for that would be the “Open Mouth” idea that Zach Lieberman explains to us when he presented his interactive music art to other people. Physical computing and Interaction design, if used correctly and coded properly can revolutionize art and expand people’s imagination and belief of the possible. I know it sounds cheesy, but I like to make people happy, and art that is produced in a way that the audience can interact with it always pleases people. 

Thank you for an awesome first week!

Monika V. Yosifova
Week 2: Response to “Long Live the Web” and “The Room Where the Internet Was Born” – Matthew Fertig

In Tim Berners-Lee piece, “Long Live the Web” he observes the internet today for what it is– constantly changing and ever powerful. Without question the internet has developed rapidly throughout time, and since the inclusion of the World Wide Web in December of 1990 the possibilities with the internet are breaking barriers, for better or for worse. He analyzes the evolutions of the web that, while unforeseeable, are now a part of our everyday lives. The limitless possibilities with social media, for example, continuously proves just how much we can and are willing to share with each other online. With that being said, the Web has brought about unprecedented, multifaceted, deep issues that go way above the user. The Web has brought about debates over human rights and internet monopolies. It’s allowed companies like google to decide what you see on the Web. It’s allowed governments and companies to access your information, both what’s done publicly and privately. It’s, in recent years, brought into question the importance of net neutrality in regulating internet speeds and costs. All in all, he concludes that it is still an “exciting time” and we have to remember “the goal of the Web is to serve humanity” (Berners-Lee 85).

Ingrid Burrington’s “Where Did the Internet Begin?” recounts her trip to UCLA to see the room that started ARPANET. At first I found it strange that she so meticulously describes the appearance of the room, including the replicated paint color and original furniture, but it didn’t take long for me to understand her intent. It got me thinking about what is worth preserving and memorializing and who decides that. Her article really highlights the disparities between the humble beginnings of the internet, one exact place at one exact time, to the ‘cloud’ that has no exact place to pinpoint through a landmark. She writes, “When we do commemorate, it is in search of a singularity where there may only be a series of convenient confluences, a statement of significance where there may only be a line in a log book.” I think this quote is true on many fronts, not just for her ARPANET vs cloud distinction. Memorialization often goes hand in hand with fabrication, i.e. recreating the spike in Utah, as she mentions. That is, really, the reality of the internet today: no exact place to call central, but a complex network of servers all around the world.

Recitation 1: Electronic Components by Linhui Wu (Leon)

Lab Date: Feb 15, 2019
Instructor: Marcele
Lab Partner:
 Daniel Qin

Aim of Today’s Lab: build three sets of circuits breadboard-based and learn how to solder

Circuit 1: Door Bell 

The material used: 1 * Breadboard, 1 * Buzzer, 1 * LM7805 Voltage Regulator, 1 * Push-Button Switch, 1 * 100 nF (0.1uF) Capacitor, 1 * 12 volt power supply, 1 * Multimeter, Several Jumper Cables (Hook-up Wires), 1 * Barrel Jack

I began by collecting all the materials that I needed to buid the circuits.  I read the instructions of the 3 sets of circuits we were going to make for the lab today. The circuits and the introduction of each electrical components are straightforward, which saves a lot of time. 

We finish the first circuit quickly, but we still face a little problem about the breadboard. At beginning, I am a little confused about the current flow of different part inside the breadboard. With the help of Leon, we figure out the direction and succeed to make the buzzer have sound. 

But we suddenly found  that the voltage regulator became so hot after test, we assume that we might put it in a wrong side. We try agin after reversing it and everything perfect.

Circuit 2: Lamp

materials: 1 * Arcade Button, 1 * 220 ohm1 * Breadboard, 1 * LM7805 Voltage Regulator, 1 * Push-Button Switch, 1 * 100 nF (0.1uF) Capacitor, 1 * 12 volt power supply, 1 * Multimeter, Several Jumper Cables (Hook-up Wires), 1 * Barrel Jack

Only a few components change compared with the first circuit. We feel fluent in the first part and no big problem happened. We replaced the old button with the soldered arcade button we made from soldering. 

Soldering part


Circuit 3: Dimmable Lamp 

materials: 1 * Arcade Button, 1 * 220 ohm1 * Breadboard, 1 * LM7805 Voltage Regulator, 1 * Push-Button Switch, 1 * 100 nF (0.1uF) Capacitor, 1 * 12 volt power supply, 1 * Multimeter, Several Jumper Cables (Hook-up Wires), 1 * Barrel Jack, 1 * 10K ohm Variable Resistor (Potentiometer) 

The third circuit challenges a little because it is more complicated. We spent more time on it. Firstly, we found we put each component so close that there is limited space for the variable resistor, and the wires are too much to check. Therefore, we rearrange their position and adopt different colors of wire for the check convenience. 

However, we still can not make the LED become light, we checked again and found we lose a wire between the voltage regulator and the power supply.  After that, we can light it up and change the level of light by using the variable resistor. 

Readings Questions 

  1. In “What Exactly Is Interactivity”, the author defines the interactivity, which is not simply what I previously thought. It is more complicated because it involves people and other factors organically. It is not merely a side-to-side process, but mutual communication. Effective interactivity need at least three standard steps, listen, think, and response. If I apply this evaluation into the work, we can understand better about the inside value of our art design and work. Meanwhile, a different level of interactivity requires us to improve and promote our work consistently.

In terms of the task I made in the recitation, I think at the beginning when every component is put on the table, they have no interaction because they have no communication. But I know that I have a mission to connect them. This goal of interactivity pushes me to design, to think, to organize, and to make. During this period, I start to communicate with these components, they are no longer a single product. I use wire to alive them. When I success to make the buzzer have the sound, I feel a sense of enjoyment, I make them alive and interactive with the outside environment. I push the button and I make a difference.  And as a creator, I receive the feedback from my work. When the LED have the light, people can see the red and green light. When I change the resistor level, I can see literally the change of the level of light. We are communicating. When the circuit doesn’t work, I need to think about how I can improve it. Such kind of thinking is also a component of interactivity. In other words, interactivity should be the core and foundation of our work and design.

2. By watching the video, I understand the significance of both physical computing and interaction design. The former and the latter serve each other to create modern interactive. Zack Lieberman applied the new technology to create new art, which shows a current popular trend and also indicates a future trend. Physical computing is a powerful tool which helps us to realize creative interactive ideas. 

Week 1. / 2 response to Woodward

My main take away from this reading is that, as the author mentions, “sustainability is not an aim , but an outcome”. In order to understand sustainability in fashion and design fashion products for people, one needs to observe what people do with fashion, what happens to the products post-purchase. This means that fashion cannot be defined externally but often comes from social practices and every day activities. Woodward introduces the term, “Accidentally sustainable” in case of jeans. From ethnographic research it turns out people own jeans for longer time than other clothes thus it’s a more durable piece of clothing. This could be because denim is more durable than other materials or because people tend to wash their jeans less than other clothes but most likely because jeans is “a medium to be ordinary.”The author mentions, it is found that there are some pieces of clothing that are “slow-burners” such as denim skirt or skinny jeans, something people wear over longer period of times and it does not go out of fashion. Fashion emerges from wider cultural values and every day activities and there is a relationship between wearer and clothes. People have a desire not to replace things and often recombine things they already own with new ones. So I believe, when designing sustainable fashion, one has to think about what pieces of clothing do people already own and love? What are ways of recombining these? What are ways of developing long term relationships with clothes? Sustainability does not only come from the production side but from the consumers too. 

Week 2: Response to “Long Live the Web” by Tim Berners-Lee and “The Room Where the Internet Was Born” by Ingrid Burrington– Murray Lu

Throughout “Long Live the Web” by Tim Berners-Lee, Lee differentiates the difference between the web and the internet and discusses how quickly and drastically both have evolved and changed overtime and how it is our responsibility to protect the uses of the internet such as net neutrality for example and how it is incredibly important. He states that despite how old the internet was been, people can still improve upon it without changing the internet itself and provides examples such as how manufacturers can improve household appliances without changing how electricity functions. I think because the internet was built to be this way, is part of the reasons to why it has became a giant global force, and is exactly part of the reason to why it has become an international force that everyone can attribute too. It is easy and versatile to use and for tasks such as doing international trade and business, the internet would be the perfect tool to aid in that.

I then chose to read â€śThe Room Where the Internet Was Born” by Ingrid Burrington. Throughout reading it, I kept thinking about how it felt to be one of the people who invented the ARPANET in a small room, which later became the internet, and how they probably did not expect their creation to have such a world wide influence and change human history forever. It’s also crazy to imagine that the internet hasn’t been around for a long time at all and has changed so much within a short time frame. And while throughout the majority of human history, the internet was never a part of someone’s daily lives but in our generation, it has become a crucial aspect of our everyday life now.