You Will Never Catch Me Mom! Justin Wu (Marcela)

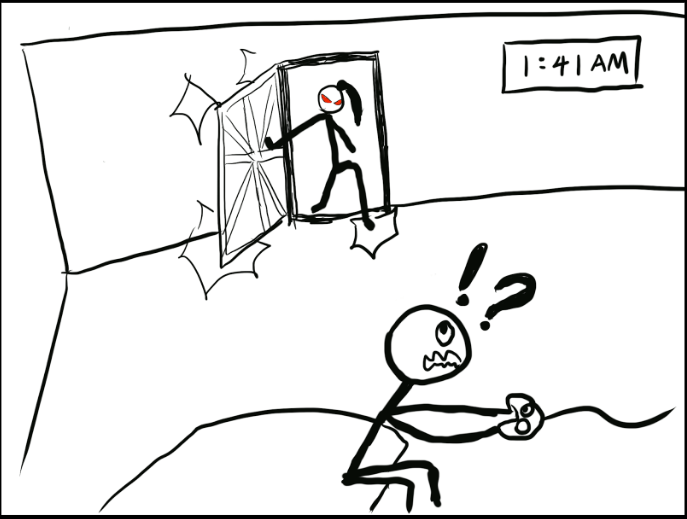
You will NEVER Catch Me Mom! Justin Wu (Marcela)

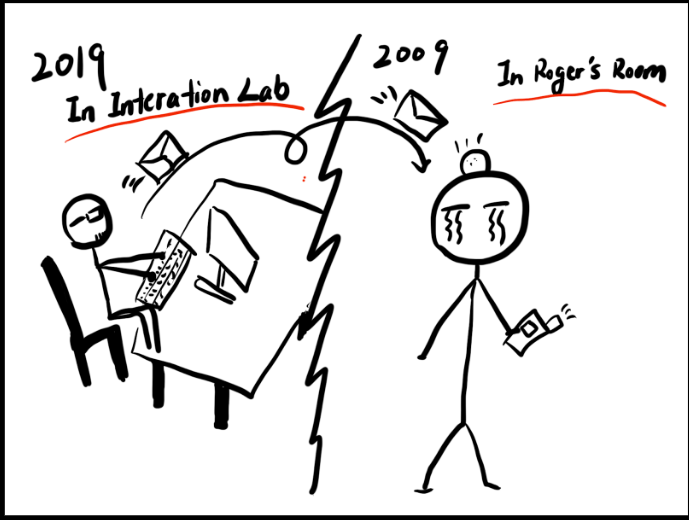
Before this midterm project, we all had to participate in another group project. In the initial group project, we create a futuristic product that can help users identify skin issues while also offering different product samples for testing. In that project, named “iMirror,” it required a human user to interact with the artificial intelligence inside the mirror. After watching my group mates try to demonstrate the interaction and watch my peers talk to another peer behind the mirror (acting as the AI), it triggered me to further my understanding of interaction. Initially, I understood interaction as two parties bouncing ideas, theories, movements off of each other and acting on one another’s decisions but after the group project, I understood interaction should also create a (1+1>2) effect. Interaction should create a more significant impact than addition; interaction should bring something new to the table. On that note, we decided not to recreate any of our previous group projects, and we decided to recreate our childhood memory together. Our new project and concept are different from the other projects as it does not pay tribute to our contemporary lifestyle or an imagined future, but instead, it pays homage to a shared memory we all share. Our group project is meant to be for everyone, and users (targeted audience) will be able to relive what it meant to try to play the late night hide and seek game with our parents in order to stay up late to watch television shows, to play games or to do anything that we were not allowed to do.

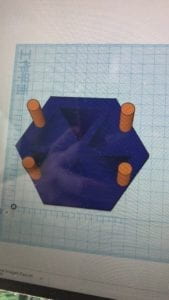
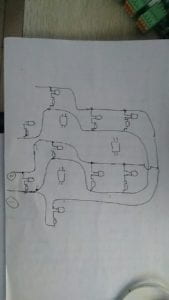
How we envisioned our project


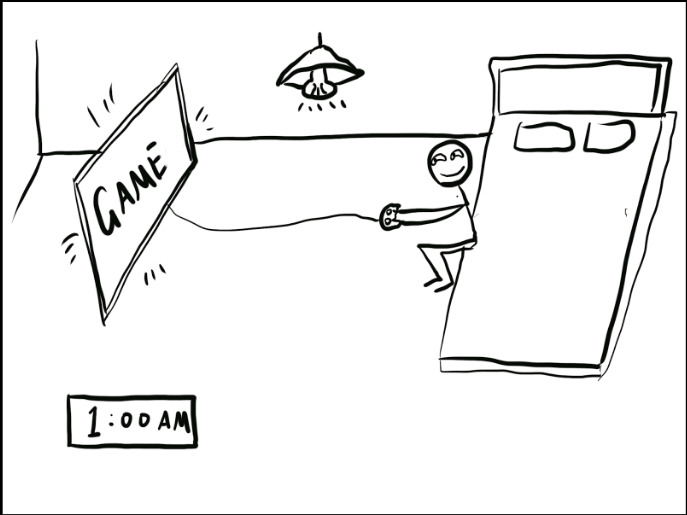
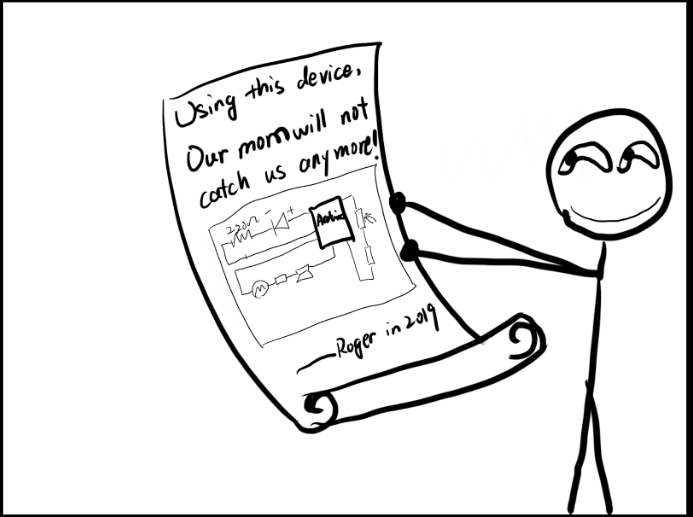
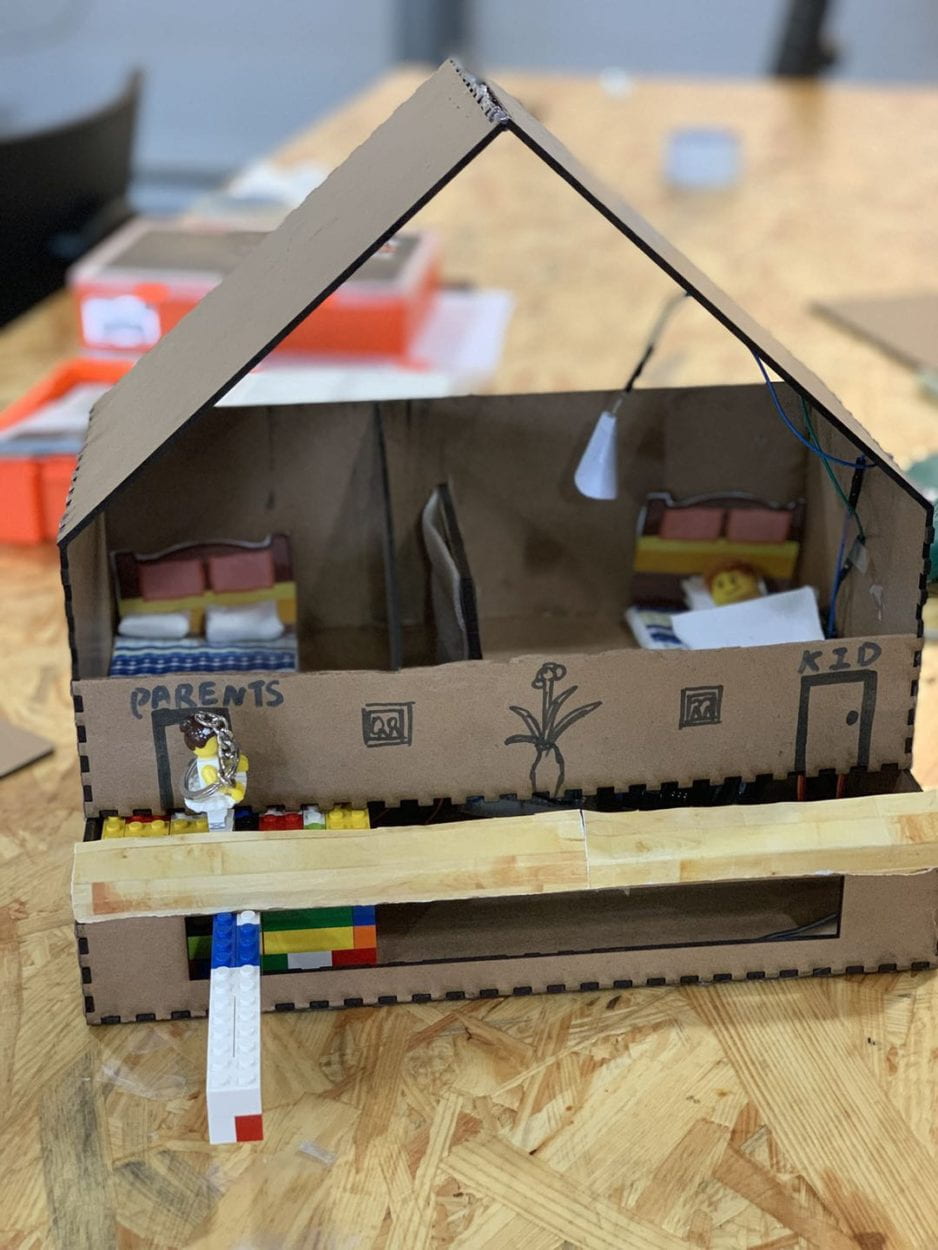
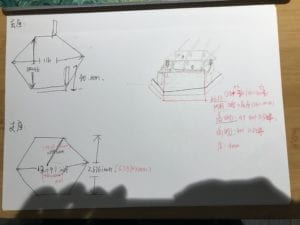
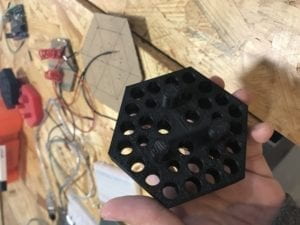
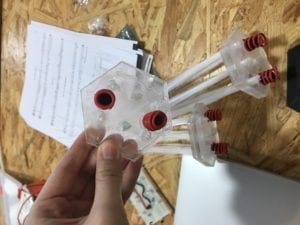
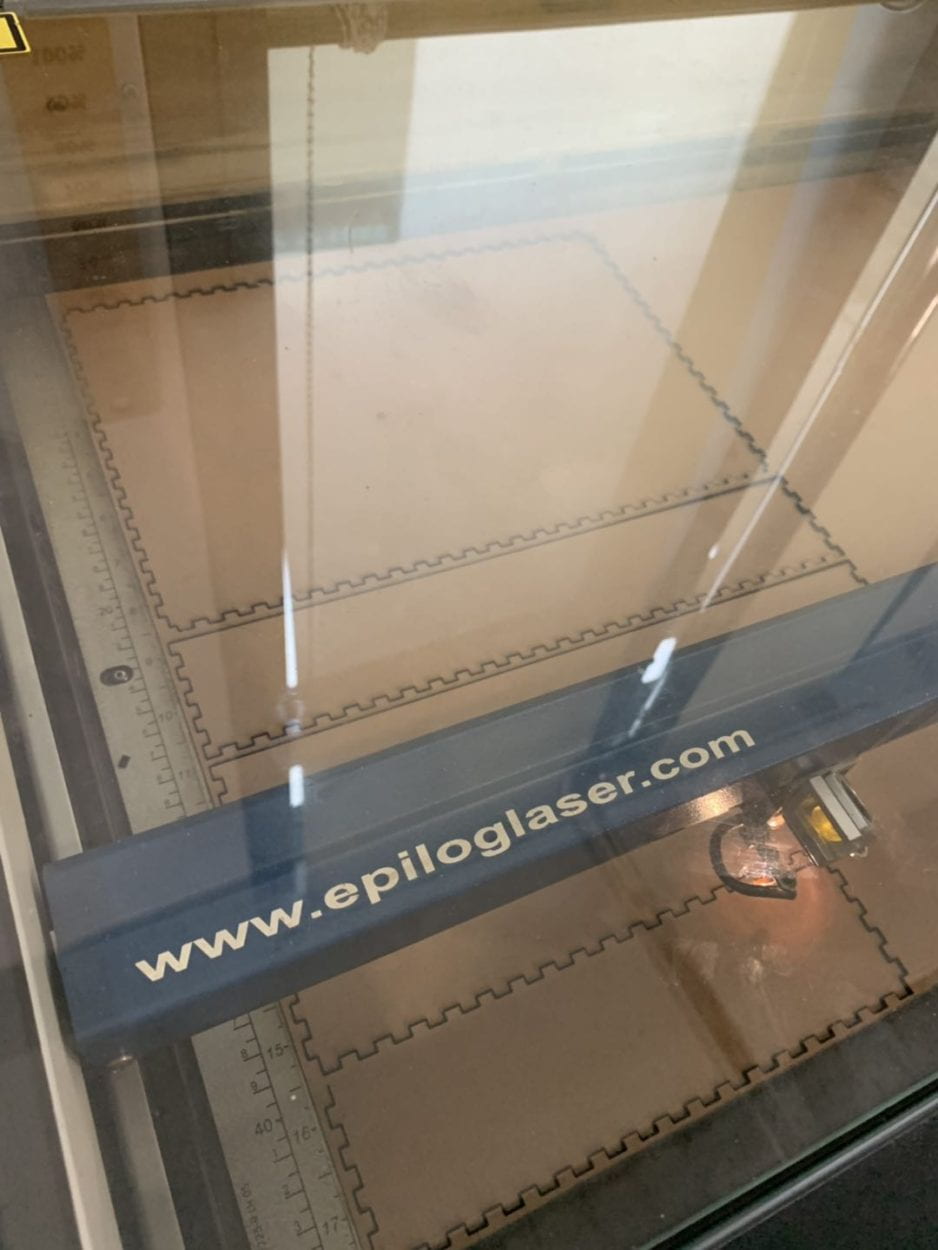
After concluding that our project should be surrounded by nostalgia, we quickly drafted different plans for our project. We finally settled with the idea of mimicking a kid trying to stay up late for a variety of reasons. As a kid, we always wanted to play an extra hour of video games, watch some more cartoon shows or play with our toys for longer but our parents always made us sleep early. Any kid in this situation would be very frustrated by their parents checking on them at night; therefore for this project, we wanted to implement automatic light sensors to help kids stay up later. It is a simple idea that most of us did not have as a kid, but we want to recreate the nervous memories. To use the automatic light sensors, we designed our project with a long hallway with a LED light in between the two bedrooms. We also decided to use a lego character to provide a three-dimensional feel. Because we chose to use the lego character, we decided to make a lego handle (that the lego character will stand on) that users will use to walk the mom to the kid’s room. To do that, we needed a thin material that we can laser cut the outline of the handle. After going through the available materials, we decided to choose the 3-millimeter wood panels so the laser cutting process will be more efficient. The wood panels provided a more homely feeling than the acrylic panels while also being more time efficient. On makercase.com, we also decided to make an open box with finger edge joints instead of the flat or t-slot joints, so we had more flexibility on how we want to use the case after printing. By using finger edge joints, we also make sure we can combine the foundations of our house by connecting the bones.

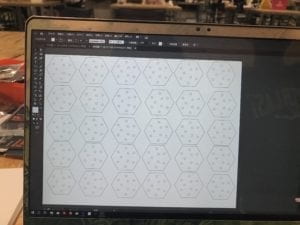
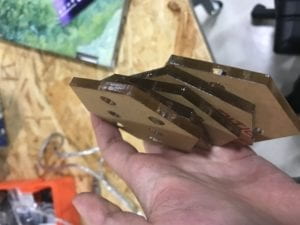
Laser cutting finger edge joint boxes

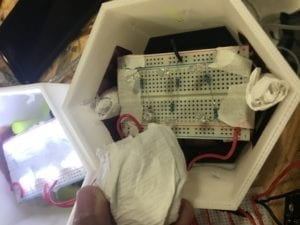
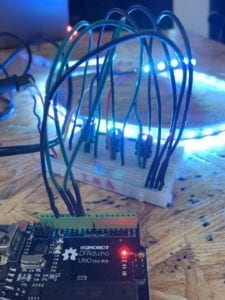
The most physically demanding of our midterm project was the fabrication and production process as it required precise measurements and meticulous planning. During the User Testing Session, although we had a working prototype, we did not have any fabrication. Many users pointed out the vague directions and poor design did not contribute to their experience. Therefore, after our user testing session, we immediately started to plan on creating a presentable project, and we created a list of objectives. First, our initial prototype was constructed with paper and plastic, and it was not a neat design. Hence, following the session, I consulted one of the teaching assistants, and I decided to use makercase.com to help create our house as it was going to be an easy method to solve how we configure our house. When it came to creating fabrication, we had many options by using makercase.com. After figuring out the dimensions of our house, I consulted groupmates Roger and Julie regarding our configurations. We realized, to improve our project, we needed a complete design that will be able to accomplish many objectives. First, we needed a two-story house to store the Arduino and breadboards on the first level and have the bedrooms stacked on top of it. Second, we needed specific measurements for our lego figurine to move freely. These ideas would all combine to help us create a newly constructed house.

Sketch of new design


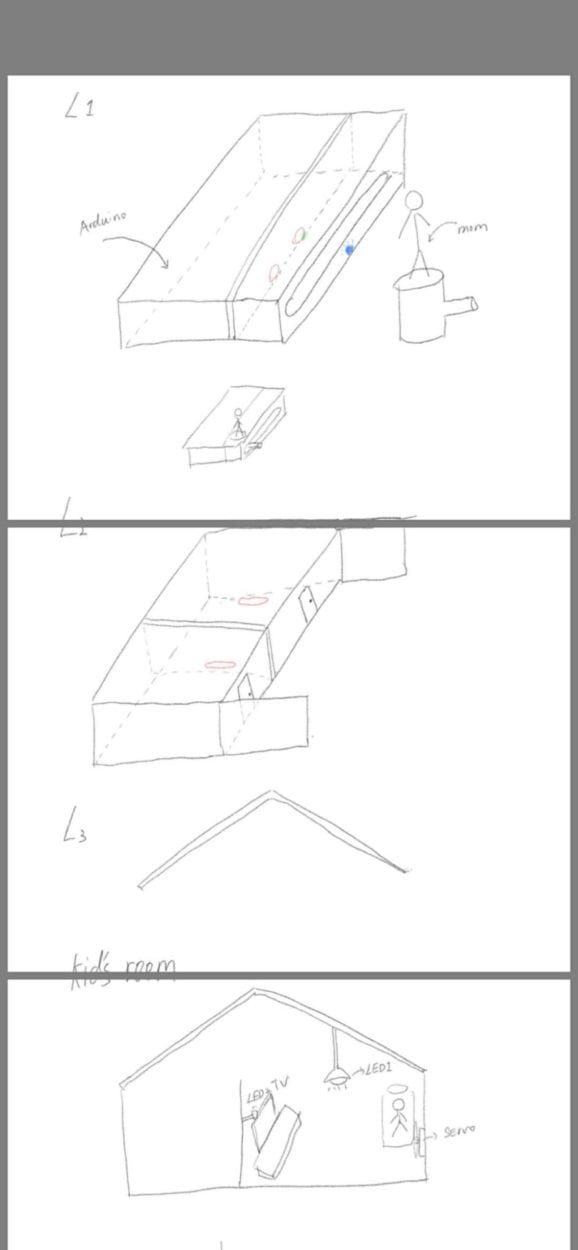
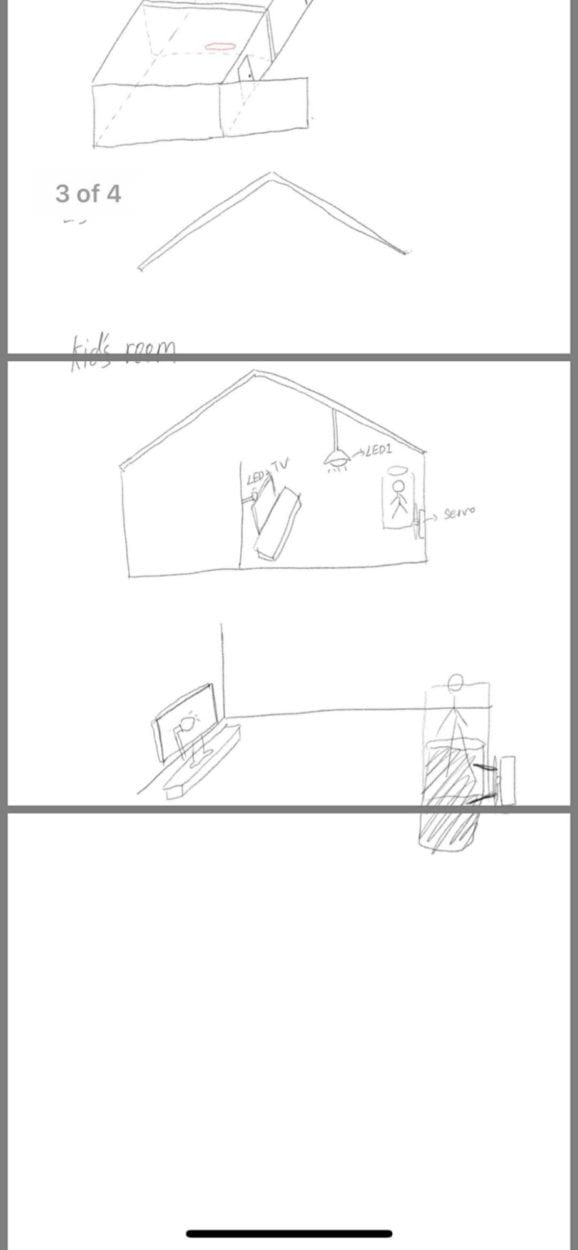
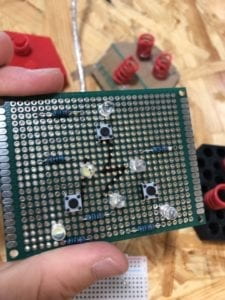
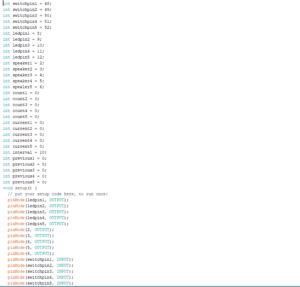
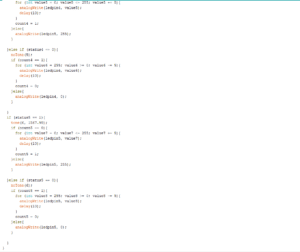
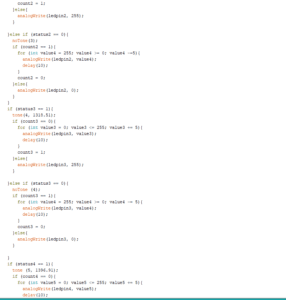
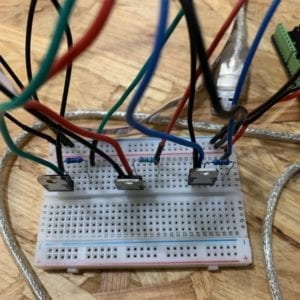
Second, we also had to address the manual reset problem. During the testing session, many users were confused by our need to reset the project manually. We were also frustrated at ourselves that we did not think beforehand. Many users would try to move the mum to the kid’s bedroom again before we could manually reset the Arduino. We desperately needed to create a loophole that will be able to automatically reset the Arduino whenever the mum walks back to her bedroom for a coherent experience. With the help of the teaching assistants, we decided to create different stages that signify different parts of the experience. The first stage is when the mum was in her bedroom or before the light in the hallway, and everything was calm and peaceful. The second stage is when the mum blocks the LED light, this stage would trigger our codes and would turn all the lights off while also triggering the kid to fall back into his bed. The third stage is when the mum reaches the kid’s door to check on the kid. The final step is when the mum walks past the LED light to return to her bedroom. Stage four would trigger our code to respond to stage one and automatically reset the whole project.

Updated model with automatic reset

In general, we tried to recreate a fraction of our childhood memory by recalling how we all tried to dodge our parent’s supervision with this midterm project. Our project incorporated interaction as users not only react differently to the different stages of our project but also get a sense of nostalgia, something that is not expected. The project aligns with my sense of interaction as in addition to enjoying the experience; users get to comes across the (1+1>2) effect once they recall how they used to act the same when they are a child. During our group’s short presentation, many people were fascinated by our idea and were eager to try and test how we incorporated our lives into a real-life model. It was incredibly relieving to see our audience not only inquire how we made this project, the intricate details behind it. It was also rewarding to see people resound with our motivation to create this project because we managed to make our users think back to their childhood memories. On that note, if we had more time, I would try and create a losing scenario for the kid. In our current model, the kid can dodge the mother’s checkup every trial, but it would make our model more realistic if the kid can get caught because we have all been caught before. During these two weeks, our group went through a series of highs and lows, and it was both rewarding and punishing to be there for all of it. However, I took away the importance of splitting tasks according to our different expertise. As a part of a three-person group, we were able to divide and conquer. Each of us took care of different tasks efficiently, and it helped expedite the process.
Most importantly, I also learned the importance of staying patient. During our fabrication session, the laser cutting machine stopped working, and we allowed our emotions to get the better of us. I started to panic and wonder if we will be able to complete our project. However, with the help of Leon, we managed to get the laser cutting machine to work again, and we resumed our fabrication process. In short, our midterm group project brought us back to our childhood memories; only this time it was a lot more demanding and challenging to create it. Although it might seem like just another model, I believe our users should care about this experience because it displays not only detailed planning but also noteworthy programming and coding skills. Most importantly, this model provides an experience that coincides with everyone’s early days.

Final Project

Midterm Project Documentation: Grass – Yixuan Liu -Eric Parren

Our project is called Grass. The reason is that the shape of the optical fibre looks like a bunch of grass, while the grass can not only light up but also make some sounds of the standard notes when you touch it. However, there is some problem with the third note of E, making the third bunch of grass sounds like an electronic sound created by a DJ.

CONTEXT AND SIGNIFICANCE:

The previous research project was called Bedman. The shape of the bed can be re-grouped according to the way you want to use it, and it can store clothes, cook food, and stretch out wheels to be a means of transportation. This project gave me an inspiration for my midterm project that we can put the existing daily objects, such as the bed, into a brand-new format, which includes functions from other areas or can make the project be in a more aesthetic way. Therefore, we think about making a musical instrument in a creative way. The project called SUN which I have researched also gave me inspiration for the midterm project. By changing the position of the physical ball, the scenery of the sun is changed by the audience. Therefore, I think my midterm project can turn out to be something giving the audience chances to carry out creativity by themselves. These two projects also perfected my definition of interaction. It is not only a process of communication between different roles, but also that the outcomes of the communication should have a significant impact on the world or on each other, either in ways of utilization or aesthetics. Based on an existing project called Glowing Grass, our project can not only give out lights but also can create five standard musical notes. The uniqueness of our project is that our project is not only a piece of art which can give out lights through the optical fibre, but also a musical instrument on which you can play some simple songs. Our project is for everyone but would have more utility for children, since the light of the grass can stimulate their sense for light, and the sounds of the grass can help them to learn the standard musical notes.

CONCEPTION AND DESIGN:

At first, we expected that users interact with our project by pushing or shaking the grass. Therefore, we tried to stick springs on each button, which is below the circuit board and surrounds the columns which connect the button and the circuit board. We expect that when people push the grass, the grass would lean, triggering the board’s leaning. The side of the board which goes down would press the button. However, we found out that the buttons are not sensitive enough, and you have to hold the grass and press it to turn on the button. Therefore, we put some conductive tape on the wall surrounding the circuit, and some conductive tape on each corner of the breadboard so that the user would not need to press too hard on the grass to make a sound. We used 30 LEDs, 5 speakers, 7 breadboards, 50 bunches of optical fibre, many transistors and resistors, 15 3D printed models, and 20 laser-cutting models. The criteria for selecting the materials was that they should be flexible since we need to make a lot of adjustments to perfect our project. Some of our material’s elasticity has to be suitable so that it would be easy for people to push the grass to make a sound, but also that the board can go back to where it was. What is more, we also used the optical fibre which can conduct the light and shape some lighting spots on the top. We thought about using the iron springs and napkin to fix the circuit board. However, they were rejected, because the first one was too hard, making the board hard to move, while the latter was too soft, and the board was hard to go back to the original position.

FABRICATION AND PRODUCTION:

The first significant process was that we used the conductive tape (which was suggested by Nick) to replace the buttons. Since the conductive tape formed a magnet circle, causing the circuit to have the opposite reaction from what it is supposed to be, we changed the circle of conductive tape into two pieces of conductive tape. The second significant process was that we designed different versions of 3D printing models so that we can make adjustments in terms of the circuit. However, we failed for more than 20 times for printing those models, each of which costs about 2 hours to print. The third significant process was that we decreased the number of LEDs so that the light can be strong enough. The fourth significant process was how we decided what kind of player to use. At first, we thought about using the Audacity to play the mp3 file, but the volume was too low. Then we used the SD card, but the sound was still too low. Then we used 5 buzzers instead, the sound was really jarring. However, since the sounds were clear and loud, we kept using the buzzers. During the User Testing Session, almost everyone pointed out that they had to press really hard to make the sound, and the grass will not go back to its original place after that. We used Nick’s suggestion that we put conductive around the breadboard, so that we don’t need to use the button. It was really effective, although at first the circle of conductive tape formed a magnet.

Draft

Daily Failure

Magnet Circle- Credit to Sheldon

9 LEDs
Circuit for 9 LEDs


Code- by Sheldon

CONCLUSION:

The original goal of our project is to make a glowing musical instrument. Our project aligns with my definition of interaction that it creates a conversation between the audience and the device, and has some significant utility such as playing some simple songs and creating a sense of aesthetics. However, it does not align with my definition of interaction that this conversation was not continuous enough since the conductive tape was not sensitive enough and the sound was jarring. Ultimately, the audience interacted with our project by pushing the grass to make the sound, and the optical fibre also gave out lights. However, they were confused about which direction should they push the grass in to make the sound. The reason is that we changed the conductive tape circle into two pieces of conductive tapes to avoid forming a magnet, but finally removed one piece from the two, leaving the other piece which has higher conductivity. If I had more time, I would put more conductive tapes on the inside of the wall of the instrument, but also make sure that they are not connected to each other, so that whichever direction you push the grass in, there can always be a sound. What is more, we would fix the annoying sound for note E, and maybe figure out how to use an SD card to play the sounds of harps. We would also add more bunches of grasses instead of having only 5 so that we can play some more complicated songs, What is more, we would also fix the code so that two different notes can be played at the same time, which can be used to play some chords.

I learned from our failure that we should have focused on only one aspect, such as how to make the project a perfect musical instrument or how to make it give out lights in a more aesthetic way, instead of focusing on fusing different functions together while achieving nothing ultimately. I would take away from our accomplishments that always have some backed up plans, and try to use some materials which are so daily that they seem to have no connection with this project (for example, we used the wires to make some springs to replace those iron springs, and used the napkins to fix the position of the breadboard). Generally, I learned that never be restricted by the prototype online if you have, since the materials we have and the creation of the project are not exactly the same with the prototype. It is always important to think about what to do in reality and pay attention to taking the audience’s advice.

Napkin Support
Wire Spring

Duet Beat – Guangbo Niu – Rudi Cossovich

Duet Beat – Guangbo Niu – Rudi Cossovich

Individual Reflection

  • Context and Significance

Our last group project is about a feeding machine that feeds the user according to user’s voice command. Although there is possibility that the machine makes its user lazier and lazier, we do believe that it would actually make things a lot easier for the user, in an interactive way. It frees user’s hands and allows them to do what they want while eating. So this time, we take a step further to lift burden for humans, we want to do something that allows nonprofessionals to create stuff in a professional way. For example, we want our user to compose wonderful music even when they have disabilities or are not trained in any musical instrument. I want our project to align with my definition of interaction: simple inputs, sophisticated processing, and wonderful outputs, with the idea or human-centric.

The first project that came to our mind is the App Garageband developed by Apple. The App has many installed  chores and drumbeats with which you can compose a song easily by combining them with your own melody or notes . So we decided that our device needs to automatically generate chores according to the user’s need. The other project that has had significant impact on our project is the world’s first electronic musical instrument called Theremin made by Soviet Union scientist Léon Theremin.  The instrument uses sophisticated sensors to detect hand movement and allow the user to play different notes with hands in the air. We want our user to have minimum physical contact with the device just like the Teremin, because then it would probably allow people with disabilities to use.

Theremin
Theremin, from amazon.com
  • Conception and Design

Now we have two principles of our project: automatic chord generating and minimum physical touch. For the first principle, after we saw another group using the heart rate sensor, we decided to apply that sensor to our project as well. It is because we need a kind of sensor to know the user’s need in order to generate the right chord, and the heart rate sensor can be used to detect the user’s mood so that our device can generate the chord based on the user’s current mood. Although hear rate may not the best indicator for mood, this is the best we can use for the time being. For the second principle, we decided to use what we learn from previous classes, which is an IR distance sensor. We set the distance range into different intervals and let each interval represent one note. So once the IR distance sensor detects an object in some distance interval, the buzzer would generate a note that is associated with that interval. This is the best way we cant think of to minimize physical contact. The reason why we didn’t use the ultrasound distance sensor is because we were told that the ultrasound sensor uses sound waves to detect distance. The sound waves could get scattered so the sensor doesn’t give accurate readings when the distance to be detected is long.

Other materials we used include laser-cut wood boxes (3D printed stuff are not a good one to contain components since they took its shape once printed out), 2 Arduinos (it’s not possible to use a single Arduino board since we later found out that the IR distance sensor doesn’t work well when there is another sensor on the board), 2 buzzers (for chord and for notes), 2 battery cases (we wanted our device to look wireless), countless wires and LEDs (3 for mood indicator, 1 for heart rate detecting indicator, 7 more for different notes. We wanted our device to provide adequate feedback for the user).

  • Fabrication and Production

Hmmmm, we did not have a formal user test because we brought the creepy dog to the user test session. And in terms of failures, I guess our biggest failure is building that creepy dog in the first place. I don’t want to talk much about it but it did provide us with valuable experiences. For example, it let us know that 3D printing is difficult to handle. Once the 3D printed stuff took shape, it would be extremely difficult to put something in it or change its shape. For the dog head we had to use electric soldering iron to melt its mouth so that the ultrasound sensor could fit in. And the outcome is just as horrible as the video shows. Therefore, we turned to laser-cut boxes when we built the new device.

In spite of that, we also came across the problem that the IR distance sensor often give spikes and the readings jump up and down. To solve this problem, we looked up in Arduino forums and found a instruction online. We then followed the instruction and put a capacitor near the sensor’s power input in order to smooth the circuit flow. After doing this, the sensor worked a lot better though it still sometimes gives spikes.  Also, we wanted to prepared three chords that respectively associate with three kind of mood: calm, just fine, and excited, and the mood is determined by the heart rate. However, we had a big trouble on coding. The sensor was set to give a heart rate reading once in 20 seconds which is too slow and it took me an entire evening to figure out the code and make it give a reading every 5 seconds. Later, it took me another evening to figure out how to make the LEDs blink along with the heart rate and the sensor’s status. In general, it was a painful process to read and write the codes.

One of the biggest success I think is when Leon praised my heart rate sensor status indicator. I added this LED the night before presentation just to make it blink when the heart rate sensor is detecting heartbeat, so that it can tell the user whether the sensor is actually working properly when they use it. Previous user test of that creepy dog has taught me that feedback is one of the most important aspects in an interactive design, and Leon’s praise proved that!

  • Conclusions

“Simple inputs, sophisticated processing, and wonderful outputs, with the idea of human-centric”, my definition of interaction is well represented by Duet Beat. It was a generally successful project because it allows us to compose our own music easily even when we don’t have much training in music. Every human being can use it to make wonderful music as long as that human has a beating heart and has some body part that can move. Most people with disabilities can also use our device just as well as we do. I was so glad to see the whole class applauded when my partner Like started to play with it. With the some simple body movements and a heart beat reading, everyone can compose their own music even more easily than Garageband. We successfully let people create new stuff with minimum barriers.

Duet Beat also has some room for improvement. For example, if we had more time, we should rent a more accurate distance sensor, or we can laser cut a new box that can better contain all of our components (this one can’t hold all the wires), or we can invite people with disabilities to actually test it so that we can make some adaptions for them. The biggest takeaway I learned from this process is that: think more before you start. The reason why our head-shaking dog failed is that we did not expect so many difficulties – we started building it even without any sketch or analyzing. I now know that before we start, we have to actually analyze, for example, what’s applicable and what’s not, and make a detailed plan of each step we have to take.

Week 7: LED Experiments – Tiger Tian

Title  20 – Sound Visualization

Presentation Date  03/19/2019

Rationale  Since the requirement was to compose a one-minute piece of narrative with this analog LED strip, I thought that music would be the easiest the way to create an atmosphere and build a mood for the audience. Therefore I used a piece of music (called “20”) that I composed with GarageBand earlier this year, cut out a one-minute snippet and wrote the LED composition according to how the music evolved.

Project Video

Documentation  Below is a video of me playing with the strip before actually starting composing. Given that there’s only three values to change to control the entire strip – r, g, and b – it’s basically the same thing as controlling an RGB LED, the only difference being that the strip would require a larger voltage and thus an external power source.

One friend told me that the music sounded like wandering in a forest, so I used green as the theme color and based most color transitions on green. The biggest challenge in composing was to make several values change at the same time but at different speeds that don’t interfere with each other, which would be almost impossible with the appearance of delay function in the code. Even though I didn’t get rid of delay function in the end, I learnt to do it by using millis function instead.

This is what the circuit looked like.


The feedback I received for this assignment included compliments on how well the music and the composition matched, and that the transitions in the composition were smooth. Nevertheless, some suggested I give it a more concrete theme, such as wandering in universe, and a better physical setting to contain it.


Title  Marine Creature

Partner  Rosie Gao

Presentation Date   03/28/2019

Rationale  When we were discussing the theme of this project, we decided to use another piece of music that I composed, which made us think of the ocean. Thus we decided blue be the main color, and that we would create an underwater effect with the two digital LED strips that we have for the assignment.

Project Video   Video

Documentation  For this assignment, we put more effort into the physical setting than I did for the last assignment. We found a cardboard box whose size approximately fitted what we wanted, so we used a spray print to make it blue. We ordered reflective materials online for wrapping.

When we started writing the code, we realized that it was a little more complicated than analog LED strip, as we are able to control each of the LED’s separately. Though the FastLED library is not difficult to use, weird problems occurred and it took us a lot of time to debug. Eventually we decided to each write a version of code and then put them together. Because both of us used the music to time our composition, our compositions would easily match. My favorite part of the composition is when my strip starts to blink to the drum beat, Rosie’s strip displays fire-like patterns.

In terms of the physical part, we hid most of the circuit in the box, letting the wires out through a hole we cut. We wrapped the strips in a transparent pipe that we made by rolling a piece of plastic paper we bought, and put another piece of reflective paper on the box. Together with the reflective and refractive materials, the strips looked more colorful while still featuring blue as the theme color.

Source code of both assignments on Github

Shake to Quake – Jonathan Lin – Young Chung

My group project helped me to understand that people needed to understand your project just by looking at it. The key to a successful product is the ability for your audience to understand it immediately. Take for example the water bottle, the structure of it instantly tells the audience it is meant to hold some sort of liquid. It’s sole opening at the top limits the imagination of the audience to what it can do. The group project was different because it was something in the future, but this time we were building something that could be used. For our research, we looked at how earthquakes worked. Earthquakes vary on a scale, which determines the damage an earthquake can inflict. Some buildings are more resistant to the damage from an earthquake so we built all these interactions into our product. Depending on how quickly the user shook our city, that would determine the rate at which the towers fell. The towers would also always fall in order because the towers at the end are just more resistant than the towers prior.

We knew our name had to be not only catchy but also understandable. Therefore, our title “Shake to Quake” were all keywords to signify what our project was. We also added the city layouts on top of the box and included instructions on the front of the box. We really tried our best to avoid a norman door situation. Our materials were pretty limited so the only differentiating part of our project was our sensor. At first, we were thinking of using a gravity sensor, which would detect the movement relative to the gravitational pull. Looking back, the code for the gravity sensor would have not only been harder, but the way it would detect the earthquake would be worse too. Gravity Sensors detect vertical movement better when in reality, an earthquake has horizontal movement. Thankfully, the back did not have gravity sensors, so we went with a much better choice: an accelerometer. We then used the data from the accelerometer and put that into a formula which then gave the vector as the output. The vector was then used as the threshold to determine whether a tower fell or not.

One of our biggest struggles was the 3D printing because when we tried to print out our city, the printer broke. Therefore, we only had time to use one city for the user testing day, but that did not really affect our feedback. We got tons of great feedback during the testing, most of which we acted upon. One of the IMA fellows gave us this great idea to have the lights on before the game started to signify electricity, and as the earthquake took place the lights would slowly turn off to signify the loss of power. This also aided in our second problem where we lacked a countdown for the game to start. Originally, the goal was to light up the 5 lights, but changing it to turning off the 5 lights made it clearer. We also added a quick fade to each light when the reset/start button was pressed to further emphasize the game restarting and ready for use again. All this feedback definitely helped us to successfully demo our project during class because now everyone knew they had to Shake to Quake!

Our idea was an Earthquake simulator, and I believe that we successfully created just that. Not only was our project meant to be a fun multiplayer game, but also to show a side of realism. Earthquakes are frequent and they do not need to be that powerful to cause major damage. Take for example our game, some people would shake quite slowly, but even that would be enough to topple the great towers in our city. Our goal was always a fun game, but spreading awareness was also a side thought. I believe that is just natural if you make a disaster simulator people will learn how it works and the damage it can cause.  Our project was definitely interactive to because not only were you able to compete against someone else, but your actions determined the rate at which the towers fell. I believed it would have been cool if we added a timer to our project because then we could have seen all the varying times it took for different people to decimate the city. Having people lose and wanting to rematch was always a fun sight to see because it showed us that people were having fun. If we had more time, data screens would have definitely been added. We could have hooked up screens and displayed all sorts of data like how quickly you were able to shake the city, how fast your shaking would translate on the Richter scale, and also maybe some high scores to entice people to play again. We learned preparation is key because sometimes printers fail, and you need to find another way. I have definitely learned that saying all your ideas is important because I thought it was silly when my last idea was an Earthquake simulator. Looking at the finished product though, it is a really awesome idea and I am happy and proud of the work my group put into it.