Midterm Project: Consuming Life by Isabel Brack and Christina Bowllan
Context and Significance
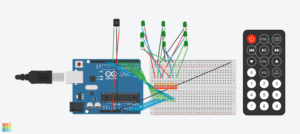
We first met to discuss or project concept the week before the testing day for recitation, that day we accumulated our own personal research and brainstormed project ideas. I presented the two main concepts we had discussed either an interactive game involving memory or whack-a-mole style games and in far contrast interactive art pieces mostly sourced from social art exhibits focusing around a comment on society like surveillance. I looked at probably 50+ examples of Arduino art to see different media mixing that artists used including looking at Arduino’s art page and many Arduino art Youtube videos like this. Although many projects were not the social statement we wanted to make, they gave us ideas on how to mix Arduino and art. The most inspirational art installation I found, personally, was a European installation of many plastic bags that would inflate and deflate based on a person’s movement, representing a creature’s movement and breath called “One Hundred and Eight.” This project had multifaceted interactions, including the physical interaction of the audience and the piece responding to each other’s movements, input, processing, and output. It also included an important interaction component for art pieces, an engagement with art where the audience engages with the art as a conceptual piece, interpreting its significance and meaning. I also took influence from my group project as we focused on a more practical, problem solving device, I wanted to expand my project’s conception to focus on an experience and interaction for the audience rather than just the object by itself. Our group project originally focused on the object itself and its components, sensors, and problem solving, rather than the larger goal of the experience our smart kitchen and alfa watch were creating. That project focused on a basic definition of interaction to only include the person and the machine/device. It had straight forward sensory inputs, processing, and then straight forward outputs of food/cooking the food. For me, art and a greater message seemed like a good way to create an overall experience that involved many aspects to the interaction. “Consuming Life” as an art project involved the simple interaction of pressing a few buttons and observing their effects on the human system including lungs and heart, but the interaction also included an aspect of thinking and interpretation of the art, which I consider to be a vital piece of the interaction. This is similar too the interactive art exhibit we visited this weekend. The audience needed to consider the physical interaction of the art piece and its greater meaning in the context of society and human life, which was part of the intended interaction and experience. With “Consuming Life,” the interaction initiated when the audience began thinking about how to interact with the piece, touching different elements, and the main interactions began when the audience touched the price tag and the “try me” button which represented the first steps of consumption. Our idea of interaction included interpreting and understanding of the entire piece even after the audience was done pressing each button. For the games we originally considered making, I found examples like a light memory game and wack-a-mole, personally after seeing these examples I preferred the art choice both because of the creativity and message that accompanies interactive art, and the fact that many of these games had been created many times and already had complete sample code. A personal goal of mine was to write the code basically from scratch to learn how to really use Arduino. So although throughout the project I looked at many sample codes to see different strategies and codes which would move DC motors and blink the lights in the fashion we wanted, most of the code I wrote without copying from any one source. The code was still influenced by many readings and other codes I read through regarding Bullion statements specifically, pullup resistors, and toggle. The circuit was also mostly based on the DC motor circuit we built in class with an H-bridge only adding a button and three red LEDS with their own button(see code at bottom of blog post).
Conception and Design

Sketch 1 Sketch 2 Sketch 3
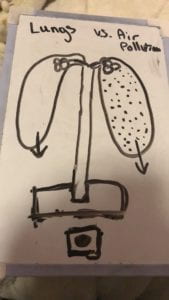
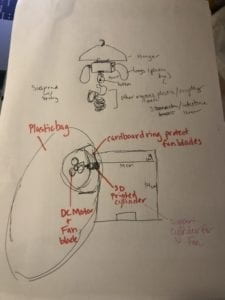
Our first idea for this art project was a lung model showing the effects of air pollution on the human lungs (sketch 1). Our original fully realized design for “Consuming Life” was an entire human organ system that used working lungs, a blinking heart, and light up organs like the stomach, all created from plastic waste(sketch 2). We were going to articulate our message of consumption taking over human life and action, through the waste products consumption created. We used 2D laser cutting for the box to hide the Arduino and breadboard and 3D printing to create the heart and some mechanical pieces like hooks to hold the box on the hanger, and two cylinders that fit into the holes of the 2D laser cut box to support the two DC motor fans, which controlled the lungs. The heart we sourced from an open source anatomical model and modified it to have a whole through it for the button and wiring, and the mechanical pieces we printed we designed ourselves with aid from Linda and Andy (Image 1). The 2D box we also designed ourselves. Besides the 2 and 3D materials we used recycling to make the lungs, price tag, and product box for the heart, which we chose as it fit our theme of consumption and the control it has on humans and the waste it creates. The box we used for the heart, actually used to be a tox product container, so we only made a few alterations to strengthen the structural integrity and cut holes for the wiring and “try me” button. We thought about many different buttons and sensors, but we ultimately choose the arcade buttons because we could integrate their use while connecting it to the meaning. We could articulate through the price tag button that the beginning of the consumption process, looking at the price tag case the human to rely and be fueled by consumption. We could not convey that same message with other sensors like ultrasonic or infrared, which would have been more interactive. Regarding our expected outcome of the audience interacting with our creation, the user testing session was extremely helpful to determine what was unclear about our how to us it, specifically making the buttons more understandable and connected to the concept, consumerism engulfing and consuming humans’ lives, controlling every aspect of their existence, demonstrated most fundamentally by the toy and consumption of it controlling the human’s lungs and heart. During the testing session, we observed and were told that they knew to press the button because they were familiar with buttons, not because their intuition was to touch the button. As a result, we altered our connection between the inputs and the rest of our art piece. We added a second button that was more intuitive made with cardboard, tinfoil, and two wires to create a price tag button that with minimal pressure will turn the lungs on. We also transformed the button inside the heart into a “try me” button like the ones often seen on kids toys to give the button purpose and reason. After user testing, I again tried a bunch of sensor out including a piezo disk, pressure pad, arcade button, and finally settled for our own price tag button (Video 1) because conceptually it fit our theme and intended interaction the best.
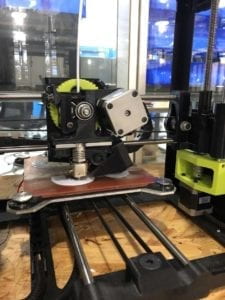
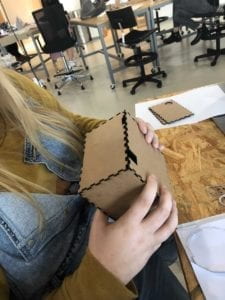
 Image 1
Image 1: 3D printing of the different parts like hooks, washers, and cylinders to hold the fans in place and hang the box on the hanger.
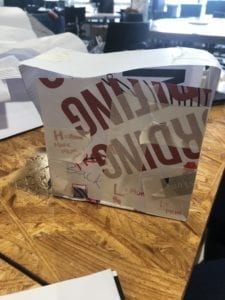
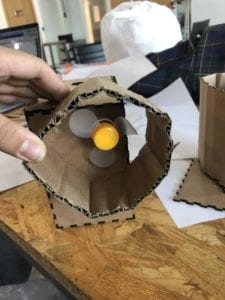
Image 2
Image 2: The paper prototype that is the same detentions of our final 2D laser cut box.
Video 1: The construction and testing of the price tag button with sample code on a digital serial monitor.
Fabrication and Production
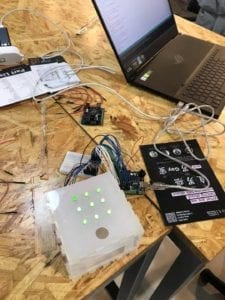
The design process, a paper prototype (Image 2), user testing prototype(video 2), and final art piece( video 3&4) all went through drastic changes from idea conception to the final product. Our first design was just a set of lungs that was controlled by a button to show the effect of air pollution on the human system, it acted more like a model than a piece of art. As we continued to create our prototype and discuss with the class our ideas, we learned that something hanging and eye level would be more effective in giving our project a human form, like the art exhibit we looked at commenting on surveillance, using belts to represent humans. Our instructor suggest using a hanger to demonstrate the human silhouette while keeping in as a more abstract art piece. Which we eventually suspended our project from a chair in the user testing and then from a string in the final presentation. This perspective gave it an art and human quality that was distinctive compared to sitting on a table which would hit it more of a model feel. We created a completely working project for the user testing, and from the participants we learned we needed to strengthen the message and purpose of our piece, specifically making our statement about consumerism more clear, and from a consultation with Marcela, she suggested we turn the heart into a physical product to represent consumerism. After the sessions, we took the entire project apart and created a new button, by making the price tag. We also turned the heart into a product by packaging it and adding a try me button and lights to eliminate the packaging. During the test session we got feedback mostly around the concept being confusing to understand as the lungs worked but much of the project was taped together and a lot of the mechanics of the box and hanging mechanism were exposed and confusing(Image 2). Based on this feedback we hid the mechanics and 2D laser cut box behind the toy heart box. We also eliminated the temporary adhesives like we initially planned to and glued the 2D box, the heart, and the toy heart box to each other to make the look more finalized, as you can see comparing image 2, the user tester version to image 3, the final project. Our greatest setback was the morning of the user testing, while Christina and I set up the project to test it before we started, some of the wires in the box came undone without our knowledge (as the box covered all the arduino and wires). As a result of the loose wires, when we powered up the 12 V power source my Arduino board got fried. After noticing this we rewired the entire circuit to a new Arduino and checked the wires, with the help of Marcela. After the board was rewired and the connections were double checked, along with replacing the H-bridge, the project function how it was supposed to, but we had to disconnect the LEDs for the user testing because there was not enough time to rewire and check them before it began. The greatest changes in our project came after our class discussion of projects and after the user testing. Both times we altered the concept and the design of the project entirely. As a result our concept and project improved greatly from the design phase to the final project. While Christina focused on 3D printing and the physical construction of the lungs, I focused on the 2D laser cutting design, the code, and the circuit. And together we designed the piece conceptually and assembled the piece together. One other issue I ran into with the code for this project was I used two different bullion statements to control each button and its corresponding function, but in Arduino, the code is used sequentially so only one button could be pressed at a time, which could be confusing for the audience, in hindsight maybe two Arduino boards each controlling one function would have helped the interaction. For the code and circuit, although I wrote and made my own I took inspiration from DC motor circuit and code ,DC motors controlled by potentiometers, and two way DC motor (our final code is pasted at the bottom of the blog post). Although in reality the circuit and code to inspiration from each combine into a new different code that included two bullion statements, input_pullup functions, and toggle which I learned in external research about how to use buttons to control different loads.
Video 2: The working prototype for the user testing session.
Video 3
Video 4
Video 3&4: The working Final Project breathing (3) and lights (4).
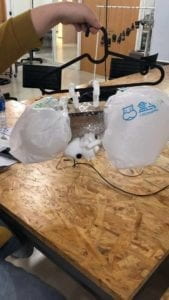
Image 2: User testing prototype
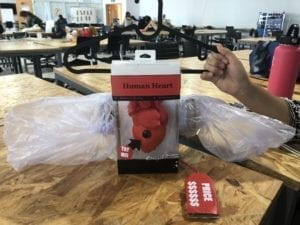
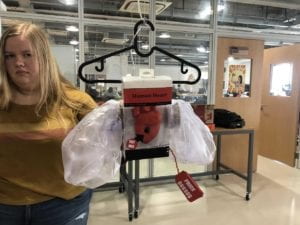
Image 3: Final product “Consuming Life”
Conclusion
Goals
Our Arduino and circuit art piece, “Consuming Life” aligned with my abstract understanding of integration. The project had physical interaction between two actors, the audience was required to press a button as an input, processing and output occured on the form of breathing or red blinking lights, and the audience was also required to think about the experience, interpreting the art and meaning. The final aspect of our interaction is what I believe is the most significant. But, our project in some ways can lend itself more to a reactionary project, having the audience press some buttons and then observe the results rather than continue to physically interact with it. In reality, the audience had a difficult time thinking past the physical object and only after a few students and instructors explained the concept did all the student understand the greater meaning and greater interaction. The interaction that took place between the project and the audience was similar to our expectations, they pressed the buttons and touched the lungs while they inflated to feel the breaths in and out. Some of the audience seemed to contemplate and engage with the project more than others as they closely observed the different details to the piece including our labels and the movements and connection between the price tag and the directions. If we had more time, I would have liked to have more aspects to the toy heart, like a heartbeat along with the red blinking to make the toy “try me” button more realistic. My main accomplishment and take away from this project was learning how to create my own code on Arduino based on learning the basic skills of bullion statements, blinking LEDs, and reversing motors. Also, I learned how to research many different codes, projects, and circuits, interpret them, and take inspiration to use on my own projects. In addition, I think we fine tuned our creative process learning to value all of the resources the IMA program has in the fabrication lab and with the professors and fellows. I learned a lot about the process of these interactive projects, prototyping in paper and cardboard then creating a working version and trouble-shooting and debugging code, and the physical mechanics of the process. We especially had setbacks and learning moments while trying to get the lungs to breath noticeably. First we tried the fans in our arduino kits with plastic shopping bags, but the fans were not powerful enough and the bags were not as air tight and thick. Later, we settled on thing trash bags and super glue to ensure a tight fit, and thick plastic fans to increase the power of the fans. Once the lungs were air tight, I could better control the air movement and reverse the motors to create and inhale effect, making a more noticeable and realistic lung movement. In making this project there were two components that gave us, the creators, and the audience distinct value. First, discussing the social concern of consumption and the role consuming plays in every human’s life along with the control it exerts over our very existence. And, as creators of the project the district value I found was following a project through from the brainstorming and design, to testing, reworking, trouble shooting, and finalizing. As a process it was the definition of experiential learning, teaching yourself to trouble shoot multiple aspects like coding, circuits, and the physical mechanics of the project. I especially remember all the trials and tribulations we faced to get the lungs air tight so that the motor could control both the exhale and inhale. Once we used the super glue and got the lungs to actually resemble human breath patterns, it felt like a real accomplishment, no matter how small a step it actually was, especially because we used trial and error for an hour or two to get our desired result. Between each design step we reworked our idea almost completely, to find the best final product we could based on our current skill level and time limit. From start to finish the project transformed resembling three conceptually and mechanically different designs each time. The process eventually lead us to our final result of “Consuming Life.”
Broader Conclusion
We created this project with a larger theme and goal in mind, not just the demonstration of lungs inhaling and exhaling and a toy turning on. Our goal was to make the audience think about humans’ relationship with consumption and plastic in their everyday life and possibly their own life. The initial consideration of a product’s price or function (the “try me”button) constitutes the first step of consumption, which in the modern era in inseparable from human life. As it is practically impossible to be self sufficient today, everyone is dependent on purchasing necessities, whether it be food and water or a toy anatomical heart. However, most of society does not think about their relationship with consumption and the environmental and societal effects it has let alone thinking of them self as a constant consumer. “Consuming Life” aims to demonstrate the inseparable bond between consumption and human life, suggesting a dependence on consumption to breathe and live. The greater meaning, experience, and interpretation, to me, is what I consider the “so what factor” to our project. Regarding the process of creating the process, this experience was helpful in improving my design process and execution, seeing the project through from research, brainstorming, sketching, designing, prototyping, building, testing, reworking, and finalizing.
Code:
int motor1pin = 6;
int motor2pin = 7;
// h bridge pin
int ButtonState = false;
int ButtonState2 = false;
int Button = 2;
int Button2= 4;
int red1= 8;
int red2= 9;
int red3= 10;
boolean toggle = true;
void setup() {
pinMode(motor1pin, OUTPUT);
pinMode (motor2pin, OUTPUT);
pinMode(red1, OUTPUT);
pinMode(red2, OUTPUT);
pinMode(red3, OUTPUT);
pinMode(Button, INPUT_PULLUP);
pinMode(Button2, INPUT_PULLUP);
}
void loop() {
int ButtonState = digitalRead(Button);
if (ButtonState == LOW)
{
if(toggle)
{
digitalWrite(motor1pin, HIGH); // motor turns on
digitalWrite(motor2pin, LOW);
delay (4000);
digitalWrite(motor1pin, LOW); // motor turns on
digitalWrite(motor2pin, LOW);
delay (100);
digitalWrite(motor1pin, LOW);
digitalWrite(motor2pin, HIGH);
delay (3000);
digitalWrite(motor1pin, HIGH);
digitalWrite(motor2pin, LOW);// motor and Redled turn off after 3 seconds after blinking finishes
delay (4000);
toggle = !toggle;
digitalWrite(motor1pin, LOW); // motor turns on
digitalWrite(motor2pin, LOW);
delay (100);
digitalWrite(motor1pin, LOW);
digitalWrite(motor2pin, HIGH);
delay (3000);
digitalWrite(motor1pin, HIGH);
digitalWrite(motor2pin, LOW);// motor and Redled turn off after 3 seconds after blinking finishes
delay (4000);
digitalWrite(motor1pin, LOW); // motor turns on
digitalWrite(motor2pin, LOW);
delay (3000);
digitalWrite(motor1pin, LOW);
digitalWrite(motor2pin, HIGH);
// motor and Redled turn off after 3 seconds after blinking finishes
delay (4000);
digitalWrite(motor1pin, LOW);
digitalWrite(motor2pin, LOW);
delay (13000);
}
else
{
digitalWrite(motor1pin, LOW);
digitalWrite(motor2pin, LOW);/// motor turns off
toggle = !toggle;
}
}
int ButtonState2 = digitalRead(Button2);
if (ButtonState2 == LOW)
{
if(toggle)
{
digitalWrite(red1, HIGH); // turn the LED on (HIGH is the voltage level)
digitalWrite(red2, HIGH);
digitalWrite(red3, HIGH);
delay(1000); // wait for a second
digitalWrite(red1, LOW); // turn the LED off by making the voltage LOW
digitalWrite(red2, LOW);
digitalWrite(red3, LOW);
delay(1000);
digitalWrite(red1, HIGH); // turn the LED on (HIGH is the voltage level)
digitalWrite(red2, HIGH);
digitalWrite(red3, HIGH);
delay(1000); // wait for a second
digitalWrite(red1, LOW); // turn the LED off by making the voltage LOW
digitalWrite(red2, LOW);
digitalWrite(red3, LOW);
delay(1000);
digitalWrite(red1, HIGH); // turn the LED on (HIGH is the voltage level)
digitalWrite(red2, HIGH);
digitalWrite(red3, HIGH);
delay(1000); // wait for a second
digitalWrite(red1, LOW); // turn the LED off by making the voltage LOW
digitalWrite(red2, LOW);
digitalWrite(red3, LOW);
delay(1000);
digitalWrite(red1, HIGH); // turn the LED on (HIGH is the voltage level)
digitalWrite(red2, HIGH);
digitalWrite(red3, HIGH);
delay(1000); // wait for a second
digitalWrite(red1, LOW); // turn the LED off by making the voltage LOW
digitalWrite(red2, LOW);
digitalWrite(red3, LOW);
toggle = !toggle;
}
else
{
digitalWrite(red1, LOW);
digitalWrite(red2, LOW);/// motor turns off
digitalWrite(red3, LOW);
toggle = !toggle;
}
}
}