Recitation 8: Serial Communication by Eric Shen

Exercise 1: Make a Processing Etch A Sketch

(1) In the first part of Exercise 1, we were tasked with building a circuit with two potentiometers and write an Arduino sketch that reads their values and sends them serially. Then write a Processing sketch that draws an ellipse and reads those two analog values from Arduino.

It’s not difficult to do the first part of Exercise 1, the only thing that we need to be careful with is to use the map() function in order to transform the serial value to analog value. And in this case, the map function is not like what it used to be in the class. For the purpose of making the ellipse moving inside the canvas, I think we need to transform the range from 0-1023 to 0-500. 

The code for the Arduino part: 

// IMA NYU Shanghai
// Interaction Lab
// For sending multiple values from Arduino to Processing

void setup() {
Serial.begin(9600);
}

void loop() {
int sensor1 = analogRead(A0);
int sensor2 = analogRead(A1);

// keep this format
Serial.print(sensor1);
Serial.print(“,”); // put comma between sensor values
Serial.print(sensor2);
Serial.println(); // add linefeed after sending the last sensor value

// too fast communication might cause some latency in Processing
// this delay resolves the issue.
delay(100);
}

The code for the Processing part: 

import processing.serial.*;

String myString = null;
Serial myPort;


int NUM_OF_VALUES = 2;   /** YOU MUST CHANGE THIS ACCORDING TO YOUR PROJECT **/
int[] sensorValues;      /** this array stores values from Arduino **/


void setup() {
  size(500, 500);
  background(0);
  setupSerial();
}


void draw() {
  background(0);
  
  updateSerial();
  float x = map(sensorValues[0], 0, 1023, 0, width);
   float y = map(sensorValues[1], 0, 1023, 0, height);
  printArray(sensorValues);
  ellipse(x,y,100,100);
  // use the values like this!
  // sensorValues[0] 

  // add your code

  //
}


void setupSerial() {
  printArray(Serial.list());
  myPort = new Serial(this, Serial.list()[5 ], 9600);
  // WARNING!
  // You will definitely get an error here.
  // Change the PORT_INDEX to 0 and try running it again.
  // And then, check the list of the ports,
  // find the port "/dev/cu.usbmodem----" or "/dev/tty.usbmodem----" 
  // and replace PORT_INDEX above with the index number of the port.

  myPort.clear();
  // Throw out the first reading,
  // in case we started reading in the middle of a string from the sender.
  myString = myPort.readStringUntil( 10 );  // 10 = '\n'  Linefeed in ASCII
  myString = null;

  sensorValues = new int[NUM_OF_VALUES];
}


void updateSerial() {
  while (myPort.available() > 0) {
    myString = myPort.readStringUntil( 10 ); // 10 = '\n'  Linefeed in ASCII
    if (myString != null) {
      String[] serialInArray = split(trim(myString), ",");
      if (serialInArray.length == NUM_OF_VALUES) {
        for (int i=0; i<serialInArray.length; i++) {
          sensorValues[i] = int(serialInArray[i]);
        }
      }
    }
  }
}

(2) In the second part of Exercise 1,  we need to replace the ellipse with a line, making some adjustment on the first part of Exercise 1. 

At first, I thought I came up with the solution to the second part which is to add another two variables as the previous x position and the previous y position before the line “updateSerial();” . Yet the line drew by Processing sometimes would disappear,  the line is not continuous. Then I found that the problem was that I drew the background in “void draw();”. 

The second problem that I met with was that it’s not a continuous line that I drew. It is some identical lines whose positions are constantly changing. Then, I asked a fellow for help, then we found out that I forgot to use the map function for the two new variables. 

The code for the Arduino part is the same as that of the first part of Exercise 1. 

The code for the Processing: 

import processing.serial.*;

String myString = null;
Serial myPort;


int NUM_OF_VALUES = 2;   /** YOU MUST CHANGE THIS ACCORDING TO YOUR PROJECT **/
int[] sensorValues;      /** this array stores values from Arduino **/


void setup() {
  size(500, 500);
  background(0);
  setupSerial();
}


void draw() {
 
  
  float pX = map(sensorValues[0], 0, 1023, 0, width);
  float pY = map(sensorValues[1], 0, 1023, 0, width);
  updateSerial();
  float x = map(sensorValues[0], 0, 1023, 0, width);
  float y = map(sensorValues[1], 0, 1023, 0, height);
  printArray(sensorValues);
  stroke(255);
  line(pX,pY,x,y);
 
  // use the values like this!
  // sensorValues[0] 

  // add your code

  //
}


void setupSerial() {
  printArray(Serial.list());
  myPort = new Serial(this, Serial.list()[5 ], 9600);
  // WARNING!
  // You will definitely get an error here.
  // Change the PORT_INDEX to 0 and try running it again.
  // And then, check the list of the ports,
  // find the port "/dev/cu.usbmodem----" or "/dev/tty.usbmodem----" 
  // and replace PORT_INDEX above with the index number of the port.

  myPort.clear();
  // Throw out the first reading,
  // in case we started reading in the middle of a string from the sender.
  myString = myPort.readStringUntil( 10 );  // 10 = '\n'  Linefeed in ASCII
  myString = null;

  sensorValues = new int[NUM_OF_VALUES];
}


void updateSerial() {
  while (myPort.available() > 0) {
    myString = myPort.readStringUntil( 10 ); // 10 = '\n'  Linefeed in ASCII
    if (myString != null) {
      String[] serialInArray = split(trim(myString), ",");
      if (serialInArray.length == NUM_OF_VALUES) {
        for (int i=0; i<serialInArray.length; i++) {
          sensorValues[i] = int(serialInArray[i]);
        }
      }
    }
  }
}

Exercise 2: Make a musical instrument with Arduino

The frequency of the tone is controlled by the x position of the mouse, and the  tone will be played only when the mouse is pressed

The code for Arduino

[code] #define NUM_OF_VALUES 2 /** YOU MUST CHANGE THIS ACCORDING TO YOUR PROJECT **/

/** DO NOT REMOVE THESE **/
int tempValue = 0;
int valueIndex = 0;

/* This is the array of values storing the data from Processing. */
int values[NUM_OF_VALUES];

void setup() {
Serial.begin(9600);
pinMode(13, OUTPUT);
pinMode(9, OUTPUT);
}

void loop() {
getSerialData();

// add your code here
// use elements in the values array
// values[0] // values[1]

if (values[2] == 1) {
tone(9, values[0]);
} else {
noTone(9);
}

}

//recieve serial data from Processing
void getSerialData() {
if (Serial.available()) {
char c = Serial.read();
//switch – case checks the value of the variable in the switch function
//in this case, the char c, then runs one of the cases that fit the value of the variable
//for more information, visit the reference page: https://www.arduino.cc/en/Reference/SwitchCase
switch (c) {
//if the char c from Processing is a number between 0 and 9
case ‘0’…’9′:
//save the value of char c to tempValue
//but simultaneously rearrange the existing values saved in tempValue
//for the digits received through char c to remain coherent
//if this does not make sense and would like to know more, send an email to me!
tempValue = tempValue * 10 + c – ‘0’;
break;
//if the char c from Processing is a comma
//indicating that the following values of char c is for the next element in the values array
case ‘,’:
values[valueIndex] = tempValue;
//reset tempValue value
tempValue = 0;
//increment valuesIndex by 1
valueIndex++;
break;
//if the char c from Processing is character ‘n’
//which signals that it is the end of data
case ‘n’:
//save the tempValue
//this will b the last element in the values array
values[valueIndex] = tempValue;
//reset tempValue and valueIndex values
//to clear out the values array for the next round of readings from Processing
tempValue = 0;
valueIndex = 0;
break;
//if the char c from Processing is character ‘e’
//it is signalling for the Arduino to send Processing the elements saved in the values array
//this case is triggered and processed by the echoSerialData function in the Processing sketch
case ‘e’: // to echo
for (int i = 0; i < NUM_OF_VALUES; i++) {
Serial.print(values[i]);
if (i < NUM_OF_VALUES – 1) {
Serial.print(‘,’);
}
else {
Serial.println();
}
}
break;
}
}
}
[/code]

Code for Processing: 

import processing.serial.*;

int NUM_OF_VALUES = 3;  /** YOU MUST CHANGE THIS ACCORDING TO YOUR PROJECT **/


Serial myPort;
String myString;

// This is the array of values you might want to send to Arduino.
int values[] = new int[NUM_OF_VALUES];

void setup() {
  size(500, 500);
  background(0);

  printArray(Serial.list());
  myPort = new Serial(this, Serial.list()[4 ], 9600);
  // check the list of the ports,
  // find the port "/dev/cu.usbmodem----" or "/dev/tty.usbmodem----" 
  // and replace PORT_INDEX above with the index of the port

  myPort.clear();
  // Throw out the first reading,
  // in case we started reading in the middle of a string from the sender.
  myString = myPort.readStringUntil( 10 );  // 10 = '\n'  Linefeed in ASCII
  myString = null;
}


void draw() {
  background(0);

  // changes the values
  for (int i=0; i<values.length; i++) {
    values[0] = mouseX; 

   /** Feel free to change this!! **/
  }
if(mousePressed) {
  values[2]= 1;
} else {
  values[2] = 0;
}
  // sends the values to Arduino.
  sendSerialData();

  // This causess the communication to become slow and unstable.
  // You might want to comment this out when everything is ready.
  // The parameter 200 is the frequency of echoing. 
  // The higher this number, the slower the program will be
  // but the higher this number, the more stable it will be.
  echoSerialData(200);
}

void sendSerialData() {
  String data = "";
  for (int i=0; i<values.length; i++) {
    data += values[i];
    //if i is less than the index number of the last element in the values array
    if (i < values.length-1) {
      data += ","; // add splitter character "," between each values element
    } 
    //if it is the last element in the values array
    else {
      data += "n"; // add the end of data character "n"
    }
  }
  //write to Arduino
  myPort.write(data);
}


void echoSerialData(int frequency) {
  //write character 'e' at the given frequency
  //to request Arduino to send back the values array
  if (frameCount % frequency == 0) myPort.write('e');

  String incomingBytes = "";
  while (myPort.available() > 0) {
    //add on all the characters received from the Arduino to the incomingBytes string
    incomingBytes += char(myPort.read());
  }
  //print what Arduino sent back to Processing
  print( incomingBytes );
}

Recitation 8: Serial Communication by ChangZhen from Inmi’s Session

What’s directly sent is always string. Copy and paste the example code, fill numbers of pin, port, and such in it, and add the task we want. Never try to understand what each line means.

Ex 1

Input from Arduino and output to Processing. Draw ellipse according to Arduino potential meter readings.

Arduino:

void setup() {
Serial.begin(9600);

}

void loop() {
int sensor1 = analogRead(A0);
int sensor2 = analogRead(A1);
Serial.print(sensor1);
Serial.print(“,”);
Serial.println(sensor2);
}

Processing:

import processing.serial.*;

String myString = null;
Serial myPort; // utilize the library onto myPort

int NUM_OF_VALUES = 2;
int[] sensorValues;

void setup() {
size(512, 512);
background(255);
setupSerial();
}

void draw() {
updateSerial();
printArray(sensorValues);
background(255);
ellipse(width/2,height/2,sensorValues[0]/2,sensorValues[1]/2);
}

void setupSerial() {
printArray(Serial.list());
myPort = new Serial(this, Serial.list()[3], 9600); // myPort is specified to be linked to port 3 USB, but what does “this” mean?
/*myPort.clear(); // mean?
myString = myPort.readStringUntil( 10 ); // 10 = ‘\n’ in ASCII meaning new line
myString = null;*/
sensorValues = new int[NUM_OF_VALUES]; // sensorValues[] contains two num
}

void updateSerial() {
while (myPort.available() > 0) { // mean by “available”?
myString = myPort.readStringUntil(10);
if (myString != null) { // why possibly null?
String[] serialInArray = split(trim(myString), “,”); // split string “trim(myString)” to element in array serialInArray[] when it meets “,”; trim(myString)removes whitespace characters from the beginning and end of a string
if (serialInArray.length == NUM_OF_VALUES) { // length is num of elements
for (int i=0; i<serialInArray.length; i++) {
sensorValues[i] = int(serialInArray[i]); // store value from string as int
}
}
}
}
}

Ex 2

Input from Arduino and output to Processing. Etch A Sketch.

Arduino: the same.

Processing:

import processing.serial.*;

String myString = null;
Serial myPort;

int NUM_OF_VALUES = 2;
int[] sensorValues;

void setup() {
size(512, 512);
background(255);
setupSerial();
updateSerial();
}

void draw() {
int pX = sensorValues[0]; // put before updateSerial to store previous 
int pY = sensorValues[1];
updateSerial();
printArray(sensorValues);
line(pX/2,pY/2,sensorValues[0]/2,sensorValues[1]/2);
if(mousePressed) {background(255);}
}

void setupSerial() {
printArray(Serial.list());
myPort = new Serial(this, Serial.list()[3], 9600);
myPort.clear();
myString = myPort.readStringUntil( 10 ); // 10 = ‘\n’ Linefeed in ASCII
myString = null;
sensorValues = new int[NUM_OF_VALUES];
}

void updateSerial() {
while (myPort.available() > 0) {
myString = myPort.readStringUntil(10); // ASCII 10 meaning new line
if (myString != null) {
String[] serialInArray = split(trim(myString), “,”);
if (serialInArray.length == NUM_OF_VALUES) {
for (int i=0; i<serialInArray.length; i++) {
sensorValues[i] = int(serialInArray[i]);
}
}
}
}
}

Ex 3

Input from Processing and output to Arduino. Arduino makes sound whose pitch depends on the coordinates in Processing. Only green texts are changed from the example code.

Arduino:

#define NUM_OF_VALUES 2 /** YOU MUST CHANGE THIS ACCORDING TO YOUR PROJECT **/

int tempValue = 0;
int valueIndex = 0;

/* This is the array of values storing the data from Processing. */
int values[NUM_OF_VALUES];

void setup() {
Serial.begin(9600);
pinMode(A2, OUTPUT);
}

void loop() {
getSerialData();
int pitch = values[0]+values[1];
tone(A2,pitch);
}

//recieve serial data from Processing
void getSerialData() {
if (Serial.available()) {
char c = Serial.read();
//switch – case checks the value of the variable in the switch function
//in this case, the char c, then runs one of the cases that fit the value of the variable
//for more information, visit the reference page: https://www.arduino.cc/en/Reference/SwitchCase
switch (c) {
//if the char c from Processing is a number between 0 and 9
case ‘0’…’9′:
//save the value of char c to tempValue
//but simultaneously rearrange the existing values saved in tempValue
//for the digits received through char c to remain coherent
//if this does not make sense and would like to know more, send an email to me!
tempValue = tempValue * 10 + c – ‘0’;
break;
//if the char c from Processing is a comma
//indicating that the following values of char c is for the next element in the values array
case ‘,’:
values[valueIndex] = tempValue;
//reset tempValue value
tempValue = 0;
//increment valuesIndex by 1
valueIndex++;
break;
//if the char c from Processing is character ‘n’
//which signals that it is the end of data
case ‘n’:
//save the tempValue
//this will b the last element in the values array
values[valueIndex] = tempValue;
//reset tempValue and valueIndex values
//to clear out the values array for the next round of readings from Processing
tempValue = 0;
valueIndex = 0;
break;
//if the char c from Processing is character ‘e’
//it is signalling for the Arduino to send Processing the elements saved in the values array
//this case is triggered and processed by the echoSerialData function in the Processing sketch
case ‘e’: // to echo
for (int i = 0; i < NUM_OF_VALUES; i++) {
Serial.print(values[i]);
if (i < NUM_OF_VALUES – 1) {
Serial.print(‘,’);
}
else {
Serial.println();
}
}
break;
}
}
}

Processing:

import processing.serial.*;

int NUM_OF_VALUES = 2;

Serial myPort;
String myString;

// This is the array of values you might want to send to Arduino.
int values[] = new int[NUM_OF_VALUES];

void setup() {
size(500, 500);
background(0);

printArray(Serial.list());
myPort = new Serial(this, Serial.list()[3], 9600);

myPort.clear(); // throw out the first reading, in case start reading in the middle of a string from the sender
myString = myPort.readStringUntil(10); // 10 = ‘\n’ Linefeed in ASCII
myString = null;
}

void draw() {
noStroke();
fill(0, 30);
rect(0, 0, 500, 500);

strokeWeight(5);
stroke(255);
line(pmouseX, pmouseY, mouseX, mouseY);

values[0] = mouseX;
values[1] = mouseY;

sendSerialData();
echoSerialData(200);
}

void sendSerialData() {
String data = “”;
for (int i=0; i<values.length; i++) {
data += values[i];
//if i is less than the index number of the last element in the values array
if (i < values.length-1) {
data += “,”; // add splitter character “,” between each values element
}
//if it is the last element in the values array
else {
data += “n”; // add the end of data character “n”
}
}
//write to Arduino
myPort.write(data);
}

void echoSerialData(int frequency) {
//write character ‘e’ at the given frequency
//to request Arduino to send back the values array
if (frameCount % frequency == 0) myPort.write(‘e’);

String incomingBytes = “”;
while (myPort.available() > 0) {
//add on all the characters received from the Arduino to the incomingBytes string
incomingBytes += char(myPort.read());
}
//print what Arduino sent back to Processing
print(incomingBytes);
}

3

Final Project: Step 3 – Essay – Lillie Yao

Motion Painting

This idea was influenced by my interest in interactive art exhibits. We found this interactive art exhibit called Leap Motion in Tampa, Florida. This piece was especially interesting because it showed people interacting with the piece just by moving their hands/body and the output on the screen was just random shapes in random colors moving symmetrically to them. This reminded me of the activities we did in recitation, just without the motion. This project inspired my idea for the final because I thought it was really neat how a piece of art could be controlled by a users movements. At the same time, I really liked the output and how there were different outputs that randomly showed up according to the different users who tested it.

This project aligns with my definition of interaction because there is an input given by the user and an output from the exhibit. Similarly, the project will also run on its own if there is not a user there and it’s just an ongoing cycle of input/output.

For Motion Painting, we wanted to implement a motion sensor so that it could sense the different movements a user would make. Then using Processing, we would display different shapes and colors according to whatever motions the user made. We were also thinking about making certain strokes that could correspond with the users movement. Of course, we would need to put the motion sensor somewhere so that the user would know where to move, so we were thinking about having a “controller” that would be covered by some sort of dome that we would 3D print or fabricate.

To start out, we need to figure out how to link Arduino with the motion sensor,  and Processing together to make our project. Since motion sensors are fairly sensitive, we wanted to get all of the code done early so we have enough time to play with different sensors and test their sensitivity before fabricating the controller. After figuring out and prototyping the controller, we will start the 3D printing process. Then after that, we will put some finishing touches and our project will be done!

Our timeline:

11/22 Start coding and test motion sensors

11/26 Continue coding and testing our project

12/3 Finish the code for Arduino and Processing and test the circuit

12/4 Fabricate the controller

12/6 Finish the project

12/9 Finishing touches by 9th

Since we are re-creating something that already exists, our take has a different approach to it. We wanted the display on the screen to be different colors and shapes but for it to easily be customized if the user wanted to do so. Our contribution to this piece is for there to be more pieces of work that can do similar things so that more and more people are able to experience it. We wanted to create this so that it could potentially be displayed in exhibits for the public to appreciate.

We wanted to make this project for everyone to be able to use and have fun with. At the same time, we wanted to make this project for people that are especially interested in interactive media art and would come just to see this art piece. The meaning we wanted to interpret into this project was that you don’t need a pen/pencil and paper in order to create art. Art comes in many different forms and “motions.” We wanted to break the barriers between the standards of art, that it doesn’t necessarily have to be physical to be considered art. I think this project will hold a lot of value for people who truly appreciate art and understand that there are many ways to create meaningful pieces or work.

“Sometimes when people learning about physical computing hear that a particular idea has been done before, they give up on it, because they think it’s not original. What’s great about the themes that follow here is that they allow a lot of room for originality. Despite their perennial recurrence, they offer surprises each time they come up. So if you’re new to physical computing and thinking to yourself “I don’t want do to that, it’s already done,” stop thinking that way! There’s a lot you can add to these themes through your variation on them.” (Igoe)

This quote from Physical Computing’s Greatest Hits (and misses) by Tom Igoe really stuck out to me because my partner and I were thinking the same exact things. We were planning on re-creating a project and worried about the fact that our project may not be as original as others. But, we thought about the different ways we could implement and personalize it so that we could call it our own and overcame that obstacle just by talking about it. 

Final Project Essay, By Megan See


  1. “Are You Going to be a Criminal?/Check your Assumptions”

My partner Ashley and I decided to make a project called “Are You Going to be a Criminal?/Check your Assumptions.” 

  1. PROJECT STATEMENT OF PURPOSE 

Our project is going to be based on criminal justice and informing people of the realities of criminals and the system. It is an interactive video game project that will include quizzes and activities asking the user “what is a criminal” and questions about topics that most people are misinformed about. We want our users to be more informed and then rethink the assumptions and prejudices they have made in the past. Being well informed, our users will be safer as well as more likely to help improve the current situation of the justice system.


  1. PROJECT PLAN

 We will be using Processing and Arduino to make our project. The game and quizzes will be made and displayed on the screen through processing. We will have many physical ways for users to take this quiz using Arduino, for example,  we will put them in a situation, and if they think the criminal turn a doorknob(and have them turn the potentiometer), bang on the door(pressure sensor), or ring the doorbell (button plus a buzzer.) We will animate and include different graphics and pictures to make the project more engaging with the user. We will use functions with the keys and mouse to interact with the code. Although we want the user to enjoy the game, we want them to take it seriously since it is a real issue, so we plan to use simple but sophisticated colors and physical attributed to make it seem more polished. In our display, we will use digital fabrication, both 3D printing, and laser-cutting, to make the project as appealing to the user as we can.

  1. CONTEXT AND SIGNIFICANCE *

This project focuses on a specific issue but will be useful for a wide range of people. What we are informing people about is something commonly overlooked, and gives others that aren’t directly involved a closer look at what really goes on.  We will ask about what the user thinks makes it likely for a person to commit a crime based on family history, personalities, and physical attributes.  When the quiz and other activities are completed, we will inform them of the misconceptions they hold of criminals, the criminal justice system, and how to recognize these traits. We will show statistics of what people commonly think about a certain topic versus what the real statistics are. The end goal of the game will be to have people rethink their assumptions about criminals and be more interested in helping to improve the system. 

works cited

https://www.themarshallproject.org/  ~ a “Nonprofit journal about criminal justice”

https://www.gotoquiz.com/results/how_much_of_a_criminal_are_you

AI ARTS Week 11- Deep Dream Experiments – Eszter Vigh

Jennifer Lawrence
My starting Image

Aven’s Deep Dream example with his face was scary. I was wondering if maybe it was just that specific filter he has chosen to use for the example that yielded such a terrifying output.

Deep Dream
Deep Dream Attempt 1

So the first thing I learned with the example is YOU MUST USE CHROME. I am a safari user, and I couldn’t get my own image uploaded into the sample. I restarted my computer several times before giving in and switching browsers. This was my first attempt using Aven’s presets to see if I could get a result (as the in-class example videos just would not work for me, despite Aven’s continued efforts to help me).

another experiment
Slightly Different Filter (3A vs 4A)

I picked the most aesthetically pleasing option, in this case option 3A over 4A. I liked it slightly better, so I thought maybe the output wouldn’t gross me out as much as the previous example. (I was wrong, but I didn’t know that yet).

3A
Continued 3A filter Experimentation

So I worked through the example, changing all of the subsequent parts of the process to reflect my 3A filter preference. I felt like the 3A filter gave the whole image this more “comic-like” design, at least from a distance. 

Iterations
Further 3A Iteration

Then I decided to do the zoom example, and this is where I stopped liking 3A and Deep Dream altogether. It starts looking as if my favorite actress has horrible scarring from a distance.

3a zoom
Zoom Attempt

Zoom 1 didn’t help. I am happy that this isn’t the “eye” example that Aven did because that was creepy, these squares were nicer, but this zoom still showed her mouth, and it made the now striped patten look odd. 

Zoom zoom
Further Zooming

The zoom feature worked well! Further zooming yielded actual results. It’s a relief that at least SOMETHING works in terms of examples. I still haven’t been able to get Style Transfer stuff downloaded, but at least this worked. 

Not cute
This isn’t cute

UPDATE! Hi! I got the video to work with my old LinkedIn photo! Enjoy! 

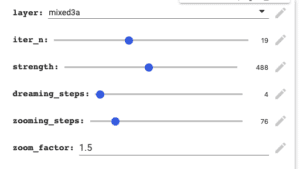
It is a total of eighty frames. The actual information on how I inputed the variables is here:

ai inputs
Inputs!