Step 1: Build the Circuit
Materials:
1 * 42STH33-0404AC stepper motor
1 * SN754410NE ic chip
1 * power jack
1 * 12 VDC power supply
1 * Arduino kit and its contents
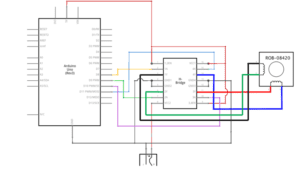
Diagram:
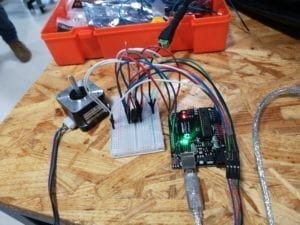
Picture:
Video:
Process:
Though the circuit is complicated, I didn’t really encounter any difficulties when I made it. I made the circuit as the diagram very carefully and connected it to my computer after double check. My first try was successful. After I finished my work, I helped my partner check her circuit because the motor did not move at all. At last, we found there was a short out in her circuit – she forgot to connect a pin of the ic chip to the ground, and that mistake unfortunately burnt out her Arduino. This event taught me a lesson that only when we make sure our circuit is safe, we can connect it to our computer, otherwise, both our computer and Arduino could be destroyed.
Step 2: Control rotation with a potentiometer
Materials:
1* potentiometer
1 * 42STH33-0404AC stepper motor
1 * SN754410NE ic chip
1 * power jack
1 * 12 VDC power supply
1 * Arduino kit and its contents
Video:
Process:
When I completed the circuit of step 2, I found the motor didn’t react to the potentiometer. After our assistant Eszter helped me check my work, we found my circuit had no mistake but I less copied one line of the sample code. Therefore, my code wasn’t completed and it couldn’t make the potentiometer command the motor. Next time I would copy all parts of the sample then make changes, instead of taking it for granted and leaving the key components.
Step 3: Build a Drawing Machine
Materials (based on the work of step 2):
2 * Laser-cut short arms
2 * Laser-cut long arms
1* Laser-cut motor holder
2 * 3D printed motor coupling
5 * Paper Fasteners
1 * Pen that fits the laser-cut mechanisms
Paper
Video:
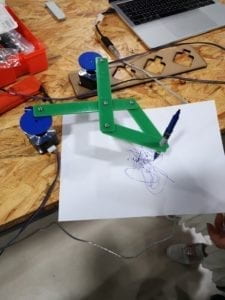
Picture:
Process:
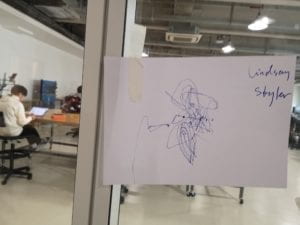
Because my partner burnt out her Arduino in step 1 and it took us a lot of time to figure out where the problem was, her progress was very behindhand – after I completed step 2, she was still stuck on step 1. I turned to help her again when I once finished my work. However, when her work of step 2 was finally done, the official class time was just over. Thanks to the fellows waiting for us till we completed the entire work. Our drawing machine made a kind of post-modern painting, I would call it “The Order in Disorder”.
Question 1: What kind of machines would you be interested in building? Add a reflection about the use of actuators, the digital manipulation of art, and the creative process to your blog post.
I want to build an automatic door unlike the revolving door but the normal push/pull door, because the revolving door is not suitable for every place and the push/pull door is more common; sometimes the push/pull door is too heavy and hard to open or it’s confusing for the passerby to recognize whether pushing or pulling can open the door, at that time, I think an automatic push/pull door would be helpful.
When someone is close to the door, the sensor would detect the signal and send a command to the actuators, then the actuators would provide power to open the door. And the door needs to be able to rotate 180o because it has to rotate to the opposite direction of the passerby to be open, otherwise, it might hurt the passerby. When it detects movement on its both sides, it should open the door slowly to make sure the passerby can recognize the opening direction and avoid hitting.
Question 2: Choose an art installation mentioned in the reading ART + Science NOW, Stephen Wilson (Kinetics chapter). Post your thoughts about it and make a comparison with the work you did during this recitation. How do you think that the artist selected those specific actuators for his project?
Aoki Takafumi, Kobito: Virtual Brownies, 2005
This project is an interaction between the real world and virtual world. If a user pushes a physical block in the reality, a small animal on the digital screen would also be pushed by a digital block; and if the digital block is pushed by the small animal on the digital screen, the physical block would also be moved. The designer uses magnetic actuators to control the movement of the physical blocks. Similarly, in the work we did in the recitation, we used the actuators to control the movement of a pen. I think the artist chooses the actuators depending on their functions – if their functions can fit into the project, helping achieve the movement as designed better. For example, in Takafumi’s project, the physical block needs the magnetic actuators to actuate as the track of digital block on the screen.