Introduction:
In this recitation, we worked on building communication between Arduino and Processing. The first exercise is to use Arduino to send data to Processing, for Arduino is the input and Processing is the output. The second exercise is to use Processing to send data to Arduino, for Processing becomes the input and Arduino is the output. Through these two practises, I get more familiar with building the connection between Arduino and Processing via serial communication.
Exercise 1:
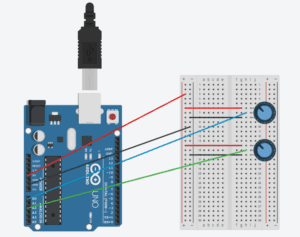
The first exercise is to make an Etch A Sketch. For this exercise, the input is two potentiometers from Arduino, and the output is the canvas of Processing. I used two potentiometers to control the position of the “pen”, then rotated them to make a sketch on Processing. Before making an actual sketch, I followed the instruction to draw an ellipse first. I practised this in previous classes, so this step is easy for me. I created two variables to stand for the values of x-axis and y-axis. I also used the “map” to keep the ellipse move inside the canvas, since the biggest value of the potentiometer is 1023, while the limit of width and height of the canvas is only 500. Then I modified the Processing code and turned the ellipse into a line. To do this, I used a sample code from a previous class as a reference, which is about using the mouse’s movement to draw a line. In order to make a “real” Etch a Sketch, I need to keep track on the previous x and y values as well. So I added two more variables that stand for previous x and y. I defined them as x and y in the “draw()” loop which were after the “line()”, so they can be stored in the previous values of x and y.
The code for Processing and Arduino is as followed.
Processing:
import processing.serial.*;

String myString = null;
Serial myPort;

int NUM_OF_VALUES = 2;   /** YOU MUST CHANGE THIS ACCORDING TO YOUR PROJECT **/
int[] sensorValues;      /** this array stores values from Arduino **/
float x;
float y;
float px;
float py;

void setup() {
  size(500, 500);
  background(0);
  setupSerial();
}

void draw() {
  //background(0);
  updateSerial();
  printArray(sensorValues);
  x = map(sensorValues[0], 0, 1023, 0, 500);
  y = map(sensorValues[1], 0, 1023, 0, 500);
  stroke(255);
  line(px,py,x,y);
  px = x;
  py = y;
}

void setupSerial() {
  printArray(Serial.list());
  myPort = new Serial(this, Serial.list()[0], 9600);

  myPort.clear();
  myString = myPort.readStringUntil( 10 );
  myString = null;

  sensorValues = new int[NUM_OF_VALUES];
}

void updateSerial() {
  while (myPort.available() > 0) {
    myString = myPort.readStringUntil( 10 ); // 10 = '\n'  Linefeed in ASCII
    if (myString != null) {
      String[] serialInArray = split(trim(myString), ",");
      if (serialInArray.length == NUM_OF_VALUES) {
        for (int i=0; i<serialInArray.length; i++) {
          sensorValues[i] = int(serialInArray[i]);
        }
      }
    }
  }
}
Arduino:
void setup() {
  Serial.begin(9600);
}

void loop() {
  int sensor1 = analogRead(A0);
  int sensor3 = analogRead(A2);

  Serial.print(sensor1);
  Serial.print(",");
  Serial.print(sensor3);
  Serial.println();
  delay(100);
}
Exercise 2:
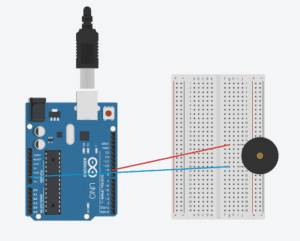
The second exercise is to make a musical instrument. For this exercise, the input is the mouse’s movement in Processing, and the output is the buzzer on Arduino board. In order to do this, I only made a few changes to the sample code. I used the mouse’s x and y positions to control frequency and duration of the tone. Since the buzzer can only make a sound when the frequency is bigger than 31, I used the “map” to keep the frequency in the range of 200 and 2000. I also used “mousePressed()” to set the pressing of the mouse to control the on and off of the sound. On this basis, I made some improvements to the original canvas. I modified the Processing code so that the canvas would change the color when I press the mouse and turn to black when I release my mouse. In this way, you can visually see that you are playing with this musical instrument.
The code for Processing and Arduino is as followed.
Processing:
import processing.serial.*;

int NUM_OF_VALUES = 3;
int x;
int y;
color c;
float h = 0;

Serial myPort;
String myString;

int values[] = new int[NUM_OF_VALUES];

void setup() {
  size(500, 500);
  colorMode(HSB,360,100,100);
  background(360);

  printArray(Serial.list());
  myPort = new Serial(this, Serial.list()[0], 9600);

  myPort.clear();
  myString = myPort.readStringUntil( 10 );  // 10 = '\n'  Linefeed in ASCII
  myString = null;
}

void draw() {
  background(360);
  c = color(h,100,100);
  if (mousePressed){
    h += 1;
    background(c);
    if (h > 360){
      h = 0;
    }
  } else {
    background(0,0,0);
  }

  x = mouseX;
  map(x,0,500,200,2000);
  y = mouseY;
  map(y,0,500,100,1000);

  values[0] = x;
  values[2] = y;


  if (mousePressed == true){
    values[1] = 1;
  } else {
    values[1] = 0;
  }

  sendSerialData();
  echoSerialData(200);
}

void sendSerialData() {
  String data = "";
  for (int i=0; i<values.length; i++) {
    data += values[i];
    //if i is less than the index number of the last element in the values array
    if (i < values.length-1) {
      data += ","; // add splitter character "," between each values element
    }
    //if it is the last element in the values array
    else {
      data += "n"; // add the end of data character "n"
    }
  }
  //write to Arduino
  myPort.write(data);
}

void echoSerialData(int frequency) {
  //write character 'e' at the given frequency
  //to request Arduino to send back the values array
  if (frameCount % frequency == 0) myPort.write('e');

  String incomingBytes = "";
  while (myPort.available() > 0) {
    //add on all the characters received from the Arduino to the incomingBytes string
    incomingBytes += char(myPort.read());
  }
  //print what Arduino sent back to Processing
  print( incomingBytes );
}
Arduino:
#define NUM_OF_VALUES 3    /** YOU MUST CHANGE THIS ACCORDING TO YOUR PROJECT **/
/** DO NOT REMOVE THESE **/
int tempValue = 0;
int valueIndex = 0;
/* This is the array of values storing the data from Processing. */
int values[NUM_OF_VALUES];

void setup() {
  Serial.begin(9600);
  pinMode(9, OUTPUT);
}

void loop() {
  getSerialData();

  if (values[1] == 1) {
    tone(9, values[0],values[2]);
  } else {
    noTone(9);
  }
}

//recieve serial data from Processing
void getSerialData() {
  if (Serial.available()) {
    char c = Serial.read();
    //switch - case checks the value of the variable in the switch function
    //in this case, the char c, then runs one of the cases that fit the value of the variable
    //for more information, visit the reference page: https://www.arduino.cc/en/Reference/SwitchCase
    switch (c) {
      //if the char c from Processing is a number between 0 and 9
      case '0'...'9':
        //save the value of char c to tempValue
        //but simultaneously rearrange the existing values saved in tempValue
        //for the digits received through char c to remain coherent
        //if this does not make sense and would like to know more, send an email to me!
        tempValue = tempValue * 10 + c - '0';
        break;
      //if the char c from Processing is a comma
      //indicating that the following values of char c is for the next element in the values array
      case ',':
        values[valueIndex] = tempValue;
        //reset tempValue value
        tempValue = 0;
        //increment valuesIndex by 1
        valueIndex++;
        break;
      //if the char c from Processing is character 'n'
      //which signals that it is the end of data
      case 'n':
        //save the tempValue
        //this will b the last element in the values array
        values[valueIndex] = tempValue;
        //reset tempValue and valueIndex values
        //to clear out the values array for the next round of readings from Processing
        tempValue = 0;
        valueIndex = 0;
        break;
      //if the char c from Processing is character 'e'
      //it is signalling for the Arduino to send Processing the elements saved in the values array
      //this case is triggered and processed by the echoSerialData function in the Processing sketch
      case 'e': // to echo
        for (int i = 0; i < NUM_OF_VALUES; i++) {
          Serial.print(values[i]);
          if (i < NUM_OF_VALUES - 1) {
            Serial.print(',');
          }
          else {
            Serial.println();
          }
        }
        break;
    }
  }
}