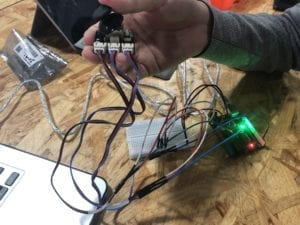
For recitation 3, we tried to use the Joystick module to create interactions. We used LED, buzzer, and Servo motor to make the interaction happen. Our process can be regarded as four major steps.
Step 1: Build the circuit and link Joystick module.
After reading the online document and compare it with the actual module we get, we quickly understood how it works.
After building the power and ground, we link “x” and “y” to analog pins and “z” to digital pin since “z” axis is a button. We test the input data of the Joystick by printing out the analog data to the serial monitor. When the Joystick is in the initial position, “x” is 502, ranging from 0 to 1023; “y” is 520, ranging from 0 to 1023; “z” equal to 0 when pressing the button.
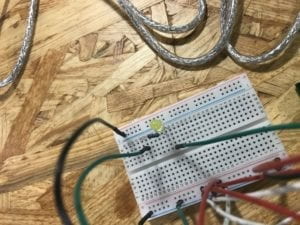
Step 2: light-up LED when pressing the button.
At first, we want to make the buzzer beeping when pressing the button. When we finished the circuit by linking the buzzer to the digital output and uploaded the code to the Arduino board, it did not work. We opened the serial monitor and thought everything went well. Then we suddenly realized that it is not merely setting the digital output could make the buzzer sound. Instead, to test our circuit works or not, we replace the buzzer to a LED. Finally, the LED blinks while pressing the button.
Step 3: Make the buzzer work
We continued to think about what we can do for x and y-axis. Maybe try making the buzzer work, which we failed at the first attempt, is a good idea. Therefore, we add it to the Arduino. Then, we realized that we have sample code from Recitation 2 that we can reference. We apply the sample code, setting that when we move the Joystick to where x-axis data is larger than 1000, the buzzer is supposed to ring the preset melody. We spent some time working the coding part. But it is not so difficult so that we worked it out quickly.
However, there are some parts that we can improve due to the time limit. We can change the tune of the melody. Also, it cannot light up the LED and sound the buzzer at the same time.
Step 4: Rotate the Servo motor
Till this moment, we still did not have the chance to utilize the y-axis. We think it is a great idea to associate the user’s operation on the movement of the y-axis to the rotating angle of the Servo motor. Therefore, we tried a similar circuit build as step 3. Then we used the “map” function to map the analog input ranging from 0 to 1023 to the angle of Servo motor ranging from 0 to 180. It works, and it is super fun to play with it!
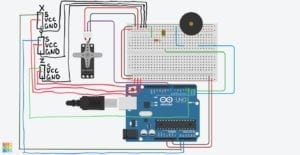
Our overall circuit diagram is like this. The hand drawing part is the Servo motor.
Question 1:
Combining these three parts we built together, we believe it is a functional prototype of a kind of assistant technology. With this, it can help disables to their daily lives more accessible, especially when going out. For instance, this circuit can be used as a control center on the wheelchair. When pressing the button, the torch is on, which makes disables’ mobility safer. When moving the Joystick along the x-axis, the buzzer beeping, making other passengers aware of him/her. Or use it to ask for help. Also, it can direct the wheelchair to a different direction just as easy as playing the game.
Question 2:
When we are trying to code, we referred to many tutorial and examples that are built-in or provided before. For instance, we used the sample code from Arcuino.cc to make the buzzer works. We use the basic serial and analog/digital read/out module everywhere. Based on these, we combine the modules we want to use together and add extra functions like the if-else statement. That’s how we follow the tutorials to make our project work.
Question 3:
As Lev Manovich explains in “The Language of New Media” that “the identity of media has changed even more dramatically than that of the computer” in terms of five representative areas, the development of computer also changes human behaviors a lot. The most significant influence, I believe, is the changing way for humans to interact with nonhuman objects. With the development of artificial intelligence and the Internet of Things, everything becomes interconnect and more reachable and accessible to human beings. Before the age of computer technology, we only use the object as tools that do not respond and send out information. Now, we give “life” to many things with the Internet and hardware by applying computer science. We interact with more items and objects that used to be “dead.” Now, they can “process” our “input” and give response as “output.” We are generally beginning to treat them as humans, and we are closer to all the human and nonhuman factors in the world we are living.