Recitation 2: Arduino Basics
In this week, we are getting hands on the basic principles and coding of Arduino. My partner Joseph and I succeeded building up all the required three circuits. Besides, we built on the third model and created a 4 player verison of Speed Game.
Materials:
From Arduino Kit:
1 * Arduino Uno
1 * USB A to B cable
1 * breadboard
1 * buzzer
2 * LEDs
2 * 220 ohm resistors
2 * 10K ohm resistors
2 * pushbuttons
A handful of jumper cables
From cart:
2 * arcade buttons
1 * Multimeter (optional)
Circuit 1:
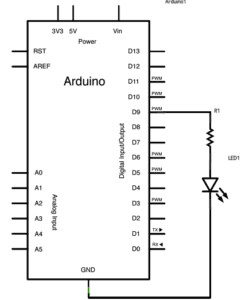 This is a straightforward circuit, which only needs to hook up the wire following the circuit diagram. In the code part, we use digitalWrite() function to switch the LED on and off at with different brightedness to create a fade effect.
Here is the test video of the circuit:
Circuit 2:

Also a pretty straightforward one. We put the notes we want to play in a list, and feed this list into the loop() function so that it plays one note every loop.
Here is the test video of this circuit:
Circuit 3:
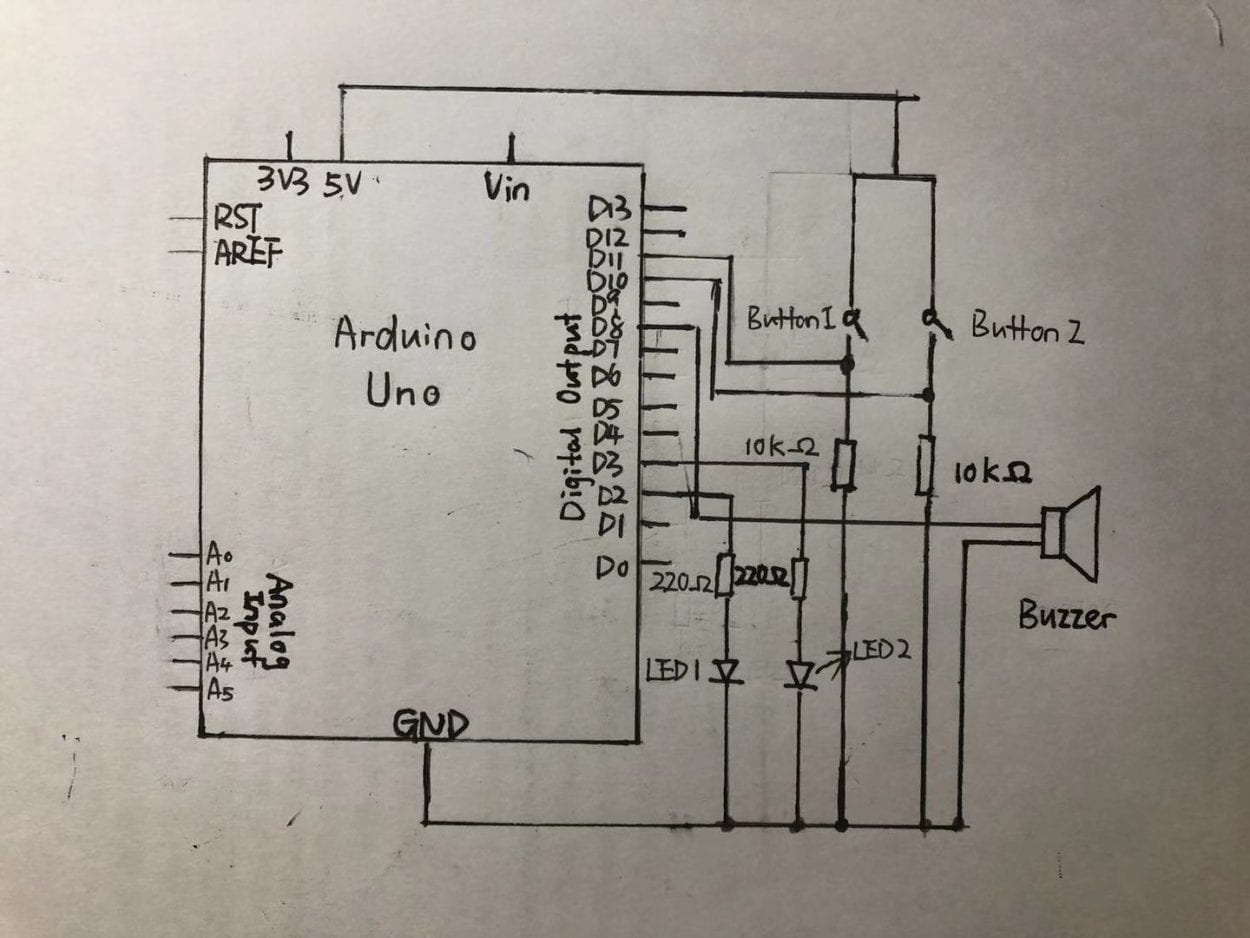
This circuit is a simple speed game, which has two buttons , two LEDs and one buzzer. Once the game begins, the two player clicks the button as fast as possible. Winner is the one who reaches 10 clicks first.
This is the most difficult one among these three circuits. There are a lot required electric components, and the wiring on the breadboard is quite complicated. To simplify, I draw this schematic to make the whole process clear.
For this circuit, we have two main parts, one part is the button circuit, and the other one is the LED and buzzer part. For the first part, we have two buttons wired with a 10kΩ resistor and another wire to a digital pin. We use the digital pin, with digitalRead() function to detect the current as a symbol of button click. Once a digital pin has detected 10 clicks, it sends siginal to another digital pin to light up the corresponding LED light and to turn on the buzzer.
Here is the test video of this circuit:
Playtime: Four Players Speed Game
As an improvement of circuit 3, we added two more plays into the game. The schematic would be a bit messy, so I called TINKERCAD to help.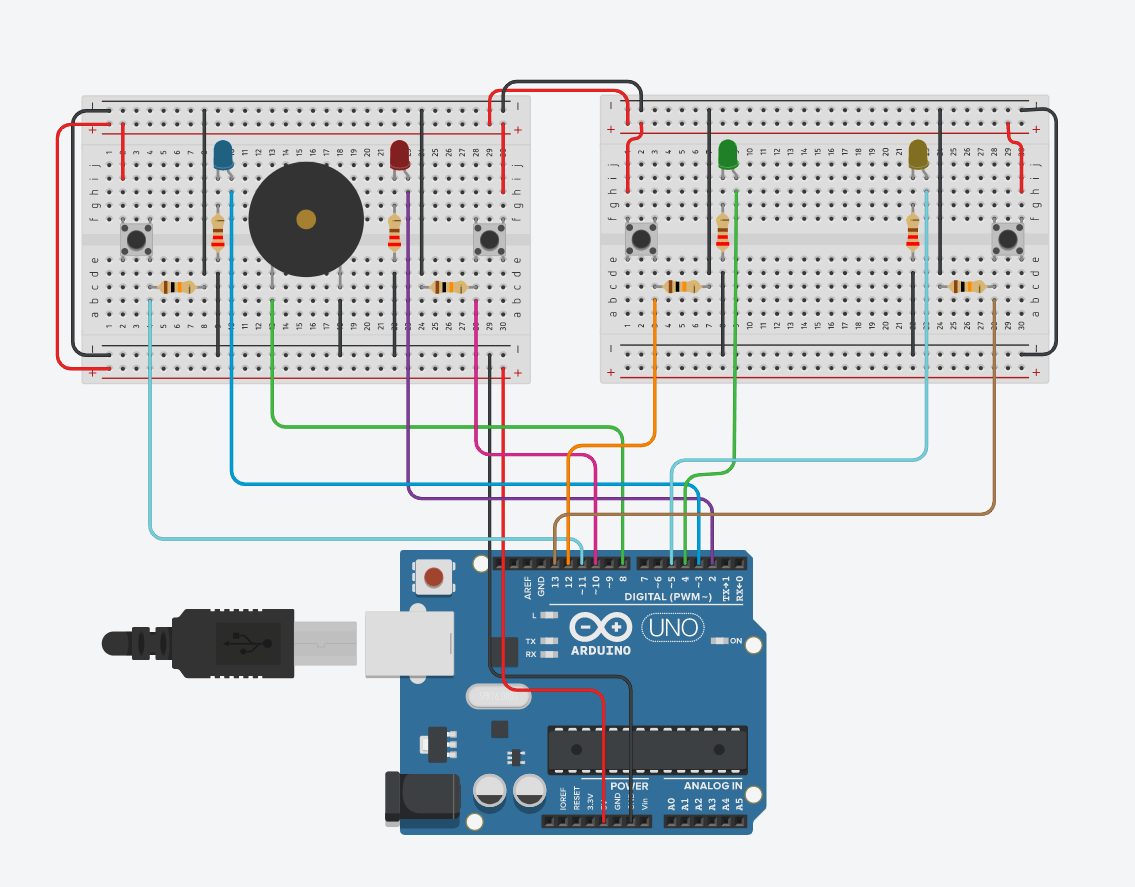
 The principle is the same as circuit 3, what we are doing is basically power up another breadboard, and connect two more buttons and LEDs.
But in the coding part, there comes a bug of this program. In the detection of click part, the code has a sequence that it detects from button1 to button4. That means that, if button1 and button2 are simutaneously clicked, the click of button2 will not be counted. This could be improved in the future development. But overall, this is a joyful product since we can interact with more players.
Here is the test video of this circuit:
Question1:
In text Physical Computing, it defines a interaction as the flow of input-processing-output. My personal definition is basically same as this. Interatction is a process of act and react, input and output. Processing is not necessary in a interaction, for example, when I turn on a switch, the lights come on. There isn’t any processing part involved. However, when I type a key on the keyboard, the screen shows the character on the screen. From these examples, we can see that, though processing is not necessary, but input and output are always needed.
Question2:
The 10KΩ resistor is used to protect the circuit. If it’s not there, when we push the button, there will be a short circuit which might damage Aduino and other electronical components.
Question3:
I will probably make a huge “light ball”, a bit similar as those one used in club, but much bigger. It can be put in the center of a fountain in the city square or someplace. I can make the LEDs flash according to the background music. That will definitely add a lot of joy.