Exercise One:
For the first exercise of the drawing machine, I opened the file of sending data from Arduino to Processing for multiple values first. Then I changed the port index into [0]. One important step for this exercise is to use the map function when drawing the ellipse, which I forgot to do at first. The highest value to be transformed into should be the width and height of this exercise.
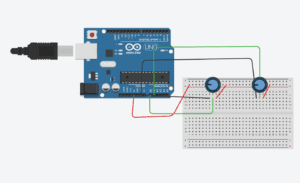
Then I built a circuit including two potentiometers, going to the power, the ground, and pin A0 and A1. After uploading the code, the data on the serial monitor was changing as I twisted the potentiometers.
It turned out that I can at least draw something by twisting the potentiometers, but the track of the ellipses was not highly controllable.
Video:
Schematic:
Code:
Arduino:
// IMA NYU Shanghai
// Interaction Lab
// For sending multiple values from Arduino to Processing
void setup() {
Serial.begin(9600);
}
void loop() {
int sensor1 = analogRead(A0);
int sensor2 = analogRead(A1);
// keep this format
Serial.print(sensor1);
Serial.print(“,”); // put comma between sensor values
Serial.print(sensor2);
Serial.println();//////
// add linefeed after sending the last sensor value
// too fast communication might cause some latency in Processing
// this delay resolves the issue.
delay(100);
}
Processing:
// IMA NYU Shanghai
// Interaction Lab
// For receiving multiple values from Arduino to Processing
import processing.serial.*;
String myString = null;
Serial myPort;
int NUM_OF_VALUES = 2; /** YOU MUST CHANGE THIS ACCORDING TO YOUR PROJECT **/
int[] sensorValues; /** this array stores values from Arduino **/
void setup() {
size(500, 500);
background(0);
setupSerial();
}
void draw() {
updateSerial();
printArray(sensorValues);
noStroke();
fill(#14FAEC);
ellipse(map(sensorValues[0],0,1023,0,width),map(sensorValues[1],0,1023,0,height),30,30);
} //////////!!!!
// use the values like this!
// sensorValues[0]
// add your code
//
void setupSerial() {
printArray(Serial.list());
myPort = new Serial(this, Serial.list()[0], 9600);
// WARNING!
// You will definitely get an error here.
// Change the PORT_INDEX to 0 and try running it again.
// And then, check the list of the ports,
// find the port “/dev/cu.usbmodem—-” or “/dev/tty.usbmodem—-”
// and replace PORT_INDEX above with the index number of the port.
myPort.clear();
// Throw out the first reading,
// in case we started reading in the middle of a string from the sender.
myString = myPort.readStringUntil( 10 ); // 10 = ‘\n’ Linefeed in ASCII
myString = null;
sensorValues = new int[NUM_OF_VALUES];
}
void updateSerial() {
while (myPort.available() > 0) {
myString = myPort.readStringUntil( 10 ); // 10 = ‘\n’ Linefeed in ASCII
if (myString != null) {
String[] serialInArray = split(trim(myString), “,”);
if (serialInArray.length == NUM_OF_VALUES) {
for (int i=0; i<serialInArray.length; i++) {
sensorValues[i] = int(serialInArray[i]);
}
}
}
}
}
Exercise Two:
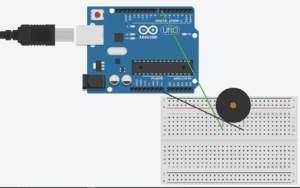
First of all, I built a circuit with a buzzer connecting to pin 7 and the ground. Then, I changed the port index to 0.
After these basic settings, I started to set the musical notes. As I wanted to play the tone of Family Mart by clicking different keys, I needed to set 5 standard notes for this melody. I used the frequency number provided by https://pages.mtu.edu/~suits/notefreqs.html . I set 5 basic notes, E5, C5, G4, D5, G5 in Arduino first, using the tone function.
For the Processing, I used the keyCode function to correspond the direction keys with different musical notes.
However, when I ran the code, nothing changed when I pressed different keys. The reason is that I simply used the “if” function for each note in both the Arduino and the Processing. I revised my code by using “if” and “else if”, and added a ‘Y’ note, which made no sound when no key was pressed.
By clicking the notes following the order of “E C g C D G G D E D g C”, you can play the tone of Family Mart.
Here’s the code and the video.
Video:
Schematic:
Code:
Arduino:
char valueFromProcessing;
int buzzerPin = 7;
void setup() {
Serial.begin(9600);
pinMode(buzzerPin, OUTPUT);//////
}
void loop() {
while(Serial.available()){//////
valueFromProcessing = Serial.read();//////
}
if(valueFromProcessing==’E’){
tone(7,659.25);
}
else if (valueFromProcessing==’C’){//////
tone(7,523.25);
}
else if(valueFromProcessing==’g’){//////
tone(7,392);
}else if(valueFromProcessing==’D’){
tone(7,587.33);
}
else if(valueFromProcessing==’G’){
tone(7,783.99);
}
else if(valueFromProcessing==’Y’){
tone(7,0);
}
delay(15);
}
Processing:
import processing.serial.*;
Serial myPort;
void setup() {
size(500, 500);
background(0);
printArray(Serial.list());
myPort = new Serial(this, Serial.list()[0], 9600);
}
void draw() {
if(key==CODED){ //////
if(keyCode==UP){
myPort.write(‘E’);
}else if(keyCode==DOWN){//////
myPort.write(‘C’);
}else if(keyCode==LEFT){//////
myPort.write(‘g’);
}else if(keyCode==RIGHT){
myPort.write(‘D’);
}else if(keyCode==SHIFT){
myPort.write(‘G’);
}else{
myPort.write(‘Y’);
}
}
}