Week 3 Documentation Blog
Recitation Exercise:
For this recitation exercise, please work with a partner. Choose one of the sensors listed below and read about what it is and how it performs. Once you have picked a sensor, build a circuit that integrates this sensor with your Arduino.
- Use the data (input) from your sensor to drive an output (Servo-motor, LEDs, Buzzer, etc.).
- Document the finished circuit and your interaction with it.
- In addition, draw a diagram of how all the components are connected and add this to your documentation. If you finish your circuit early, swap out the sensor in your circuit with a different sensor. Please cite any sources you reference to do this exercise.
- For these circuits, think back to the lessons from class, such as how to map() an analog input, as well as how to set an analog output with an analog input. This can be seen in the example AnalogInOutSerial (Arduino>File>Examples>0.3Analog>AnalogInOutSerial).
Recitation Documentation:
In the recitation session, my partner and I created a circuit using moisture sensor to detect moisture level and LED to indicate the differences in moisture level.

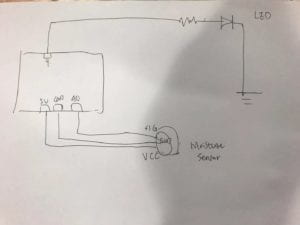
We firstly connected the moisture circuit to the arduino board, using a red wire to connect 5V pin to the VCC pin, connecting the arduino GND pin to the sensor’s GND pin, and connected the A0 pin on arduino to sensor’s SIG (signal pin). Now, a circuit of the moisture sensor is finished. When we placed the sensor deeper into the water ,the value in serial monitor goes from 0 to about 600. When we gradually took the sensor out of the water, the value drops and eventually became 0.
Then, we connected pin 9 on arduino board to a resistor then a LED on the breadboard, as well as using another wire to connect the LED to the ground. Below is a schematics of our circuit.
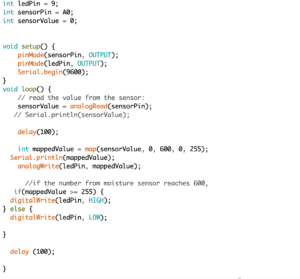
Based on the code for the moisture sensor, we added in a category for the LED, set its pin mode. Then we mapped the value from the sensor to the LED. Through just testing the sensor, we noticed that the maximum value is approximately 600 and the minimum value is 0. Thus, we used the “mappedValue ()” code to map sensor value to the LED value, in order that the LED’s brightness changes as the moisture level changes.


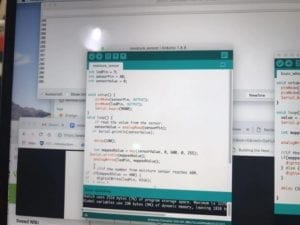
When we uploaded the code and put out the serial monitor, we observed that as the moisture sensor is put deeper into the water, the value shown in serial monitor increased from 0 to about 255 (the value that has been mapped to a range of 0 and 255), and the LED kept become brighter. When we gradually took the sensor out of the water and tried to dry it up, the LED became darker and darker, and eventually off, when the moisture level became 0.
(Later, we also added codes that say when the sensor detects the maximum moisture value, the LED lights up. Otherwise, the LED is off. However, we did not have enough time to test out this function.)
Question 1: What did you intend to assemble in the recitation exercise? If your sensor/actuator combination were to be used for pragmatic purposes, who would use it, why would they use it, and how could it be used?
When building the circuit, my partner and I intended to use the moisture sensor to detect different moisture level and use different brightness of LEDs to indicate different moisture levels.
For instance, gardeners or anyone growing their own plants might want to use this sensor/actuator combination. They can use it to detect the moisture level inside the soil, making sure that they are not watering the plants too much or too little. If the moisture level exceed a certain threshold, the LED light will be on, indicating that they’ve put too much water. If the water level is below a certain threshold, another LED light can also be on, suggesting that they should water more. The product can be used by placing the censor into the soil, and possibly that the LEDs can be installed in some kind of well-designed boxes. If the plants are contained by flowerpots, the sensors and LEDs can be embedded in the flowerpots. The plant growers will see moisture levels of the soil through embedded LEDs suggesting not enough water or too much water.
Question 2: Code is often compared to following a recipe or tutorial. Why do you think that is?
A recipe or tutorial provides detailed information about the necessary ingredients or materials to make something. Besides, they also provides step-by-step guidance about the tangible steps needed to assemble ingredients into a man-made outcome, a dish or a product. Similarly, code provides necessary information about the necessary inputs needed in order to achieve some kinds of outputs. Codes also involve the necessary steps or procedures to create that output.
Question 3: In Language of New Media, Manovich describes the influence of computers on new media. In what ways do you believe the computer influences our human behaviors?
In the numerical representation section, Manovich argues that the development of computers fundamentally challenged the tradition that digital codes were used as tools to create art or media forms, but instead media or art became tools to represent the language of computers. Such an argument might also be applied to the understandings and behaviors of humans. We used to think that human beings created the language, logics, and behaviors of computer; however, as computers became more automated and intelligent, in many ways, human behaviors and thinking have become the ramification of computational language and algorithmic logics. For instance, when I make a decision of which movie to watch, I use my digital devices to look at the scores or ratings people give to those movies, instead of basing my decision on other sources of information.