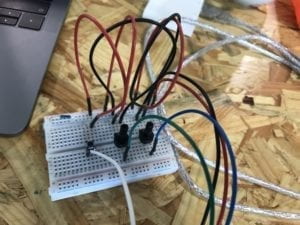
In the Friday recitation, I joined the serial communication workshop.
First, I built the circuit including two potentiometers to receive analog inputs and one switch to receive digital inputs. I revised the multiple values code on Arduino to set PIN numbers for the button and the two potentiometers
Then, I checked the port number on processing; and I wrote the processing code so that values from potentiometers can control the position of an ellipse on the screen. We also wrote the code to say that when the button is pressed, using an if statement, a red rectangle will show up on the screen based on the X and Y positions of the mouse.
Below is the video and photo documentation of this exercise
Below is my Processing code
import processing.serial.*;
String myString = null;
Serial myPort;
int NUM_OF_VALUES = 3; /** YOU MUST CHANGE THIS ACCORDING TO YOUR PROJECT **/
int[] sensorValues; /** this array stores values from Arduino **/
void setup() {
size(500, 500);
background(0);
setupSerial();
}
void draw() {
updateSerial();
printArray(sensorValues);
// use the values like this!
// sensorValues[0] : pot 1
// sensorValues[1] : pot 2
//sensorValues[2] : button switch
// add your code
background (255);
fill(0);
float posX = map (sensorValues[0], 0, 1023, 0, width); //map function returns float
float posY = map (sensorValues[1], 0, 1023, 0, height);
ellipse(posX, posY, 50,50);
if (sensorValues[2] == 1){
fill(255,0,0);
rectMode(CENTER);
rect(mouseX,mouseY, 100,100); //when button pressed, a red rectangle pop up
}
//
}
void setupSerial() {
printArray(Serial.list());
myPort = new Serial(this, Serial.list()[ 1 ], 9600);
// WARNING!
// You will definitely get an error here.
// Change the PORT_INDEX to 0 and try running it again.
// And then, check the list of the ports,
// find the port “/dev/cu.usbmodem—-” or “/dev/tty.usbmodem—-”
// and replace PORT_INDEX above with the index number of the port.
myPort.clear();
// Throw out the first reading,
// in case we started reading in the middle of a string from the sender.
myString = myPort.readStringUntil( 10 ); // 10 = ‘\n’ Linefeed in ASCII
myString = null;
sensorValues = new int[NUM_OF_VALUES];
}
void updateSerial() {
while (myPort.available() > 0) {
myString = myPort.readStringUntil( 10 ); // 10 = ‘\n’ Linefeed in ASCII
if (myString != null) {
String[] serialInArray = split(trim(myString), “,”);
if (serialInArray.length == NUM_OF_VALUES) {
for (int i=0; i<serialInArray.length; i++) {
sensorValues[i] = int(serialInArray[i]);
}
}
}
}
}
Below is my Arduino code
const int buttonPin = 2;
int buttonState = 0;
void setup() {
Serial.begin(9600);
pinMode(buttonPin, INPUT);
}
void loop() {
int sensor0 = analogRead(A0);
int sensor1 = analogRead(A1);
int buttonState = digitalRead(buttonPin);
// check if the pushbutton is pressed. If it is, the buttonState is HIGH:
if (buttonState == HIGH) {
// turn LED on:
digitalWrite(13, HIGH);
} else {
// turn LED off:
digitalWrite(13, LOW);
}
// keep this format
Serial.print(sensor0);
Serial.print(“,”); // put comma between sensor values
Serial.print(sensor1);
Serial.print(“,”);
Serial.print(buttonState);
Serial.println(); // add linefeed after sending the last sensor value
// too fast communication might cause some latency in Processing
// this delay resolves the issue.
delay(100);
}
