Partner: Zhiqiu Wang
Instructor: Young
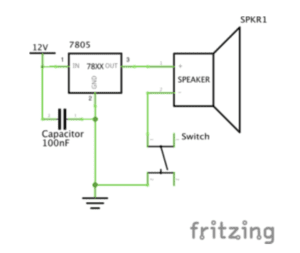
Circuit1: Door Bell
Components and their functions:
Push button: connect/disconnect the circuit to let the electric current pass/not pass to control the on/off of the speaker
12V power: provide power for the whole circuit
Speaker: make sound
Capacitor: store electricity, let the electric current change slowly to protect the circuit
Wire: connect different components of the circuit
Voltage regulator: regulate voltage
Breadboard: fix all components and provide connections between them
The process of building the circuit:
At first, we’re confused because it was the first time for both me and my partner to use a breadboard. Therefore, we have to ask for help to figure out how this component worked. Things got more smoothly after we got familiar with the inner structure of the breadboard. We built the circuit and adjusted some of the wire under the guidance of professors, but to our disappointment, when we pushed the push button, the speaker didn’t make any sound. We together with professors tried to find the problem by testing each component of the circuit but failed to figure it out. Therefore, we picked another set of all components and test our circuit again. This time it worked.
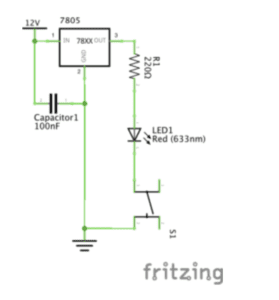
Circuit 2: Lamp
Components and their functions:
12V power: provide power for the whole circuit
Voltage regulator: keep the voltage at a stable number
Capacitor: store electricity, let the electric current change slowly to protect the circuit
Wire: connect different components of the circuit
Breadboard: fix all components and provide connections between them
Push button: connect/disconnect the circuit to let the electric current pass/not pass to control the on/off of the LED
LED: shine
220-ohm resistor: ensure the current is running within a safe range
The process of building the circuit:
Since the first circuit has provided us with some basic knowledge of how the breadboard works, we connected the whole circuit quickly and adjusted fewer than before since fewer mistakes took place. However, when we pushed the button, the LED didn’t light up as we expected. We still seek help from instructors but again, he couldn’t tell where was the problem thus we had to change another set again. Luckily, the LED light up in our second try.
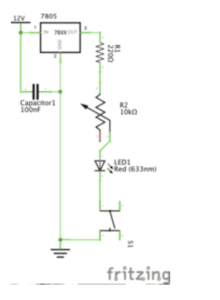
Circuit 3: Dimmable Lamp
Components and their functions:
12V power: provide power for the whole circuit
Voltage regulator: keep the voltage at a stable number
Capacitor: store electricity, let the electric current change slowly to protect the circuit
Wire: connect different components of the circuit
Breadboard: fix all components and provide connections between them
Push button: connect/disconnect the circuit to let the electric current pass/not pass to control the on/off of the LED
LED: shine
Variable resistor: change the resistance to change the amount of current
The process of building the circuit:
This time the process went quite well since we used the same set in circuit 2 so every component can be guaranteed working normally. And we only added a variable resistor. The brightness of LED can be witnessed changed obviously when we rotating the variable resistor.
Question 1:
After reading The Art of Interactive Design, in what way do you think that the circuits you built today include interactivity? Please explain your answer.
According to my understanding of The Art of Interactive Design, interactivity is two or more agents respond to each other’s action. This process includes first understanding the other’s action and then react to it and then flipping the order to form a loop. In our practice, I think the stitch shows this kind of interactivity because when people push the button, the circuit is closed and current flows to make the speaker or the LED works. It understands and responds to people’s action of pushing the button.
Question 2:
How can Interaction Design and Physical Computing be used to create Interactive Art? You can reference Zack Lieberman’s video or any other artist that you know.
Because interactive art is an activity relates more than one single agent. Therefore, the more controllable parts in the circuit, the more degree of interactivity it shows with people. We can build more components which can be adjusted or controlled by people into the circuit or any other physical computing program to increase the interactivity.