This week, we were asked to first build a circuit to control a stepper motor, then build a circuit that could control the stepper motor with a potentiometer and finally work with a partner to build a drawing machine.
Materials:
For Steps 1 and 2
1 * 42STH33-0404AC stepper motor
1 * L293D ic chip
1 * power jack
1 * 12 VDC power supply
1 * Arduino kit and its contents
For Step 3
2 * Laser-cut short arms
2 * Laser-cut long arms
1* Laser-cut motor holder
2 * 3D printed motor coupling
5 * Paper Fasteners
1 * Pen that fits the laser-cut mechanisms
Paper
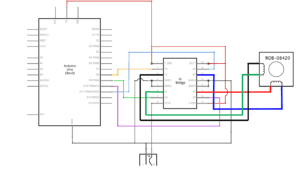
Step 1: Build the circuit
When building this circuit, I had two problems. The first one is that I didn’t quite understand how the components on the breadboard were connected. Therefore, I was not sure where to put some of the components shown on the diagram. One of the learning assistant showed me the back of the breadboard where shows how components are connected. The second problem was that after the learning assistant checked my circuit, I put the H-bridge upside down. Since we were working with 12 voltage, if the circuit was connected incorrectly, there is potential damage to my computer. It was fortunate for me not to connect the circuit to 12 voltage after checking it again. After I solved these problems, nothing wrong happened.
Step 2: Control rotation with a potentiometer
The circuit was pretty simple because I only needed to add a potentiometer to the circuit for Step 1. The tricky part was the code. First we should modify the steps of the potentiometer to 200. Then, we ought to use the function “map()” in order to match the movement of the knob with the rotation of the motor. Yet, the function “map()” was not used in the common way that we were used to. At the beginning, I don’t what things that I should map. After asking one of the learning assistants, I realized that we needed to map the range of analogRead to the steps of the motor. After that, I modified the code in the right way and the circuit worked smoothly
Step 3: Build a drawing machine
After finishing Step 1 and Step 2, my partner and I started to work on the drawing machine. We collected the materials needed and assembled them correctly. The drawing machine worked, and we drew things by spinning the potentiometers that controlled the rotation of the motor
Question 1:
The machine that I want to build is a huge LED projection wall that could reflect the movement of people who stands in front of the camera. I’d like to make people’s physical movement to turn into digital information and then to be shown in other physical form which is LED. With different actuators, we could easily create all kinds of physical output that we want to produce, using various mechanism for help. With the digital manipulation of art, the projections on the wall would be a bit different from people’s original movement, adding artistic visual effect.
Question 2:
In the reading ART + Science NOW, Stephen Wilson (Kinetics chapter), I found The Firebird created by Paul DeMarinis, 2005 quite interesting and intriguing, which invokes my thought. This project could change adjust the temperature around the flame accordingly. Yet this technology was applied in such a long time ago, as a person from the contemporary society, I still don’t quite understand how it works. Compared with the drawing machine that we’ve built during the recitation, one of the similarities is that these machines could all react accordingly with our physical interaction to it.