Project name: Puppet
CONCEPTION AND DESGIN
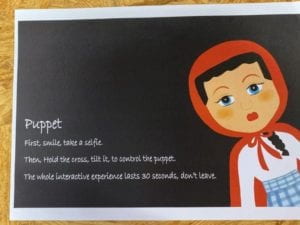
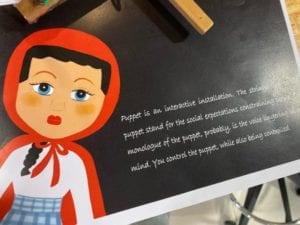
Originally, our understanding of the interaction between the users and our project only focuses on showing our theme of social expectation. In order to better explain our theme, we want the user to be the forces in the society that force people behave in a certain way and impose the social expectation on others, while the puppet is the representative of the people who are being controlled and meet the social expectation. Therefore, the initial interaction that we thought of was to let users use the keyboard and the mouse to control the simulative image of the puppet in Processing to set a pose. After that, the real puppet on the stage would first change several random poses, and finally stay at the pose that the user sets. For the purpose of using Arduino to make the real puppet move, we chose to use 4 servo motors to control the legs and the arms of the puppet. Our criteria for motors is that it can be easily attached with things and it can rotate within a certain angle in a precise way. Stepper motor was once under our consideration, but it’s hard to be attached with things. Another disadvantage of stepper motor is that each stepper motor needs power supply. If we use stepper motors, it needs a huge amount of power and if something goes wrong in the circuit, there would be potential danger. Due to the reasons listed above, we gave up using stepper motors. In order to make the users resonate with our a bit sad theme, we need to find a puppet that is not funny and childish. Finally, after a long time of searching, we decided to use this particular puppet.
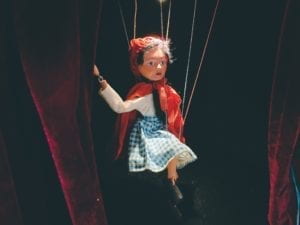
When selecting the material to build the stage, we first thought of using laser cut to create a delicate box. Yet, we also need to contain all the components including the Arduino, the puppet and the servo motors inside this box leading to the fact that this stage will be of a large size. If we chose to laser cut, it will use too much materials in the fabrication room. Therefore, eventually, we chose to use a carton box as the stage and the container of the components.
We also used 3D printing to make the parts attached to both the servo and the string connected to the puppet more stable. We first use the cardboard to build those, but it turned out that they were too easy to be bent and couldn’t stand the resistance of the string.

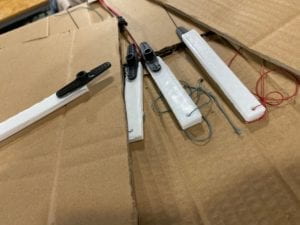
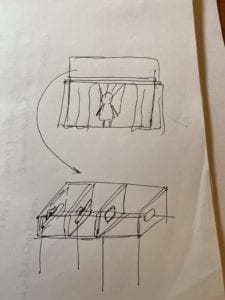
FABRICATION AND PRODUCTION
According to our original plan, one of the most important steps in the process of creating the project was to make the real puppet move accordingly with the digital puppet in Processing. After my partner and I both finished the coding of the Arduino and Processing, we started to test how the data from Processing could be sent to the Arduino. At first, I thought that I needed to figure out how to map the data that I had in Processing to the angle of the servo motors. Then I suddenly realized that I could just create another 4 new variables that stand in Processing and directly transfer them to Arduino to make the servo motors rotate, which turned out to be a success.
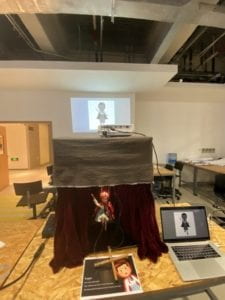
After we got over this most significant technical problem in our project, we sought advice from the fellows, they pointed out that it may be hard for the users to perceive and understand of our theme of social expectation through such a simple interaction. In addition, we present the exact same thing both on Arduino and Processing, which is not of much use, but even a bit unnecessary and redundant. They asked a question that we couldn’t answer: why would I interact with the computer to make the puppet move which does not make sense instead of just controlling it with physical interaction. In that way, the interaction would be more interesting and easier to understand. After getting the suggestion from the fellows, we reflected on our project. First, when I thought of the definition that I gave to a successful interactive project in the previous research, this final project that I was working actually contradicts the very definition that I gave before because the interaction with the project is mundane and the users would know clearly about how their interaction influents the puppet. This project is more like a display of things instead of being an interactive one. After due consideration, we decided that we would also make the curtain controlled by the Arduino so that the users can interact with it. The puppet shown in Processing would be black and white to be projected on the stage so that it can be interpreted as the shadow of the real puppet.
During the user test session, the technical basis of our project completely changed. After we explain the theme of the project, Professor Marcela said that our theme is intriguing and plausible, but with our original plan for the project, we couldn’t explain the theme with logic. The first suggestion that she gave us was similar to the suggestions from the fellows. We should not display the almost exact same thing both on Arduino and Processing and we should use the cross to interact with the project instead of merely using the keyboard and the mouse. In that way, this project makes more sense and the interaction would be more interesting and perceivable. Besides, she puts forward an interesting idea that we could use the webcam to capture the users’ face to replace the face of the puppet so that we can show the users that they are also being controlled while trying to control others and the logic of this theme is clear. Another useful advice that we got from this session was that we could add a voice of the puppet and make some lines for the puppet to make the theme clearer.
We were transferring data from Processing to Arduino, but now we needed to switch to transferring data from Arduino to Processing. The sensor that a fellow recommended us to use was the accelerometer. And some weird things happened after I applied it to the project. When I was testing the each two servo motors with x-axis or y-axis, they work fine. But when I tested with all four servo motors together, the code ran well for a period of time, and then the Arduino Uno would be dead and the Arduino Uno couldn’t connect to the computer. This happened one day before the presentation. Professor Marcela and Tristan both came to help and examined the code and the circuit, they were both good. After we worked together trying to find the problem for a long time, they suggested me to either switch an accelerometer or just switch the sensor to tilt switch sensor. After I changed every components in the circuit, it still failed to run normally. Eventually, I gave up using the accelerometer, and used two tilt switch sensor in my project to control the movement of the arms and legs respectively. And the logic is, if the left arm rises up, the right arm would fall down, vice versa. Though the tilt switch sensor can only use digital output, but it provides stability for the rotation of the servo motors because the angle of each rotation is fixed.
Another difficulty is to map the transferred data in Processing to a certain range so that the movement of the legs and arms can accord with the real puppet. After a lot of testing and calculation, we made it work. Another problem was that the animation in Processing was not smooth enough. The legs and the arms would look like jump to a certain position. Then, Tristan introduced me a function called lerp(); which solved the problem and I apply this method to control the movement of the string.
CONCLUSIONS:
The goal of our project is to show users the theme of social expectation. In the society, there is a phenomenon that people are trying to impose their social expectation on others. But while they are giving out their social expectation on others, they themselves are also being controlled and meeting others’ social expectation of them. In my preparatory research and analysis, my definition of a successful interactive project was that the interaction between users and the project should straightforward so that the users can tell how their interactions affect the project. The project should have many forms of interaction instead of merely one type. At the same time, the project should have a specific meaning. From my perspective, I think our project this time actually mostly align with my definition of a good interactive project. The audience can tell the logic behind the movement of the puppet with cross tilting. Besides, the meaning of our project which is about social expectation is really clear and has its explainable logic. The aspect that it doesn’t align the definition is that the interaction of our project only contains one forms of interaction which is tilting the cross if we don’t the process of taking a selfie into account. The users interaction is that they hold and tilt the cross, trying to figure out how it controls the puppet, while listening to the background music and the monologue of the puppet. The only thing that is not expected by us before is that the audience would neglect our projection on the wall because they focus too much on looking at the puppet inside the box. If we have more time, we will make the instructions more clear. Moreover, we would probably make the whole process of the interaction longer so that the user can have time to reflect on what is going on and figure out the theme by themselves. Another thing is, we should project the animation of Processing inside the stage in order to let the audience see what is going on in Processing and for the purpose of integrating Arduino and Processing better. From the process of building this project, I learned that things would always go as how you expect, just like what happens to the accelerometer, but what we can do is to be patient and find an alternative or find what is going wrong.
The Whole Process
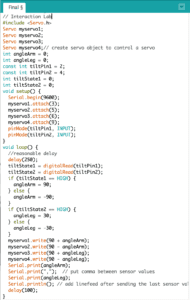
Code for Arduino
Code for Processing
import processing.sound.*;
SoundFile sound;
SoundFile sound1;
import processing.video.*;
Capture cam;
PImage cutout = new PImage(160, 190);

import processing.serial.*;

String myString = null;
Serial myPort;
int NUM_OF_VALUES = 2;   /** YOU MUST CHANGE THIS ACCORDING TO YOUR PROJECT **/
int[] sensorValues;      /** this array stores values from Arduino **/

PImage background;
PImage body;
PImage arml;
PImage armr;
PImage stringlr;
PImage stringar;
PImage stringal;
PImage legl;
PImage stringll;
PImage legr;
float yal=100;
float yll=0;
float yar=0;
float ylr=0;
float leftangle=PI/4;
float rightangle=-PI/4;
float leftleg = 570;
float rightleg = 570;
float armLerp = 0.22;
float legLerp = 0.22;
float pointleftx =-110;
float pointlefty =148;
PImage body2;
boolean playSound = true;
void setup() {
  size(850, 920);
  setupSerial();
  cam = new Capture(this, 640, 480);
  cam.start();
  background = loadImage("background.png");
  body=loadImage("body.png");
  arml=loadImage("arml.png");
  stringal=loadImage("stringal.png");
  armr=loadImage("armr.png");
  legl=loadImage("legl.png");
  stringll=loadImage("stringll.png");
  legr=loadImage("legr.png");
  stringar=loadImage("stringar.png");
  stringlr=loadImage("stringlr.png");
  body2 =loadImage("body2.png");
  sound = new SoundFile(this, "voice.mp3");
  sound1 = new SoundFile(this, "bgm.mp3");
  sound1.play();
  sound1.amp(0.3);


}


void draw() {
  updateSerial();
  printArray(sensorValues);
  if (millis()<15000) {
    if (cam.available()) {
      cam.read();
    }
    imageMode(CENTER);

    int xOffset = 220;
    int yOffset = 40;

    for (int x=0; x<cutout.width; x++) {
      for (int y=0; y<cutout.height; y++) {
        color c = cam.get(x+xOffset, y+yOffset);
        cutout.set(x, y, c);
      }
    }

    background(0);
    image(cutout, width/2, height/2);

    fill(255);
    textSize(30);
    textAlign(CENTER);
    text("Place your face in the square", width/2, height-100);
    text(15 - (millis()/1000), width/2, height-50);
  } else {
    if (!sound.isPlaying()) {
      // play the sound
      sound.play();

      // and prevent it from playing again by setting the boolean to false
    }
    imageMode(CORNER);
    image(background, 0, 0, width, height);
    image(legl, 325, leftleg, 140, 280);
    image(legr, 435, rightleg, 85, 270);
    image(body, 0, 0, width, height);
    if (millis()<43000) {
      image(body, 0, 0, width, height);
    } else {
      image(cutout, 355, 95);
      image(body2, 0, 0, width, height);

      sound.amp(0);
    }
    arml();
    armr();
    //stringarmleft();
    image(stringal, 255, yal, 30, 470);
    image(stringll, 350, yll, 40, 600);
    image(stringar, 605, yar, 30, 475);
    image(stringlr, 475, ylr, 40, 600);

    //if(sensorValues[0]=90){
    //}
    //else if (){
    //}
    // use the values like this!
    // sensorValues[0]
    int a = sensorValues[0];
    int b = sensorValues[1];
    float targetleftangle= PI/4 + radians(a/2);
     float targetrightangle= -PI/4 + radians(a/2);
     float targetleftleg= 570+b*1.6;
     float targetrightleg= 570-b*1.6;

     leftangle = lerp(leftangle, targetleftangle, armLerp);
     rightangle = lerp(rightangle, targetrightangle, armLerp);
     leftleg = lerp(leftleg, targetleftleg, legLerp);
     rightleg = lerp(rightleg, targetrightleg, legLerp);

float targetpointr = -100-a*1.1;
float targetpointl = -120+a*1.1;
float targetpointr1 = -50+b*1.3;
float targetpointr2 = -50-b*1.3;
yal= lerp(yal, targetpointr, armLerp);
yar = lerp(yar,targetpointl,armLerp);
yll= lerp(yll,targetpointr1,legLerp);
ylr = lerp(ylr,targetpointr2,legLerp);

    //delay(10);
  }
}

void arml() {
  pushMatrix();
  translate(375, 342);
  rotate(leftangle);
  image(arml, -145, -42, 190, 230);
  fill(255, 0, 0);
  noStroke();

  popMatrix();
}


void armr() {
  //fill(0);
  //ellipse(500,345,10,10);
  pushMatrix();
  translate(490, 345);
  rotate(rightangle);
  //rotate(millis()*PI/800);
  image(armr, -18, -30, 190, 200);
  popMatrix();
}

void setupSerial() {
  printArray(Serial.list());
  myPort = new Serial(this, Serial.list()[ 11 ], 9600);
  // WARNING!
  // You will definitely get an error here.
  // Change the PORT_INDEX to 0 and try running it again.
  // And then, check the list of the ports,
  // find the port "/dev/cu.usbmodem----" or "/dev/tty.usbmodem----"
  // and replace PORT_INDEX above with the index number of the port.

  myPort.clear();
  // Throw out the first reading,
  // in case we started reading in the middle of a string from the sender.
  myString = myPort.readStringUntil( 10 );  // 10 = '\n'  Linefeed in ASCII
  myString = null;

  sensorValues = new int[NUM_OF_VALUES];
}


void updateSerial() {
  while (myPort.available() > 0) {
    myString = myPort.readStringUntil( 10 ); // 10 = '\n'  Linefeed in ASCII
    if (myString != null) {
      String[] serialInArray = split(trim(myString), ",");
      if (serialInArray.length == NUM_OF_VALUES) {
        for (int i=0; i<serialInArray.length; i++) {
          sensorValues[i] = int(serialInArray[i]);
        }
      }
    }
  }
}