Partner: Sarah Waxman
“Create a Tree”
This essay has the purpose of explaining and exposing my process and progress of my final project. But before disclosing all my information in regards to the design and fabrication, I want to mention how everything I learned through this semester led me to build this project. It is evident that I learned the necessary code, Arduino, Processing, Illustrator, and how to use the components and sensors, but the most important thing I learned was that if one uses the interaction with a clear purpose in mind one can create incredible things. For me, the interaction begins when a particular factor or organisms establish (triggers) a reciprocal interrelation where, through a connection, one body or item influences the other and causes it to respond immediately in a relative (understanding) manner. This “reciprocal relationship” is what one as a creator must exploit to achieve a successful project. This reciprocal relationship is the hook that maintains and makes the user interact with one’s project. For my project, this relationship was the most important thing that we wanted to establish; we intend for the user to interact with our project frequently. Since the purpose of our project is for the users to recycle, we aspire that the user regularly interacts with our project.
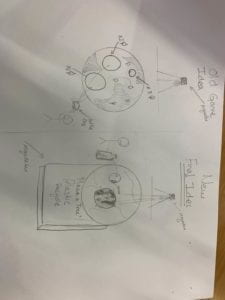
Our original idea was based on a game for people to recycle bottle caps (since they are more useful in the process of recycling because they contain large amounts of plastic and are short in size), but then my partner and I decided that a game was not the interaction that we wanted to create accordingly to our purpose.. Before we begin to describe how the user interaction inspired our project design, it is essential first to explain the project itself. The project is an interactive trashcan bin, which means that when people throw their plastic bottles into the basket, the user visually interacts with the basket. When the container is thrown into the hole, there is a rotating world that projects onto the surface of the lid that creates a tree every time the hole detects a bottle.
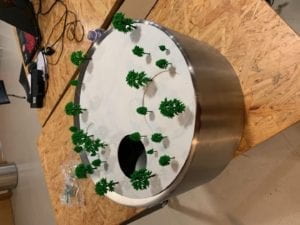
That said, when we wanted to start a game we realized that the infrared detectors did not detect the lids due to their short size and also the user had difficulty in throwing the lids inside the three holes of different sizes (each hole corresponded to how many trees they were going to project, for example, the small hole created 3 trees, the middle two, etc.). The game inspired us to create a single medium-sized hole for people to throw their bottles without difficulty (and the detector can detect the size of the containers). The materials we used to create our final project were one distance detector, one round wooden surface (laser cut), a projector, and small artificial trees (for the aesthetics of the project). In terms of programming, we use an Arduino (to send the signals of the sensors to Processing) and processing to create the world and trees (codding). We decided to use the minimum amount of materials, since the process of littering is not complicated, and neither should be the interaction between the project and the user.
On the other hand, it is important to always incorporate and immediate feedback to the user as a way of signaling that the action of the user was understood. Given that we decided to project a tree immediately after the user throws the bottle to create a visual, immediate response
The manufacturing process was not as complicated to the brainstorm of the idea. At first, my partner and I had a lot of problems thinking about an idea of how to create an interactive and attractive recycling project. Then we decided that we should create something visually appealing, easy to understand, and that motivates people to recycle, and that is why we created “Create a Tree”. In terms of fabrication, in the beginning, we cut a wooden cardboard in a circular shape with a hole. Second, we painted the wood with white paint so that the image of the projected world along with the trees it would look even more apparent. Third, we installed a distance sensor on the back of the wooden surface next to the hole so that the bottles can be detected. As for coding, this was the most complicated part (it took us around 9 hours of just coding) since we had to use a video of a rotating world in which every time the sensor detects movement, it must create a tree. But together with the help of the IMA fellows, we made it possible.
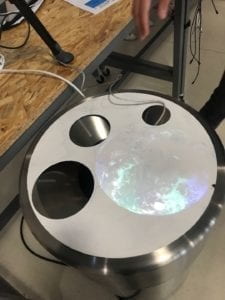

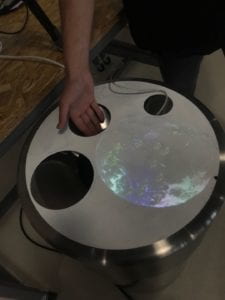
However, based on our failures and successes, one of our failures made us realize how we could even improve our project. For example, the fact that the sensors did not detect the covers, made us come with the idea that our project should not be a game but rather something with a more concrete, simple and clear purpose and that is why we created a single hole instead of three. Also, during the user testing session, the most significant responses from the users were that we should create a more personalized relationship every time the user drops a bottle, we should make it visually more attractive, and we should incorporate something that does the purpose clearer. Thanks to the feedback, we decided to include the following changes. First, each tree will represent a bottle; in that way, a person can track for a few minutes his tree as it rotates around the world. Second, we added some trees, as mentioned previously, to enhance the aesthetics of the project. Finally, by making the trees last longer instead of vanishing right away, people can track how often bottles are thrown into the recycling bin.

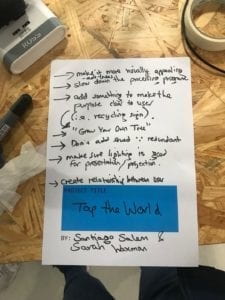
On the other hand, I believe that the user testing session is something vital in the process of the creation of the project. Users often give you a different perspective on how to assemble and enhance your project in unimaginable ways. It is always important to remember that your project serves a purpose that depends heavily on the user’s interaction, and hence, the project is for the users. Therefore, users’ feedback is a crucial step in the fabrication and design of one’s project.
My conclusion is based on my experience and personal perspective with the recycling bins. For example, every time I go to a basket to throw a plastic bottle, I look for the basket and I throw it there. A simple process that anyone can do. But through this project, I wanted to enhance this “process that is so simple”. What I mean is I want to give the user a kind of visual feedback every time he does the right thing to throw a plastic bottle where it belongs. This visual interaction is a simple feedback for people to see in a concrete way how the world says thank you. It is obvious that every time you throw a bottle, a tree will not appear magically in the earth. But through this symbolization, my partner and I want the user to be motivated to recycle. When we finally presented our final project to our class, we noticed the reaction and interaction of the users with our project. People were surprised to see that by throwing a simple plastic bottle, a tree appeared on the surface of the bin. The excitement of the users was the hook we wanted to create for people to interact with our project and therefore, be encouraged to recycle. Although my project was successful during the class, to be honest, if I had more time to change something in my project, I will incorporate another sensor that can turn on the projector every time someone approaches “Make a Tree”. In this was the projector won’t be turn on 24/7 and we could safe some energy (Young). I am quite proud of my project from my partner, and myself. At the beginning of the course, sometimes it was difficult for me to even turn on an LED, now together with Sarah (my partner), we have created something that I never imagined possible. To create this project, you can not only value the creation of the project itself, but also assess the progress of what I learned throughout this semester in order to create my final project. The purpose of this project for me is goes beyond than just recycling, for me, it represents all my effort, knowledge, and experience that I have for interaction.
(The code is below the video)
Processing code: Tab 1 “Earth”
import processing.serial.*;
String myString = null;
Serial myPort;
int valueFromArduino;
int NUM_OF_VALUES = 1; /** YOU MUST CHANGE THIS ACCORDING TO YOUR PROJECT **/
int[] sensorValues; /** this array stores values from Arduino **/
import processing.video.*;
Movie earth;
PImage tree;
ArrayList<Tree> trees = new ArrayList<Tree>();
void setup() {
//size(640,360); //
fullScreen();//
earth = new Movie(this, “earth2.mp4”);
earth.loop();
tree = loadImage(“tree.png”);
filter(INVERT);
myPort = new Serial(this, Serial.list()[ 24 ], 9600);
sensorValues = new int[NUM_OF_VALUES];
}
void draw() {
updateSerial();
printArray(sensorValues);
if (earth.available()) {
earth.read();
}
filter(GRAY);
background(255);
imageMode(CORNER);
image(earth, 0, 0, width, height);
if (sensorValues[0]== 1){
trees.add( new Tree() );
}
//float timeStamp = earth.time();
// println(timeStamp);
for(int i=0; i<trees.size(); i++) {
trees.get(i).display();
trees.get(i).move();
}
for(int i=0; i<trees.size(); i++) {
if(trees.get(i).offEarth == true) {
trees.remove(i);
}
}
println(valueFromArduino);//println(mouseX, mouseY);
println(trees.size());
}
//void mousePressed() {
// trees.add( new Tree() );
//}
void setupSerial() {
printArray(Serial.list());
myPort = new Serial(this, Serial.list()[ 24 ], 9600);
// WARNING!
// You will definitely get an error here.
// Change the PORT_INDEX to 0 and try running it again.
// And then, check the list of the ports,
// find the port “/dev/cu.usbmodem—-” or “/dev/tty.usbmodem—-”
// and replace PORT_INDEX above with the index number of the port.
myPort.clear();
// Throw out the first reading,
// in case we started reading in the middle of a string from the sender.
myString = myPort.readStringUntil( 10 ); // 10 = ‘\n’ Linefeed in ASCII
myString = null;
}
void updateSerial() {
while (myPort.available() > 0) {
myString = myPort.readStringUntil( 10 ); // 10 = ‘\n’ Linefeed in ASCII
if (myString != null) {
String[] serialInArray = split(trim(myString), “,”);
printArray(serialInArray);
if (serialInArray.length == NUM_OF_VALUES) {
for (int i=0; i<serialInArray.length; i++) {
sensorValues[i] = 0;
println(sensorValues[i]);
sensorValues[i] = int(serialInArray[i]);
println(sensorValues[i]);
}
}
}
}
}
Processing code: Tab 2 “Trees”
class Tree {
float x, y;
float speed;
boolean offEarth = false;
Tree() {
float centerX = width/2;
float centerY = height/2;
// while( dist(x, y, width/2, height/2) > 150) {
x = centerX + random(-200, 200);
//x = random(170, 200);
y = centerY + random(-200, 200);
// }
speed = 7;
}
void display() {
ellipse(x, y, 10, 10);
imageMode(CENTER);
image(tree, x, y);
}
void move() {
x += speed;
if(dist(x, y, width/2, height/2) > 300) {
offEarth = true;
}
}
}
Arduino Code:
#define trigPin 2
#define echoPin 3
int sensor1;
void setup() {
SensorSetup();
Serial.begin(9600);
}
void loop() {
int actualDistance = MeasureDistance();
if (actualDistance < 15) {
sensor1 = 1;
}else {
sensor1 = 0;
}
// keep this format
Serial.println(sensor1);
}
void SensorSetup() {
pinMode(trigPin, OUTPUT);
pinMode(echoPin, INPUT);
}
int MeasureDistance() { // a low pull on pin COMP/TRIG triggering a sensor reading
long duration;
digitalWrite(trigPin, LOW); // Added this line
delayMicroseconds(2); // Added this line
digitalWrite(trigPin, HIGH);
delayMicroseconds(10); // Added this line
digitalWrite(trigPin, LOW);
duration = pulseIn(echoPin, HIGH);
long distance = (duration / 2) / 29.1;
return (int)distance;
}